Table of contents
Abstract
A breathtaking animated light show on the top of the Christmas Tree using a 3d printed Angel, rotating 60mm suncatcher crystal illuminated underneath with a NeoPixel ring projecting an Aurora like light, and 10 red lasers for the kitties amusement.
Project
INTRO: Around Halloween I started forming an idea for the ultimate Christmas Tree Topper.
- The tree topper had to be fun to build and watch.
- It had to be spectacularly glitzy, ostentatious, over the top (nyuk nyuk).
- The design had to have a Christmas theme, at least Chrismassy enough that my wife would allow it to be put on the tree. No SciFi space ships, no Star Trek or Star Wars, no H.P. Lovecraft, no sports themes.
An idea started formin’ in me head…….an Angel…….. The tree topper had to start with an Angel…… A 3D printed angel…..a unique angel.
At the top of the tree, the angel tree topper needed to be a guiding beacon like a lighthouse. Wouldn’t be cool to build one that even got the cats attention. It will need a multifaceted prism like crystal, mounted a motor so it can rotate. A neopixel ring could light it from underneath it’s base for Aurora Borealis effect. Lasers…..it has to have lasers.
This is the tale of the experiments and development of Kitty Teasing Angelic Animated Beacon Tree Topper.
This posts contains:
- The Opening Scene: video with tree topper and kitties
- Up close video of the tree topper in action
- Video of the tree topper construction
- Materials used
- Photos
- Schematic
- Arduino code
- Future Call
The Opening Scene:
Like all good movie opening scenes to hook the audience into watching the story develop, here is a video of the finished tree topper, on the Christmas Tree, drawing a lot of attention from the cats.
There are 3 Siamese cats in the house.
Loki is the oldest and largest, a Siamese mix, a grumpy alpha male who is also a momma’s boy.
Mei Li is the youngest, a whiney finicky female.
Thor is a really friendly lovable male Siamese lap cat. He is always rubbing and sniffing everything and everybody with his snotty runny nose that he loves to smear on your ears and face. He is really a scaredy cat when it comes to strangers in the house and can disappear for hours.
Thor is the kitty who leaves all his fears behind when something gets his attention like birds at the birdfeeder, bright lights or laser beams………….
Lets open with the video link of finished tree topper, in Christmas tree, getting intense scrutiny from the kitties:
Up Close with of Kitty Teasing Angelic Animated Beacon Tree Topper.
Video link of finished tree topper on it’s desktop stand, only black light is used for illumination.
Video link of finished tree topper construction
The material used:
A PVC pipe is used to slide over the top of the Christmas Tree branches.
A smaller PVC pipe, hot glued to the support pipe, is used to support the neopixel, and cover the drive shaft, motor coupling, and motor.
A 60mm crystal suncatcher crystal acts as a prism and reflector. Spinning the suncatcher slowly would reflect light and lasers everywhere and drive the cats nuts.
Placing a neopixel ring underneatch the crystal looks really cool just running an Arduino demo example.
Laser testing started with 3 colors of laser pointers. I destroyed a blue laser pointer modifying the laser pointers to mount on the tree topper. The green laser consumed 350mA at 3V by itself. I scrapped using laser pointers as they were too bulky.
An Arduino Nano controls the neopixels and lasers. The lasers are arranged in pairs, a lower laser and upper laser. This reduces the # of IO needed, but requires a power driver per pin.
Here are pix of the lighting beacon test stand:
neopixel testing
playing with laser pointers
Trial 2 uses qty 10 standard 5V 5mW red lasers, measured at 30 mA each.
A ULN2803 hex driver IC is used to drive the laser pairs, 100mA per point. A special board was built for wiring the lasers conveniently with a lot of extra Vccs and COM.
After the prototyping on the test stand, it was time to assemble the components.
First to mount the crystal beacon and motor assembly into a protective PVC tube that would also support the neopixel ring.
The motor mount would be hot glued to the tube that sides over the top of the christmas tree.
The crystal assembly is top heavy, so a base needed built for the remaining construction and to have a tabletop display.
The Angel: biblical rendition is powerful and a touch creepy.
It took 35 hrs to 3D print one in white PLA ,. https://www thingiverse.com/thing:5153207
Latex metallic pearl paint, tinted with baby blue was thinned, washed on the printed angel and gently wiped off to create lines in the relief.
Fluorescent yellow eyes, silver iris, green pupil completed the angel. I printed 2 just in case......
The painted angel compared to the unpainted.
The next step is to add the angel to the motor beacon assembly.
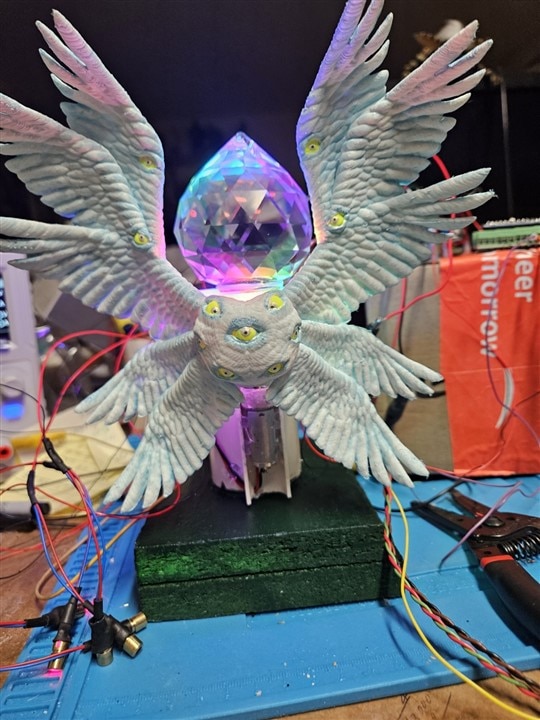
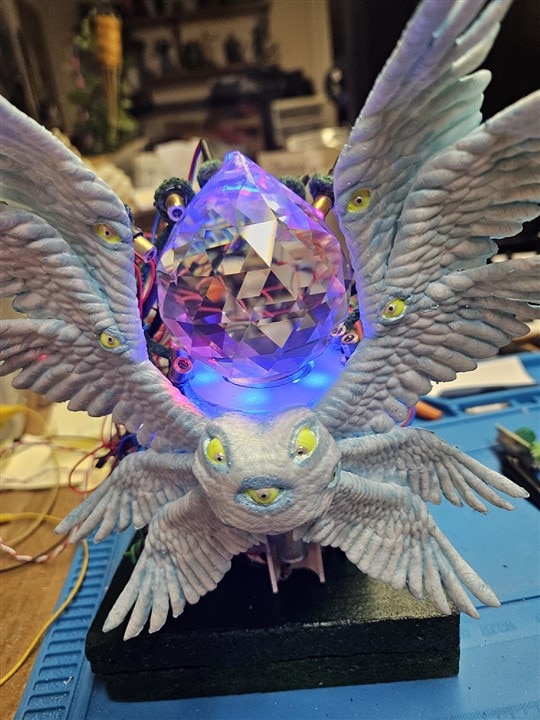
Now to move the control cards from the test stand to the tree topper.
This is the ULN2803 driver card for switching the 10 lasers off and on, and 5V power distribution.
The Arduino Nano for controlling the Neopixel and lasers.
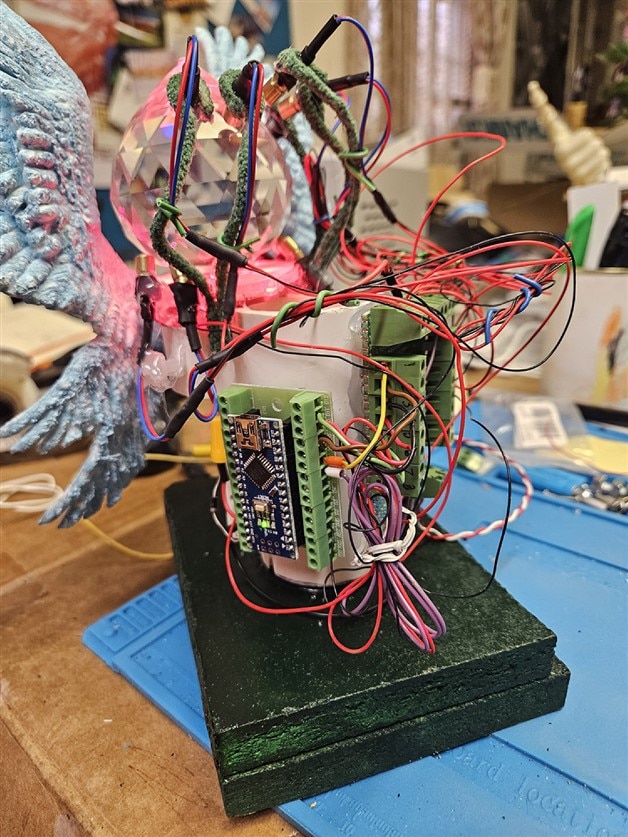
An LM2596 buck power supply is the motor speed control. The PS is set for 2 volts out. It is buried under the laser wiring.
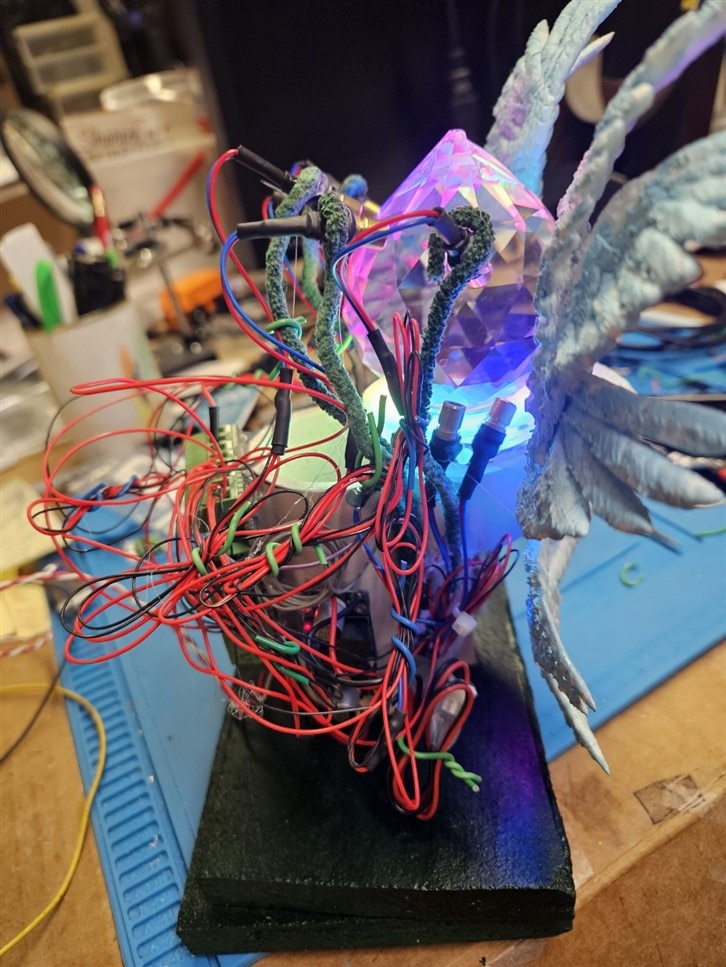
a 5V wall wart powers the tree topper.
The upper lasers are mounted on pipe cleaners so they can be re-aimed as needed.
The motor assembly and tree topper base are covered in cotton to emulate clouds.
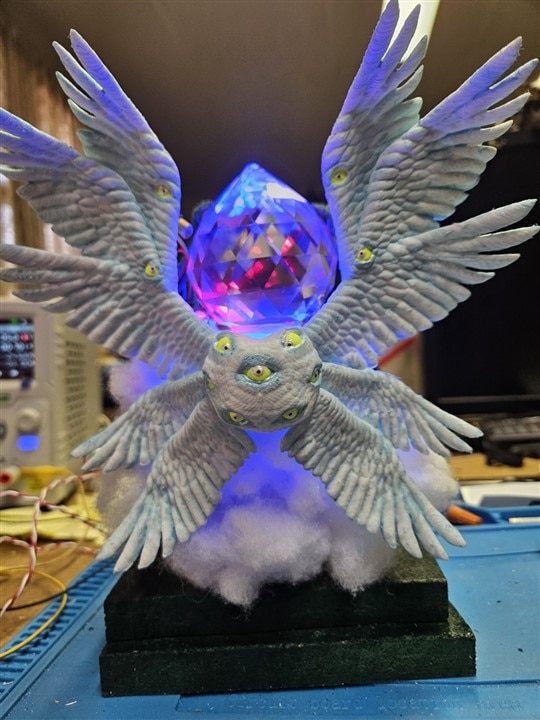
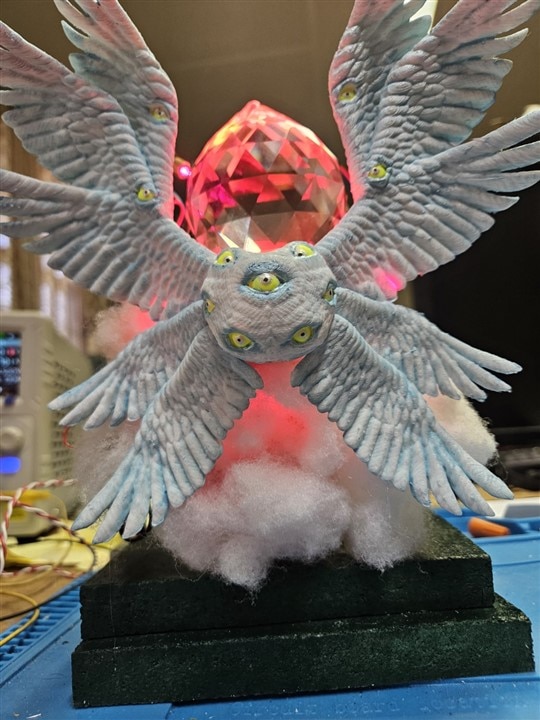
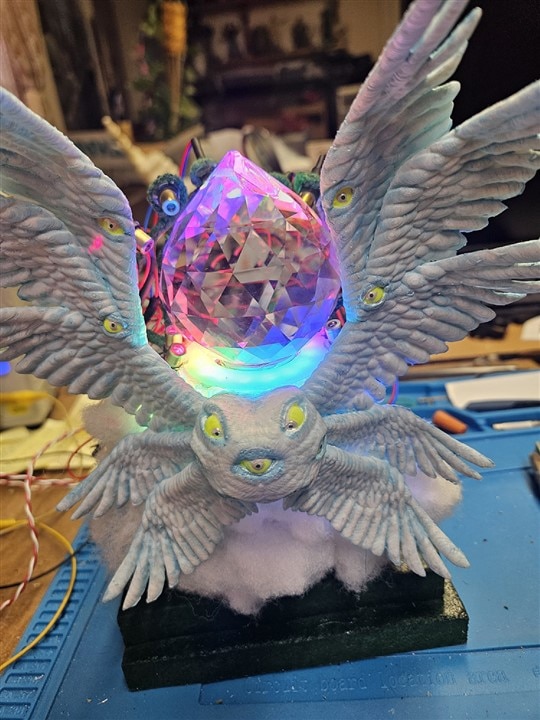
I didnt take closeup photos of the Kitty Teasing Angelic Animated Beacon tree topper because they didnt convey any revealing new information........
BUT the videos were really nice with the projected colors and laser dots and driving the kitties crazy trying to catch them.
Schematics:
code:
//
// This program started with example Adafruit Neopixel buttoncycler.
// The push button selection was removed. ON startup, routine runs in sequence, the sequence is in a continuous loop

// The canned routines 1-6 are based on 2 routines colorwipe and theatrechase, sets color per case #
// void colorWipe(uint32_t c, uint8_t wait)  Fill the dots one after the other with a color
// void rainbow(uint8_t wait), rainbowcycle, rainbowtheatrechase sets the colrs within themselves
//
// 2 key variables read by the voids are uint32_t c, uint8_t wait
// c is the color   color is a 32-bit type that merges the red, green and blue values into a single number.
// wait ??
// https://learn.adafruit.com/adafruit-neopixel-uberguide/arduino-library-use
//
// There are 5 banks of laser diodes, and a green laser diode,


#include <Adafruit_NeoPixel.h>


#define PIXEL_PIN    6    // Digital IO pin connected to the NeoPixels.

#define PIXEL_COUNT 16

// Parameter 1 = number of pixels in strip,  neopixel stick has 8
// Parameter 2 = pin number (most are valid)
// Parameter 3 = pixel type flags, add together as needed:
//   NEO_RGB     Pixels are wired for RGB bitstream
//   NEO_GRB     Pixels are wired for GRB bitstream, correct for neopixel stick
//   NEO_KHZ400  400 KHz bitstream (e.g. FLORA pixels)
//   NEO_KHZ800  800 KHz bitstream (e.g. High Density LED strip), correct for neopixel stick
Adafruit_NeoPixel strip = Adafruit_NeoPixel(PIXEL_COUNT, PIXEL_PIN, NEO_GRB + NEO_KHZ800);


void setup() {
//  pinMode(BUTTON_PIN, INPUT_PULLUP);
    pinMode(7, OUTPUT);  //red 5v laser bank 1
    pinMode(8, OUTPUT);  //red 5v laser bank 2
    pinMode(9, OUTPUT);  //red 5v laser bank 3
    pinMode(10, OUTPUT);  //red 5v laser bank 4
    pinMode(11, OUTPUT);  //red 5v laser bank 5
    pinMode(12, OUTPUT);  //3V green laser out

  strip.begin();
  strip.show(); // Initialize all pixels to 'off'
  delay (2000);  // allow system to initiaize

}

void loop() {
 startShow ();
 delay(20);
}


void startShow()
    {
    colorWipe(strip.Color(0, 0, 0), 50);    // Black/off
    delay(10);
    colorWipe(strip.Color(255, 0, 0), 50);  // Red
    delay(3000);
    colorWipe(strip.Color(0, 255, 0), 50);  // Green
      delay(3000);
    colorWipe(strip.Color(0, 0, 255), 50);  // Blue
           delay(3000);
    theaterChase(strip.Color(127, 127, 127), 50); // White
           delay(20);
    theaterChase(strip.Color(127,   0,   0), 50); // Red
           delay(20);
    theaterChase(strip.Color(  0,   0, 127), 50); // Blue
            delay(20);
    rainbow(20);
            delay(20);
    rainbowCycle(20);
            delay(20);
    theaterChaseRainbow(50);
            delay(20);
  }


// Fill the dots one after the other with a color
void colorWipe(uint32_t c, uint8_t wait) {
  for(uint16_t i=0; i<strip.numPixels(); i++) {
    strip.setPixelColor(i, c);
    delay(50);
    strip.show();
    delay(wait);
  }
}

void rainbow(uint8_t wait) {
  uint16_t i, j;

  for(j=0; j<256; j++) {
    for(i=0; i<strip.numPixels(); i++) {
      strip.setPixelColor(i, Wheel((i+j) & 255));
    }
    strip.show();
    delay(wait);
  }
}

// Slightly different, this makes the rainbow equally distributed throughout
void rainbowCycle(uint8_t wait) {
  uint16_t i, j;

  for(j=0; j<256*15; j++) { // 5 cycles of all colors on wheel
    for(i=0; i< strip.numPixels(); i++) {
      strip.setPixelColor(i, Wheel(((i * 256 / strip.numPixels()) + j) & 255));
    }
    strip.show();
    delay(wait);
  }
}

//Theatre-style crawling lights.
void theaterChase(uint32_t c, uint8_t wait) {
  for (int j=0; j<25; j++) {  //do 10 cycles of chasing
    for (int q=0; q < 3; q++) {
      for (int i=0; i < strip.numPixels(); i=i+3) {
        strip.setPixelColor(i+q, c);    //turn every third pixel on
      }
      strip.show();

      delay(wait);

      for (int i=0; i < strip.numPixels(); i=i+3) {
        strip.setPixelColor(i+q, 0);        //turn every third pixel off
      }
    }
  }
}

//Theatre-style crawling lights with rainbow effect
void theaterChaseRainbow(uint8_t wait) {
  for (int j=0; j < 256; j++) {     // cycle all 256 colors in the wheel
    for (int q=0; q < 3; q++) {
      for (int i=0; i < strip.numPixels(); i=i+3) {
        strip.setPixelColor(i+q, Wheel( (i+j) % 255));    //turn every third pixel on
      }
      strip.show();

      delay(wait);

      for (int i=0; i < strip.numPixels(); i=i+3) {
        strip.setPixelColor(i+q, 0);        //turn every third pixel off
      }
    }
  }
}

// Input a value 0 to 255 to get a color value.
// The colours are a transition r - g - b - back to r.
uint32_t Wheel(byte WheelPos) {
  WheelPos = 255 - WheelPos;
  if(WheelPos < 85) {
    return strip.Color(255 - WheelPos * 3, 0, WheelPos * 3);
  }
  if(WheelPos < 170) {
    WheelPos -= 85;
    return strip.Color(0, WheelPos * 3, 255 - WheelPos * 3);
  }
  WheelPos -= 170;
  return strip.Color(WheelPos * 3, 255 - WheelPos * 3, 0);
}
The Future Call: I really wanted to have a mode with the tree topper to play music, with the neopixels and lasers coordinated with the music.
The Nano doesn’t have the IO.
The neopixel code was tested and will run on an Arduino Mega, but the Mega is getting big for the design, and the additional DFPlayer and MSGEQ7 IC takes up room too. Maybe next year.
References
The Angel 3D model files created by mz4250: https://www thingiverse.com/thing:5153207
I reduced by 10% to fit on my Monoprice 3D printer table.

.jpg-300x300x2.jpg?sv=2016-05-31&sr=b&sig=xMkfADzBe1qbDfnCzgezIO%2Fwu3iycutAzFnAbotpuqI%3D&se=2026-02-17T23%3A59%3A59Z&sp=r&_=6OtXMzPSMF51v/elpdMQEg==)