


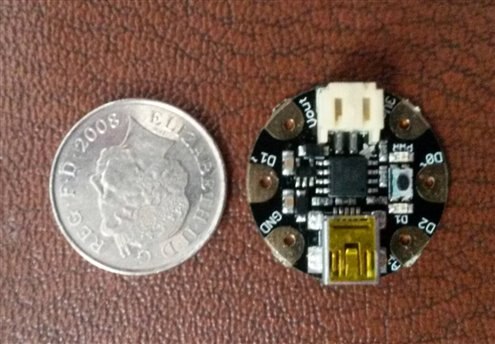
The first thing that strikes you when you see the Gemma in the flesh is how small it is. It is only slightly bigger than a 10p piece! The second thing that hits you is how quickly you want to set it up and getting going! 
I’m a (very) enthusiastic Arduino amateur and just wanted to give an overview of what I did and some of the things that happened to me along the way, so below is the set-up in a nutshell with some of my observations. I have linked the Gemma to both my Windows 8.0 and XP laptops to see how easy/difficult the set-up on both systems could be.
(All set-up information can be found at https://learn.adafruit.com/introducing-gemma)
Windows 8.0 Set-Up
Downloading the drivers for Windows
Download the USBtiny Signed Drivers for Windows 8 from https://learn.adafruit.com/usbtinyisp/drivers
Once downloaded, unzip/extract the folder
Plug the Gemma into your computer using a A to Mini B USB cable
The familiar Windows pings of a new hardware device being found will be heard
If a message comes up saying the hardware cannot be recognised (like it did in my case) go to the Windows device manager
(To access this on Windows 8 get the Charms bar up by putting the cursor into the extreme upper or lower right of the screen and selecting settings -> control panel. Click on system and security and then administrative tools. Right click computer management and open. In the left pane go to system tools -> device manager)
The Gemma shows up as an unknown trinket. (Right) Click on it and then install drivers
Go to "Search on this device" and choose the folder where the extracted driver files are and press OK
It should then say that a new hardware device has been recognised/installed
(If this doesn’t happen and an error message comes up telling you to contact the manufacturer, just re-extract the zipped USBtiny Signed Drivers folder and start the process again – that’s what I had to do)
Arduino IDE set-up
To set-up the IDE quickly, go to https://learn.adafruit.com/introducing-gemma/setting-up-with-arduino-ide and go to “The Fast Way” section
Click on “Windows Arduino IDE v1.05 w/Trinket, Gemma, Flora” to download
Extract/unzip the downloaded folder
In the folder, click on the Arduino icon to open up the IDE
To set-up the IDE for the Gemma, go to Tools -> Board and select Gemma 8MHz
(When I uploaded code for the first time to my Gemma an error message was displayed at the bottom of the screen asking if I had chosen the right device so I changed the board setting from Gemma 8MHz to Trinket 8MHz and I have been able to upload to the Gemma successfully ever since)
Go to Tools -> Programmer and select USBtinyISP
Everything is now set-up ready for lots of wearables fun!
Running the blink sketch
Go to https://learn.adafruit.com/introducing-gemma/setting-up-with-arduino-ide and copy and paste the blink sketch
Make sure the Gemma is attached in the bootloader mode (a red pulsing light) and press upload
(To get the Gemma in bootloader mode press the reset button)
(For more on the bootloader mode, go to https://learn.adafruit.com/introducing-gemma/about-the-bootloader)
If upload is successful the onboard LED flash steadily on and off
(If there are any problems https://learn.adafruit.com/introducing-gemma/setting-up-with-arduino-ide shows some common errors that occur)
Windows XP Set-Up
Downloading the drivers for Windows
Download the USBtiny Signed Drivers for Windows XP from https://learn.adafruit.com/usbtinyisp/drivers and unzip the folder
Follow the excellent instructions on https://learn.adafruit.com/usbtinyisp/drivers to set-up the hardware
Arduino IDE set-up
See relevant section above in “Windows 8.0 Set-Up”
(Note: the board was recognised as Gemma 8MHz using on my XP set-up, unlike with Windows 8.0)
Running the blink sketch
Go to https://learn.adafruit.com/introducing-gemma/setting-up-with-arduino-ide and copy and paste the blink sketch
(Because the blink sketch from the Windows 8.0 set-up was still on the Gemma, I modified the blink sketch slightly to make sure I could tell the sketch had been uploaded. In the void loop, I changed the digitalWrite(led,LOW) delay parameter to 100 (see below) so that there was an obvious difference in the blink (a second on and a much shorter period off) so that I could see if the sketch had been uploaded)
void loop() { digitalWrite(led, HIGH); delay(1000); digitalWrite(led, LOW); delay(100);}
Make sure the Gemma is attached in the bootloader mode (a red pulsing light) and press upload
(To get the Gemma in bootloader mode press the reset button)
If upload is successful the onboard LED flash steady on and off
(However in my case, the following error message came up: “avrdude: Error: Could not find USBtiny device (0x1781/0xc9f)” so I made sure the bootloader mode was active (by pressing the reset button) and re-tried to upload the sketch. The same thing happened again. What I did notice was that compared to Windows 8, it took a very long time to upload the sketch and as the bootloader mode only lasts 10 seconds, I thought the best thing to do was try and upload the sketch again, but press the reset button approximately error 10 seconds throughout the upload process to see if that worked. Another very long error message did appear, but there was an obvious change in the blinking of the LED on the board; from a steady on for 1 second, for 1 second, the LED was now on for 1 second and off for about a 10th of the time)
-
So there in a nutshell are the set-up processes I used and some of the troubles I faced. As you may have guessed I am going to using my Windows 8.0 machine in future for uploading sketches! (A lot less trouble! )
The next step for me is to get my head around the programming side of things. My first thought is to get the NeoPixels to blink different colours in sequence and to use the switch to start the sequence and stop it. Fingers crossed  .
.