


The the Minions have been busy educating Trinket and as of now have indoctrinated him into the minion union,
This....Is....The....First....BIOMINIONOID.
Meet BOB
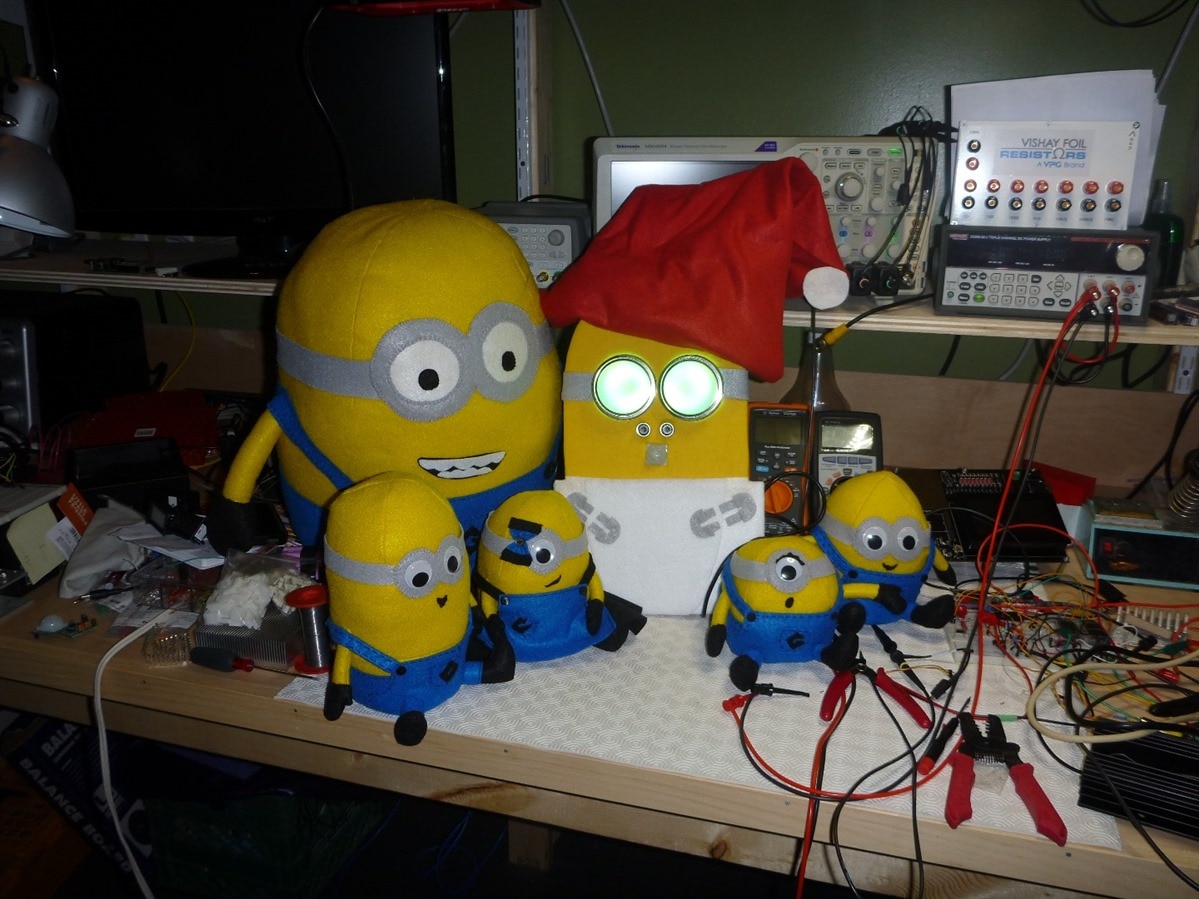
Bob is new, he is improved, he is the first Bionic Minion, he is still a baby, Oh ya, he may be bigger than his buds but he has a long way to evolve but he is aware of his surroundings, and he is ready for the BYOB Party, the minions will keep him safe and under control so all is good
between the HR-S501 motion detector, the HC-SR04 ultrasonic sensor and those goggles, he is awesome
so what makes him tick
his heart, small as it may be has loads of power, an ATTINY 85 with 8K flash running at 16Mhz, a few IO pins and built in USB capability
as much as the minions tried, he only has a limited capacity and so only has a few tricks
He will wake up if he senses movement from over 20 feet away, he will wake up and look around with those wonderful green eyes of his
If you get within a couple of feet he will see you and put on a pretty light show, but dont be fooled, get too close and he may think your after his sucker and will shows his anger by turning his eyes RED, just back away and he will calm down, get out of sight and he will go back to sleep
there are only 8 pins on an ATTINY85 so here's how they where used:
2 pins for power
2 pins taken with the ultrasonic sensor
1 pin with the PIR
1 pin to drive the WS2812 LED strings in two circles of 16 (32 in total)
1 pin for reset
1 pin spare but coupled with the USB so not easy to use for anything
The minions could not educate Bob as much as they would like as they where exceeding his capacity but they did a pretty good job
here is the video
So the fun was to integrate the NEOPIXELS, the Ultrasonic Sensor and the PIR to the ATTINY85 but still be able to upload the code (The Trinket takes a couple of K to provide a boot loader via USB so this only leaves a little over 5K), It still has one pin available but with a 1.5K pullup, the PIR had a hard time grounding when using pin 3 it so I had to move to using pin 0. Pin 3 is available for perhaps a switch but there is no code space remaining given the current memory usage because of the boot loader.
At the end of the day I was able to squeeze everything in but at a reduced set of patterns on the neopixels, no room for even additional if statements.
here is the software (Attached for easy copying if so desired)
/*
NeoPixel Ring goggles sketch -- for steampunk, rave or Burning Man fashion!
Welding or costume goggles using 50mm round lenses can be outfitted with
a pair of Adafruit NeoPixel Rings: http://www.adafruit.com/product/1463


Please exercise common sense.  These goggles emit a LOT of stray light and
should NOT BE WORN ON YOUR EYES.  They're for fashion and costuming only,
for display on a hat or on your forehead.


Draws a spinning rainbow on both eyepieces.  Not a Mac beachball, honest.
"Eyes" glance around and blink at random.


For 'reflected' colors (rainbows rotate in opposite directions, while eyes
look in same direction), connect the output of the first ring to the input
of the second.  Or you can connect the inputs of both rings to the same
Arduino pin if that's easier -- the rainbows will both twirl in the same
direction in that case.


By default, pixel #0 (the first LED) on both rings should be at the TOP of
the goggles.  Looking at the BACK of the board, pixel #0 is immediately
clockwise from the OUT connection.  If a different pixel is at the top,
that's OK, the code can compensate (TOP_LED_FIRST and TOP_LED_SECOND below).


Modified by Peter Oakes to add a couple extra patterns, motion and range sensors
to trigger the wakeup of the rings and to to sleep with inactivity
*/


#include <Adafruit_NeoPixel.h>
#ifdef __AVR_ATtiny85__ // Trinket, Gemma, etc.
  #include <avr/power.h>
#endif


#define PIN            4
#define PIR            0 // PIR input pin
#define trigPin        2 // UNLTRA Trigger pin
#define echoPin        1 // echo back pin


#define TOP_LED_FIRST  0 // Change these if the first pixel is not
#define TOP_LED_SECOND 0 // at the top of the first and/or second ring.


#define EFFECT         xECTO // Choose a visual effect from the names below


#define RAINBOW        0
#define ECTO           1


int maximumRange = 200; // Maximum range needed
int minimumRange = 0; // Minimum range needed
long duration = -1; // Duration used to calculate distance


Adafruit_NeoPixel pixels = Adafruit_NeoPixel(32, PIN, NEO_GRB + NEO_KHZ800);


const int8_t PROGMEM
  yCoord[] = { // Vertical coordinate of each pixel.  First pixel is at top.
    127,117,90,49,0,-49,-90,-117,-127,-117,-90,-49,0,49,90,117 },
  sine[] = { // Brightness table for ecto effect
    0, 28, 96, 164, 192, 164, 96, 28, 0, 28, 96, 164, 192, 164, 96, 28 };


// Eyelid vertical coordinates.  Eyes shut slightly below center.
#define upperLidTop     130
#define upperLidBottom  -45
#define lowerLidTop     -40
#define lowerLidBottom -130


// Gamma correction improves appearance of midrange colors
const uint8_t PROGMEM gamma8[] = {
      0,  0,  0,  0,  0,  0,  0,  0,  0,  0,  0,  0,  0,  0,  0,  0,
      0,  0,  0,  0,  0,  0,  0,  0,  1,  1,  1,  1,  1,  1,  1,  1,
      1,  1,  1,  1,  2,  2,  2,  2,  2,  2,  2,  2,  3,  3,  3,  3,
      3,  3,  4,  4,  4,  4,  5,  5,  5,  5,  5,  6,  6,  6,  6,  7,
      7,  7,  8,  8,  8,  9,  9,  9, 10, 10, 10, 11, 11, 11, 12, 12,
     13, 13, 13, 14, 14, 15, 15, 16, 16, 17, 17, 18, 18, 19, 19, 20,
     20, 21, 21, 22, 22, 23, 24, 24, 25, 25, 26, 27, 27, 28, 29, 29,
     30, 31, 31, 32, 33, 34, 34, 35, 36, 37, 38, 38, 39, 40, 41, 42,
     42, 43, 44, 45, 46, 47, 48, 49, 50, 51, 52, 53, 54, 55, 56, 57,
     58, 59, 60, 61, 62, 63, 64, 65, 66, 68, 69, 70, 71, 72, 73, 75,
     76, 77, 78, 80, 81, 82, 84, 85, 86, 88, 89, 90, 92, 93, 94, 96,
     97, 99,100,102,103,105,106,108,109,111,112,114,115,117,119,120,
    122,124,125,127,129,130,132,134,136,137,139,141,143,145,146,148,
    150,152,154,156,158,160,162,164,166,168,170,172,174,176,178,180,
    182,184,186,188,191,193,195,197,199,202,204,206,209,211,213,215,
    218,220,223,225,227,230,232,235,237,240,242,245,247,250,252,255
};


uint32_t
  iColor[16][3];      // Background colors for eyes
int16_t
  hue          =   0; // Initial hue around perimeter (0-1535)
uint8_t
  iBrightness[16],    // Brightness map -- eye colors get scaled by these
  brightness   = 220, // Global brightness (0-255)
  blinkFrames  =   5, // Speed of current blink
  blinkCounter =  30, // Countdown to end of next blink
  eyePos       = 192, // Current 'resting' eye (pupil) position
  newEyePos    = 192, // Next eye position when in motion
  gazeCounter  =  75, // Countdown to next eye movement
  gazeFrames   =  50; // Duration of eye movement (smaller = faster)
int8_t eyeMotion    =   0; // Distance from prior to new position
boolean off = true;


void setup() {
#ifdef __AVR_ATtiny85__ // Trinket, Gemma, etc.
  if(F_CPU == 16000000) clock_prescale_set(clock_div_1);
  // Seed random number generator from an unused analog input:
  randomSeed(analogRead(2));
#else
  randomSeed(analogRead(A0));
#endif


pinMode(PIR, INPUT_PULLUP);
pinMode(trigPin, OUTPUT);
pinMode(echoPin, INPUT);

pixels.begin();
}


void loop() {


  if(digitalRead(PIR) == 1)// wer are awake
  {
    doeffect();
    off = false;
  }
  else
  {
    if (off == false)
    {
      colorWipe(pixels.Color(0, 000, 0), 50); // Off as no one is watching
      off = true;
    }
  }
  delay(15);
}


void doeffect()
{
   uint8_t i, r, g, b, a, c, inner, outer, ep;
  int     y1, y2, y3, y4, h;
  int8_t  y;

  //is anyone near ?
rangecheck();


if (duration > 100 && duration < 1000)
{
  colorWipe(pixels.Color(255, 0, 0), 50); // Red eyes, back away
}
else if(duration > 1500 && duration < 2000)
{
  colorWipe(pixels.Color(0, 255, 255), 50);
  colorWipe(pixels.Color(255, 255, 0), 50);
  colorWipe(pixels.Color(255, 0, 255), 50);
  colorWipe(pixels.Color(0, 0, 255), 50);
}
else
{
   // A steampunk aesthetic might fare better with this more subdued effect.
  // Etherial green glow with just a little animation for visual spice.
  uint8_t i, r, g, b, a, c, inner, outer, ep;


  a = (hue >> 4) & 15;
  c =  hue       & 15;
  for(i=0; i<16; i++) {
    b = (a + 1) & 15;
    iColor[i][1] = 255; // Predominantly green
    iColor[i][0] = (pgm_read_byte(&sine[a]) * (16 - c) +
                    pgm_read_byte(&sine[b]) *       c  ) >> 4;
    iColor[i][2] = iColor[i][0] >> 1;
    a = b;
  }
  hue -= 3;
}


  // Render current blink (if any) into brightness map
  if(blinkCounter <= blinkFrames * 2) { // In mid-blink?
    if(blinkCounter > blinkFrames) {    // Eye closing
      outer = blinkFrames * 2 - blinkCounter;
      inner = outer + 1;
    } else {                            // Eye opening
      inner = blinkCounter;
      outer = inner - 1;
    }
    y1 = upperLidTop    - (upperLidTop - upperLidBottom) * outer / blinkFrames;
    y2 = upperLidTop    - (upperLidTop - upperLidBottom) * inner / blinkFrames;
    y3 = lowerLidBottom + (lowerLidTop - lowerLidBottom) * inner / blinkFrames;
    y4 = lowerLidBottom + (lowerLidTop - lowerLidBottom) * outer / blinkFrames;
    for(i=0; i<16; i++) {
      y = pgm_read_byte(&yCoord[i]);
      if(y > y1) {        // Above top lid
        iBrightness[i] = 0;
      } else if(y > y2) { // Blur edge of top lid in motion
        iBrightness[i] = brightness * (y1 - y) / (y1 - y2);
      } else if(y > y3) { // In eye
        iBrightness[i] = brightness;
      } else if(y > y4) { // Blur edge of bottom lid in motion
        iBrightness[i] = brightness * (y - y4) / (y3 - y4);
      } else {            // Below bottom lid
        iBrightness[i] = 0;
      }
    }
  } else { // Not in blink -- set all 'on'
    memset(iBrightness, brightness, sizeof(iBrightness));
  }


  if(--blinkCounter == 0) { // Init next blink?
    blinkFrames  = random(4, 8);
    blinkCounter = blinkFrames * 2 + random(5, 180);
  }


  // Calculate current eye movement, possibly init next one
  if(--gazeCounter <= gazeFrames) { // Is pupil in motion?
    ep = newEyePos - eyeMotion * gazeCounter / gazeFrames; // Current pos.
    if(gazeCounter == 0) {                   // Last frame?
      eyePos      = newEyePos;               // Current position = new pos
      newEyePos   = random(16) * 16;         // New pos. (always pixel center)
      eyeMotion   = newEyePos - eyePos;      // Distance to move
      gazeFrames  = random(10, 20);          // Duration of movement
      gazeCounter = random(gazeFrames, 130); // Count to END of next movement
    }
  } else ep = eyePos; // Not moving -- fixed gaze


//  // Draw pupil -- 2 pixels wide, but sup-pixel positioning may span 3.
//  a = ep >> 4;         // First candidate
//  b = (a + 1)  & 0x0F; // 1 pixel CCW of a
//  c = (a + 2)  & 0x0F; // 2 pixels CCW of a
//  i = ep & 0x0F;       // Fraction of 'c' covered (0-15)
//  iBrightness[a] = (iBrightness[a] *       i ) >> 4;
//  iBrightness[b] = 0;
//  iBrightness[c] = (iBrightness[c] * (16 - i)) >> 4;


  // Merge iColor with iBrightness, issue to NeoPixels
  for(i=0; i<16; i++) {
    a = iBrightness[i] + 1;
    // First eye
    r = iColor[i][0];            // Initial background RGB color
    g = iColor[i][1];
    b = iColor[i][2];
    if(a) {
      r = (r * a) >> 8;          // Scale by brightness map
      g = (g * a) >> 8;
      b = (b * a) >> 8;
    }
    pixels.setPixelColor(((i + TOP_LED_FIRST) & 15),
      pgm_read_byte(&gamma8[r]), // Gamma correct and set pixel
      pgm_read_byte(&gamma8[g]),
      pgm_read_byte(&gamma8[b]));


    // Second eye uses the same colors, but reflected horizontally.
    // The same brightness map is used, but not reflected (same left/right)
    r = iColor[15 - i][0];
    g = iColor[15 - i][1];
    b = iColor[15 - i][2];
    if(a) {
      r = (r * a) >> 8;
      g = (g * a) >> 8;
      b = (b * a) >> 8;
    }
    pixels.setPixelColor(16 + ((i + TOP_LED_SECOND) & 15),
      pgm_read_byte(&gamma8[r]),
      pgm_read_byte(&gamma8[g]),
      pgm_read_byte(&gamma8[b]));
  }
  pixels.show();
}


// Fill the dots one after the other with a color
void colorWipe(uint32_t c, uint8_t wait) {
  for(uint16_t i=0; i<pixels.numPixels(); i++) {
      pixels.setPixelColor(i, c);
      pixels.show();
      delay(wait);
  }
}


//void rainbow1(uint8_t wait) {
//  uint16_t i, j;
//
//  for(j=0; j<256; j++) {
//    for(i=0; i<pixels.numPixels(); i++) {
//      pixels.setPixelColor(i, Wheel((i+j) & 255));
//    }
//    pixels.show();
//    delay(wait);
//  }
//}


//// Slightly different, this makes the rainbow equally distributed throughout
//void rainbowCycle(uint8_t wait) {
//  uint16_t i, j;
//
//  for(j=0; j<256*5; j++) { // 5 cycles of all colors on wheel
//    for(i=0; i< pixels.numPixels(); i++) {
//      pixels.setPixelColor(i, Wheel(((i * 256 / pixels.numPixels()) + j) & 255));
//    }
//    pixels.show();
//    delay(wait);
//  }
//}
//// Input a value 0 to 255 to get a color value.
//// The colours are a transition r - g - b - back to r.
//uint32_t Wheel(byte WheelPos) {
//  if(WheelPos < 85) {
//   return pixels.Color(WheelPos * 3, 255 - WheelPos * 3, 0);
//  } else if(WheelPos < 170) {
//   WheelPos -= 85;
//   return pixels.Color(255 - WheelPos * 3, 0, WheelPos * 3);
//  } else {
//   WheelPos -= 170;
//   return pixels.Color(0, WheelPos * 3, 255 - WheelPos * 3);
//  }
//}
void rangecheck()
{
/* The following trigPin/echoPin cycle is used to determine the
distance of the nearest object by bouncing soundwaves off of it. */
digitalWrite(trigPin, LOW);
//delayMicroseconds(2);
digitalWrite(trigPin, HIGH);
//delayMicroseconds(10);
digitalWrite(trigPin, LOW);
duration = pulseIn(echoPin, HIGH);
/* Send a negative number to computer and Turn LED ON
to indicate "out of range" */
}
The making of BOB was left to my Daughter Jessica, here is her log of the process.
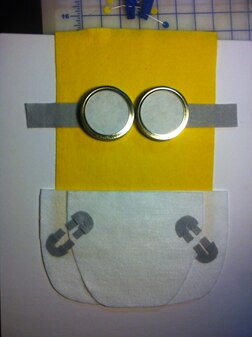
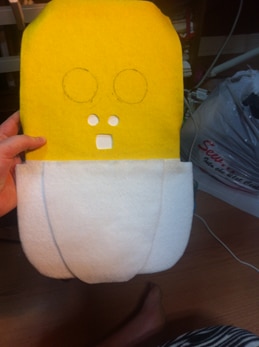
This is what we’re making, minus the digital stuff.
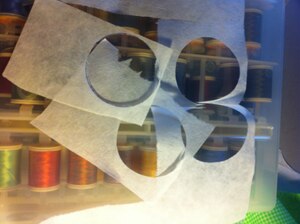
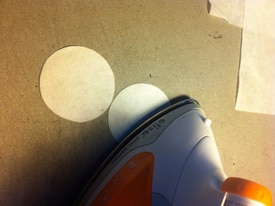
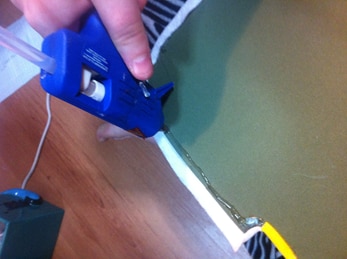
Cut out and iron together two layers of interfacing, one for each eye (substitute with paper if you like).
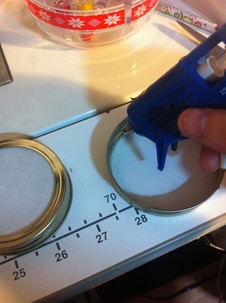
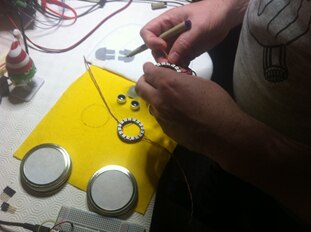
Glue to the inside of two Mason jar lid rims.
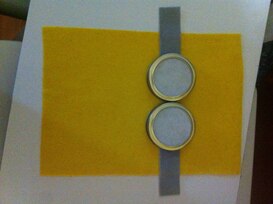
Place on a square of yellow felt. Center goggle pieces and cut out 2 grey felt goggle straps. Place.
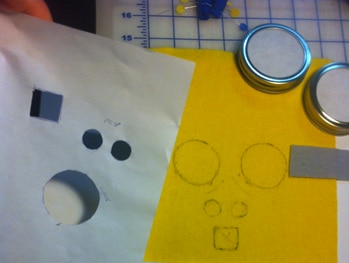
Cut out outlines of your electronic pieces and trace onto the board with iron off marker.
To start the diaper, cut a big piece for the back, rounded at the bottom corners.
Cut out a thinner layer for the front overlap section. Glue that one on top.
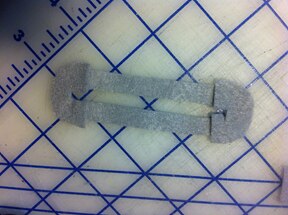
Cut little safety pins out of grey fabric; 2 half circles and two long rectangles, half circles on top.
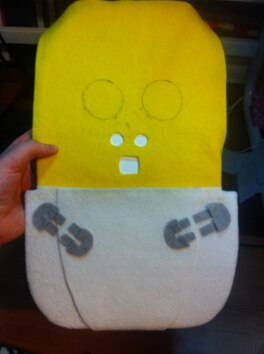
Cut safety pins in half and glue them on.
(Yes these are inaccurate, shush ;P only cut one side in half to be accurate)

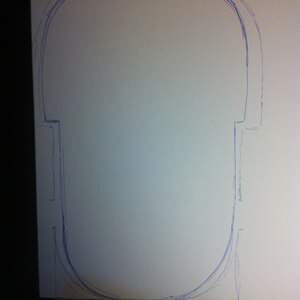
Trace the outline of your baby onto a board, measure in a half-inch, round off the top and cut it out.
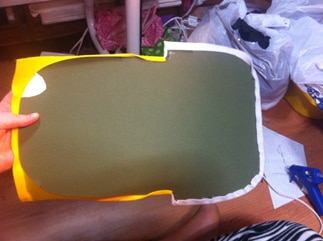
Fold the edge of the felt over the board (only the lower half, so you can insert electronics) and glue on.
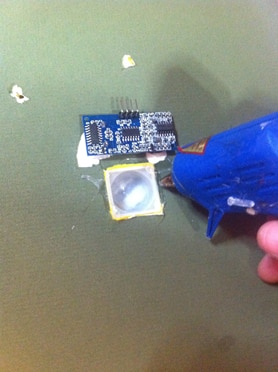
Cut holes through board for whatever pieces require it,
(Mine needed 2 wire holes and the nose and mouth pieces)
Insert the gadgets and glue down.
Finish glueing on the eyes, the goggles, and fold over the rest of the felt edges.
And your done, aside from software and power, see video and above for all that stuff
Happy new year, Jessica Oakes
Top Comments