RoadTest: PiFace Digital
Author: bampan
Creation date:
Evaluation Type: Independent Products
Did you receive all parts the manufacturer stated would be included in the package?: True
What other parts do you consider comparable to this product?: Bespoke design
What were the biggest problems encountered?: A minor issue (I'm nitpicking I know) but access to the rest of the GPIO pins on the Raspberry Pi would be useful.
Detailed Review:
To say I was excited about getting a PiFace Digital is an understatement - I was hyped.
We'd bought our home less than 6 months prior and a number of trawls across the internet had shown that we were not alone with one particular problem with our new home; there was a pre-fitted alarm system but no documentation or help was available to make use of it. Initially we didn't even know where the controller board was concealed and, after finding it eventually, trying to contact the company named on the sticker led to a dead-end; they'd gone out of business or moved and we were left with a beautifully installed home security system which we couldn't use. I was reluctant to rip everything out and start again given that the house had obviously been decorated around the previous installation and the components fitted were nicely discreet and all appeared to be working.
This is where I had high hopes for the combination of the Raspberry Pi and the PiFace Digital board; I was going to cherry-pick the best of the existing alarm components and re-engineer my own controller for the alarm system.
The short, but perfectly sufficient, safety information sheet tucked into the packaging with the PiFace helped set a few ground rules before I could get started.
The only other thing I wish I'd had initially was some more information; somewhere between the full-blown technical datasheet and a summary of the features would have been nice. A very quick search on the Element14 website delivered though, and before long I was poring through the very useful PiFace datasheet and getting started guide (here). It claims you'll be "..getting started within 10 minutes .." and I'm confident that was pretty much all it took.
I fetched an up-to-date copy of Raspbian and flashed it to my SD card, and followed the step-by-step instructions to getting the SPI driver enabled and set to start up after every reboot. Getting the libraries for the PiFace was quick, and I skipped over the emulator section and dived straight into the python examples.
Within 10 minutes and I was detecting button presses, flashing an LED and controlling a relay - superb!
I’m a software developer by trade, and the last decade has been predominantly in C#. Given that I work with that language every day, I was really keen to stay with it. My last project for my first Raspberry Pi was an MP3 player with access across the network to my NAS drive; that project is now in use daily and has integrated very well into our home. It was a small jump to move from desktop C# development to using Mono with my own hardware and I wanted to capitalise on my growing knowledge and my ‘comfort zone’ programming with the Raspberry Pi.
Several days were spent looking at various solutions on the web which may allow me to use the SPI-based PiFace hardware with Mono. Although it’s possible, it’s not exactly documented nor as easy as the excellent libraries available for Python. I eventually decided to put that thought onto the back burner, progress with the hardware, and return to the software part of my project later on.
The PiFace is designed to fit snugly onto the top of the Raspberry Pi, attaching to the GPIO connector via a 26-way female socket on the underside of the board with a neat little rubber foot which rests on the opposite side of the Pi on top of the HDMI connector. It’s an elegant design and has cut-outs on the PiFace board behind the Raspberry PI’s USB and Ethernet plug to allow the PiFace to sit low, resting on 3 points, and with the same form factor as the dinky little Pi. The problem, however, is with the rest of the GPIO pins not used by the PiFace.
My pre-installed alarm system makes use of two keypads in the house, and attaching one of them is going to be very useful. Rather than using any of the I/O ports on the PiFace, which I’d figured I need most for the PIRs, the strobe, the two bells (one internal and one external to my house), I’d hoped to hook in a keypad for control, arming and disarming the system attached to the 8 unused I/O ports on the Pi. Again, I pushed this to the back of the queue of things to tackle when I got there. I’ve since read mcb1’s excellent review (here) and his solution to solder two single row headers onto the exposed solder points above the connector is genius – thanks Mark.
I’m now deep in the grubby bits of getting my project to take shape. Not least of my issues is figuring out this lot...
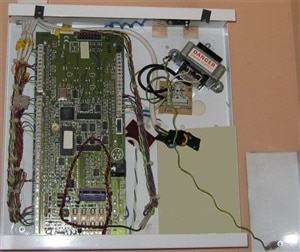
... but once I’ve got everything labelled up, I’ll merge all my prototype bits of Python code for the PIRs, the bells and the strobe and I’ll fit my Pi plus PiFace into the existing space.
Initially I’m going to use the Ethernet capability as my method of controlling the board; I’ll show a simple interface which will allow me to use my phone to enable and disable the system. The 4 very handy switches on the PiFace will be my manual override if access via my network is unavailable (network or power down, etc), but in the long run I’d really like to use one of my conveniently wall-mounted keypads to manage the whole system.
It’s a work in progress but I wanted to get my review started rather that wait until I've completed this project; it's turning out to be bigger and more complex than I thought.
But with the massive benefit of being as bespoke as I’ve always wanted (I’m thinking of the house contacting me via phone if an alarm is triggered, etc) I’m really pleased that the PiFace Digital fits the bill for attaching some real-world hardware to the amazing little Raspberry Pi.


