


As I expected, the BBB SDR road test would lead me down an exciting road to discovery. I have not been disappointed. The 1st step was of course to unpack all of
the components of the road test package. I was impressed by the small size of the SDR USB dongle. I have had previous experience with the BeagleBone Black,
having purchased one in late 2013. The LCD display however was entirely new to me.
I admit to requiring a moment to figure out exactly how the LCD display mounts on top of the BeagleBone Black, since there wasn't any documentation specifically
explaining which direction it was to be mounted. Fortunately, on closer inspection you discover that the display can only be mounted successfully in one
orientation. A quick confirmation on the Internet proved my deduction correct.
For your own reference, the LCD display mounts with the left side of the display above the 5 V power connector and ethernet connector of the BeagleBone Black. The
right side of the LCD display, which contains the 5 pushbuttons for controlling the display, hangs over the right side of the BeagleBone Black above the USB
connector.
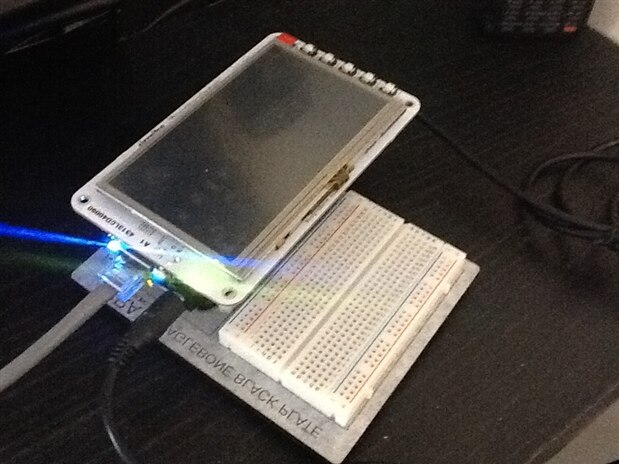
The display is easy to mount into the 2 sets of header sockets on the top of the BeagleBone Black. There isn't any set up required, just plug it in and reboot
your BBB and voilà you have your LCD display. With the keyboard plugged in you have a complete self-contained standalone Linux-based computer.
Since I had no previous experience with the USB SDR dongle, I felt the best way to proceed was to start by connecting it to my desktop PC. After doing some
research on the web, I found and downloaded several Windows-based software packages which would interface with the SDR.
I have experimented with the following:
- HDSDR (http://www.hdsdr.de/)
- WinRad (http://winrad.org/)
- SDR# (http://sdrsharp.com/)
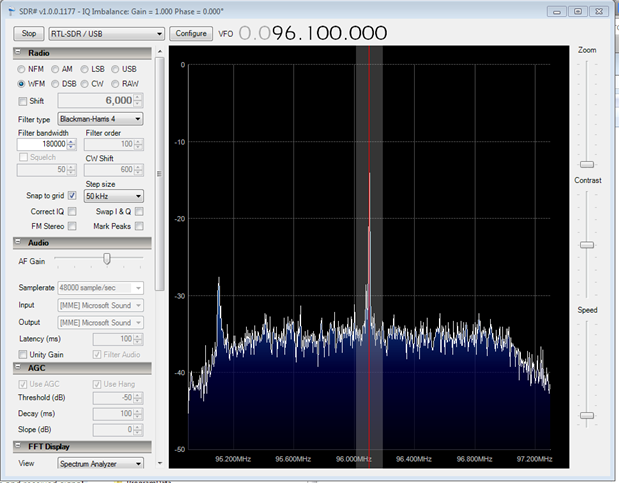
While each of these offer slightly different features, the SDR# was the easiest to install and get operational. I was able to confirm that my USB SDR dongle was
capable of receiving local commercial FM broadcast signals.
I was intending to use the local WeatherRadio Canada broadcast station close to my location has a known radio source. The station broadcasts at 162.400 MHz,
continuously 24 hours a day. My initial experimentation with the SDR dongle showed that I was just barely able to pick out the signal from the background noise
with the SDR antenna mounted on my office desk beside me. This discovery leads me to believe that if I intend to produce an accurate RF signal map of the local
radio sources in my area I will need to improve the signal-to-noise ratio of incoming signals. This will probably mean that I will need to replace the magnetic
mount antenna that comes default with the SDR dongle, or at the very least mount the antenna outside in a better receiving position.
In the meantime, I've decided to proceed with a proof of concept where I will scan across the commercial FM broadcast band and make an inventory of the stations
I'm able to receive. The stations are strong enough to be able to be received by the default antenna in a convenient indoor location. In addition they bring with
them the bonus that I know where to expect to find these stations. Once I've developed a system capable of scanning across that band and successfully locating and
identifying the frequencies and received signal strengths of those stations then I can concentrate on improving the reception capabilities of the SDR.
It is now time to turn my attention to getting the SDR dongle to work on the BeagleBone Black device. Initially I had envisioned using the GnuRadio software
system as the heart of my frequency scanner. As I did more research I realized that the processing requirements of that software package might in fact be too
intense for the BeagleBone Black. I did install this package on a Ubuntu Linux VM running in VMware on my Windows 7 PC. It certainly lives up to its reputation
as being a very complex piece of software. I can appreciate the power and flexibility that it seems to provide. I began to wonder however if it was overkill for
my application.
I took a step back and decided to try a minimalist approach. I followed the procedures described here (http://sdr.osmocom.org/trac/wiki/rtl-sdr) to install the
rtlsdr library and utility programs designed to work with the Realtek RTL2832U based SDR dongle's.
The RTLSDR library was fairly straightforward to install. Make sure that you take note of the requirement to have the development packages for libusb1.0 installed
on your BeagleBone Black before you attempt to install the RTLSDR software.
Once I completed the installation of the RTLSDR library, I was able to test the success of the installation by running the following command from the BeagleBone
Black terminal.
root@beagleboneblack:~# rtl_test -t
This provided me with the following return information thereby confirming the successful installation and connection to my SDR dongle.
Found 1 device(s):
0: Realtek, RTL2841UHIDIR, SN: 00000001
Using device 0: Generic RTL2832U OEM
Found Rafael Micro R820T tuner
Supported gain values (29): 0.0 0.9 1.4 2.7 3.7 7.7 8.7 12.5 14.4 15.7 16.6 19.7 20.7 22.9 25.4 28.0 29.7 32.8 33.8 36.4 37.2 38.6 40.2 42.1 43.4 43.9 44.5 48.0 49.6
Sampling at 2048000 S/s.
No E4000 tuner found, aborting.
root@beaglebone:~#
After looking through the documentation available for the RTLSDR library, I discovered that there is a utility called rtl_power, which may do exactly what I need to help me create my local RF source map. In my next blog installment, I will describe in detail how I plan to use rtl_power for my BeagleBone Black Internet Radio Challenge Road Test.
William