


Hello everyone,
My BeagleBone Black Wireless is up and running. I was able to configure the Wi-Fi and access the BeagleBone Black via the Putty terminal emulator. Although, I think any other terminal emulators would have worked as well. I configured a web server and was able to access the BeagleBone Black’s onboard LEDs from a webpage. I decided to hold off configuring the onboard Bluetooth module until I get some Bluetooth LE components to communicate with.
I did run into a few problems when updating the BeagleBone Black’s software packages. Section VI contains the details of the problems and what I did to resolve them. Getting the web server configured and accessing the BeagleBone Black was problematic due to software dependencies. Section VII contains the details of those problems and what I did to resolve them. Here is a list of the tasks I completed:
- Booted the BeagleBone Black.
- Configured the Wi-Fi.
- Installed Putty.
- Updated the BeagleBone Black’s software packages.
- Configured the web server.
- Wrote a small webpage to verify I could access the BeagleBone Black via the web server.
- Changed Debian Password.
I wrote a tutorial for each task I completed. If you are interested in the details you can view the following sections below. The sections are:
Section I – Introduction to the BeagleBone Black Wireless
Section II – Booting the BeagleBone Black
Section III – Accessing the Cloud9 IDE
Section IV – Configuring the Wi-Fi
Section V – Installing Putty
Section VI – Updating the BeagleBone Black’s Software Packages
Section VII – Creating a Web Server
Section VIII – Verifying the Web Server
Section IX – Security
This week I will start ordering the required components for the project and begin designing the main module for the controller program.
Talk to you soon.
Quote of the Moment -
Theory is when you know everything but nothing works. Practice is when everything works but you don't know why. On this project, theory and practice comes together - nothing works and nobody knows why.
-- Anonymous
Section I – Introduction to the BeagleBone Black Wireless
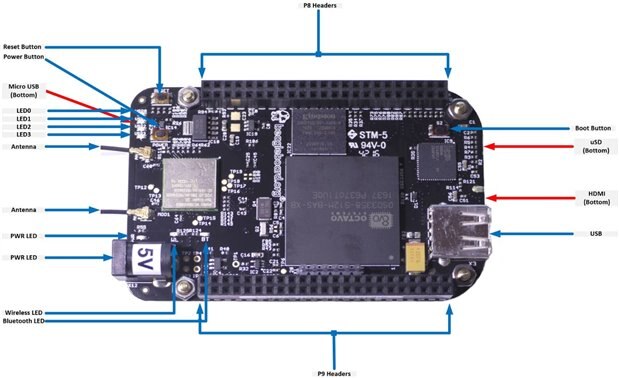
The BeagleBone line of boards are open source, System in Package (SiP) processors designed by Octavo Systems. In 2016 BeagleBoard.org released its third board in the BeagleBone line, the BeagleBone Black Wireless. BeagleBoard.org worked with Octavo Systems to integrate 150 components into a System-In-Package (SIP). The design was migrated to Autodesk EAGLE. These two design changes allow engineers to more easily design variants of the BeagleBone platform.
The designers removed the 10/100 Ethernet interface. They replaced it with 802.11n Wi-Fi. They also added Bluetooth 4.1 with Bluetooth low energy.
The BeagleBone Black Wireless sports an AM335x 1GHz ARM Cortex-A8 processor, a graphics accelerator, a floating-point accelerator, and 2 PRU, 32-bit 200MHz microcontrollers. It contains 4GB eMMC on-board flash, and a SD/MMC Connector for microSD. You can load the major Linux operating systems on The BeagleBone Black Wireless, such as Debian and Ubuntu. Applications Can be developed in a variety of programming languages such as Bonescript, Node.js, Java, Python, C and C++.
The BeagleBone Black wireless has the ability to accept up to four expansion boards or capes that can be stacked onto the expansion headers. The BeagleBone Black wireless contains 4 user configurable LEDs, video/audio interfaces, a LCD interface, and a stereo audio over HDMI interface.
It contains 65 general-purpose, digital IO pins, 8 PWMs, 4 timers, 7 1.8V analog inputs, serial UARTs, 2 I2C, and 2 SPI, along with access to 3.3V and 5V pins.
Section II – Booting the BeagleBone Black
Preparing the BeagleBone Black Wireless for Use
Now that we are familiar with the board, let’s get started. First, we will connect our BeagleBone Black to our PC. Take a Micro-USB to USB cable and plug the Micro-USB plug into the Micro-USB connector on the BeagleBone Black and the USB plug into your PC.
The PWR LED next to the Power Jack will light up. Then the four blue user LEDs will light up. Next, the user LEDs will begin to flash randomly. Eventually user LED1, LED2, and LED3 will stop blinking. LED0 will continue blinking. This is the BeagleBone Black’s heartbeat. It indicates that the Debian operating system has completed booting and ready for use. About 30 seconds later the blue LEDs for the Wi-Fi and Bluetooth chips will light up, indicting the Wi-Fi and Bluetooth modules are working. When your PC recognizes the BeagleBone Black a pop-up message at the bottom right-hand side of your screen, similar to the Figure 1 below may appear.
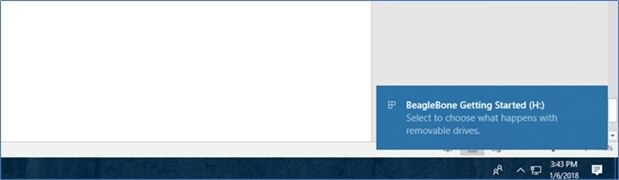
Figure1.
The following window should display, showing the contents of the BeagleBone Black file system.
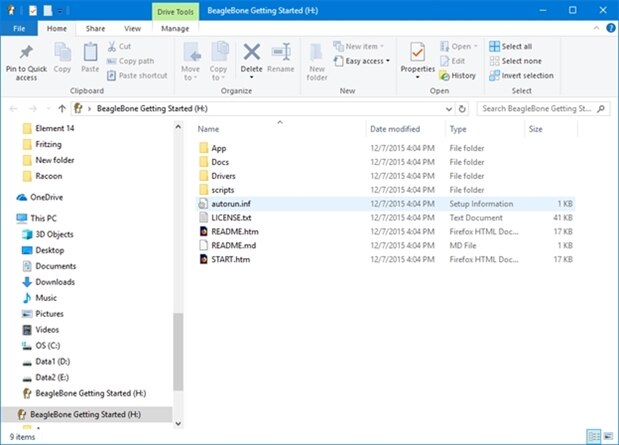
Figure 2.
If is above window does not display (Figure 2).
Open a File Explorer window.
Scroll down to the bottom of the left navigation bar.
You should see a BeagleBone Getting Started drive as shown below (Figure 3).
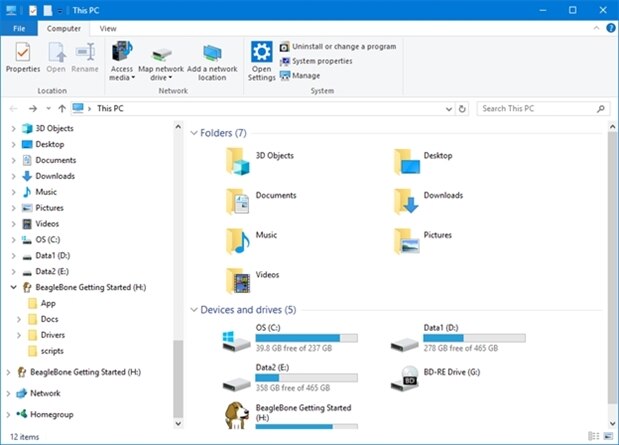
Figure 3.
Double click on the BeagleBone Getting Started drive. A list of the folders and drives is displayed as shown in Figure 2.
Double click on the START.htm file (See Figure2). A window is displayed in your browser as shown in figure 4.
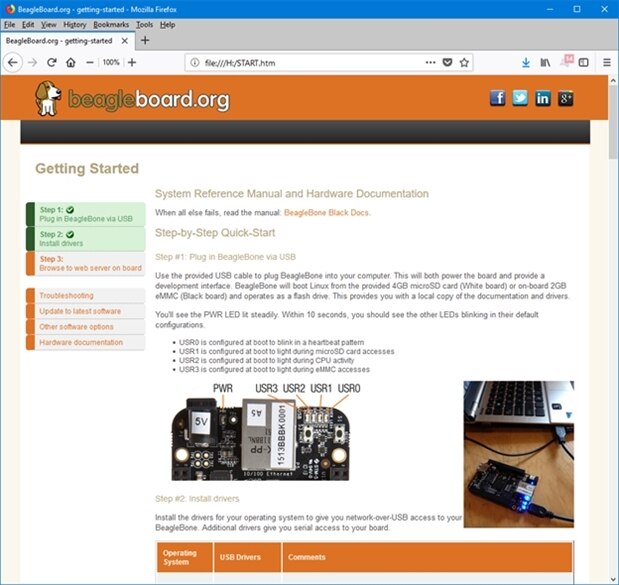
Figure 4.
Scroll down to the table that contains the BeagleBone drivers (Figure 5). In the USB Drivers column click on the drivers that pertains to your operating system. I have a Windows (64-bit) PC so I clicked on the 64-bit driver installer.
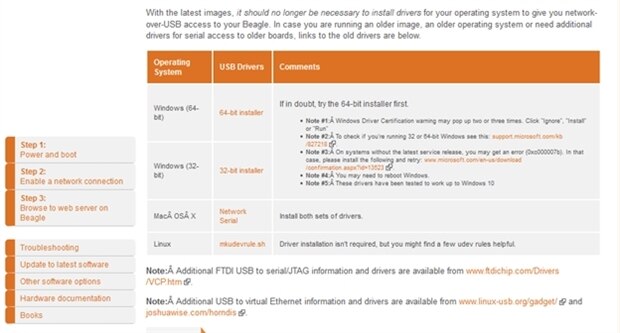
Figure 5.
The following pop-up appears (Figure 6). Click on save file.
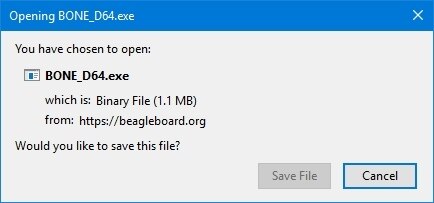
Figure 6.
Once the file is downloaded execute it. Click on the Next button once the BeagleBone Driver Installer window appears (Figure 7).
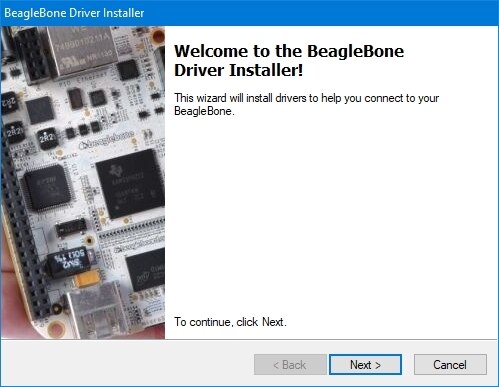
Figure 7.
Once the drivers are installed the following window appears (Figure 8). Click on the Finish button and you are ready for the next step.
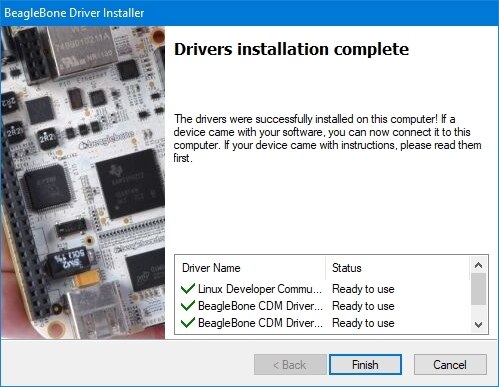
Figure 8.
Section III – Accessing the Cloud9 IDE
Now that we have our BeagleBone Black booted and our drivers loaded on our PC we can access the Cloud9 IDE to setup the Wi-Fi network. In the START.htm web page, scroll down to Step 3 (Figure 9). Click on the http://192.168.7.2 link. The Bone101 page will be displayed (Figure 10).

Figure 9.
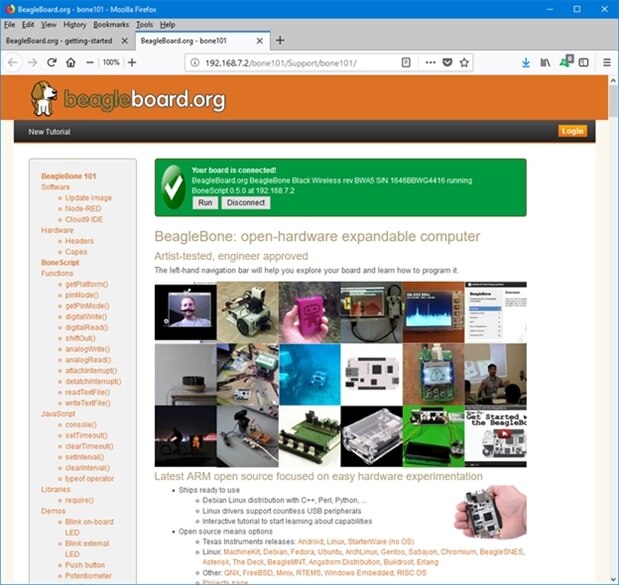
Figure 10.
Click on the Cloud9 IDE link in the left navigation bar. Cloud9 is a web server-based IDE served by the web server on the BeagleBone Black (Figure 11). Note that the port serving up the Cloud IDE uses port 3000. Also note that you can use the local name for the BeagleBone Black (beaglebone.local) to browse to the Cloud9 IDE (i.e. http://beaglebone.local:3000/ide.html)
The left side of the Cloud9 IDE contains the folder structure of the Cloud9 directories. You can add/change/delete files and folders from here. On the top half of the page, where you see the Welcome screen, you can create, edit, and delete files. If you use this IDE for development this is where you would create and maintain your code. The bottom half of the page is used to execute programs and create terminal sessions. The right top part of the screen contains information to help you learn how to use the IDE. If you want to know more about how to use the Cloud9 IDE click on the More link at the bottom of the Cloud9 Blog section.
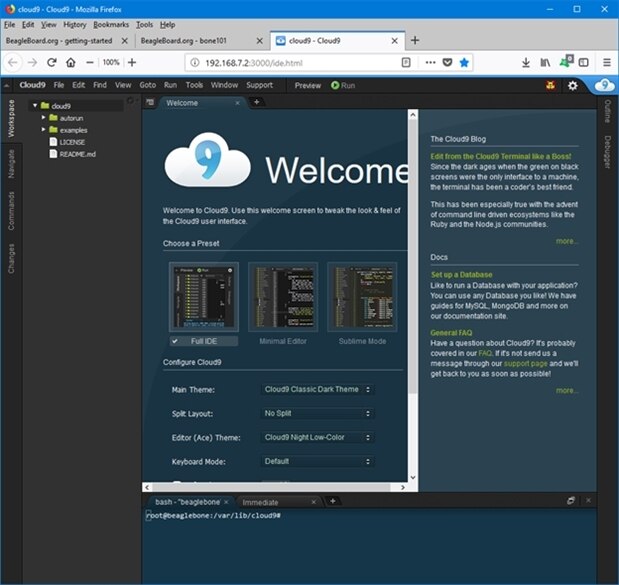
Figure 11.
Section IV – Configuring the Wi-Fi
We are going to use the bottom half of the screen of the IDE to create a terminal session to the BeagleBone Black where we will install some software and create a connection to your router. Actually, you do not have to create a terminal session. The IDE creates one when you start it. We can use that one instead of creating another one. So now it is time to configure the Wi-Fi.
Click on the Bash – “beaglebone” tab and enter the following commands (Figure 12).
- connmanctl
- This is a communications utility that allows you to configure your Wi-Fi.
- connmanctl> tether wifi off
- Verify tethering is off. It will give you an error message if tethering is already off. You can ignore the message.
- connmanctl> enable wifi
- Verity the Wi-Fi is enabled. It will give you an error message is it is already enabled. You can ignore the message.
- connmanctl> scan wifi
- This command will scan for devices available on your network. It does not display the results. Use the next command to display the results.
- connmanctl> services
- Displays the devices available on your network. Look for you router name (Network Id/ SSID). In this example the router is ATT368.
- connmanctl> agent on
- This command will allow you to enter your router password when prompted.
- connmanctl> connect wifi_506583d377bf_415454333638_managed_psk
- The connect command will attempt to connect you your router. Copy the long string that is on the same line as your Network Id. Then paste it after the connect command.
- Passpharse? YOUR PASSWORD
- Connmanctl will ask you for your router password. Enter you’re your password here. You should get massage stating you have connected. (i.e. Connected wifi_506583d377bf_415454333638_managed_psk)
- connmanctl>quit
- You are now connected. Enter quit to exit the connmanctl utility.
Run “ifconfig wlan0”
Look at the wlan0 section. wlan0 contains the information about your Wi-Fi connection. We are interested in the IP address assigned to your BeagleBone Black. Locate the label inet addr: on the second line. The IP address that follows the inet addr: label is the address you use to connect your BeagleBone Black. In the example below the IP address is 192.168.1.147. Take note of your inet IP address. You need it to create remote terminal sessions and to browse to a webpage on the BeagleBone black.
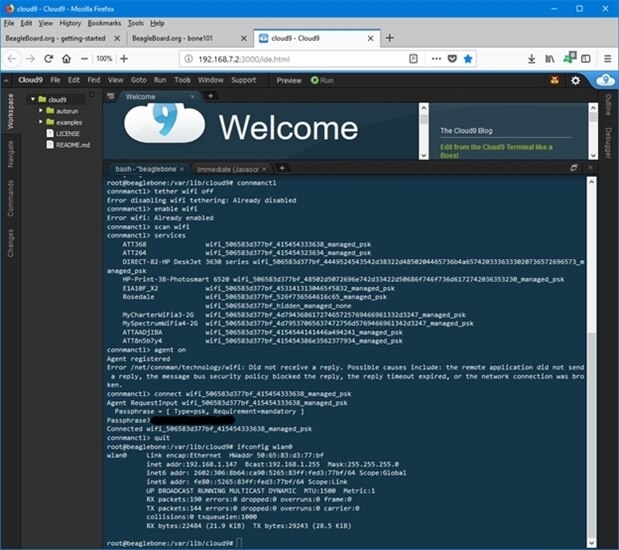
Figure 12.
Section V – Installing Putty
Now that we have the WIFI setup we can connect to the BeagleBone Black without using the USB interface. We will use a free software application called Putty to access our BeagleBone Black via the WIFI interface we just created. First, we will download Putty from the official Putty download site, which contains the latest Putty releases. Browse to: https://www.chiark.greenend.org.uk/~sgtatham/putty/latest.html
Select either the 32-bit or 64-bit MSI installer depending on the architecture of your PC. Most people have 64-bit PC these days. You should get a page similar to the one below (Figure 13). In the package section, click on the appropriate MSI installer.
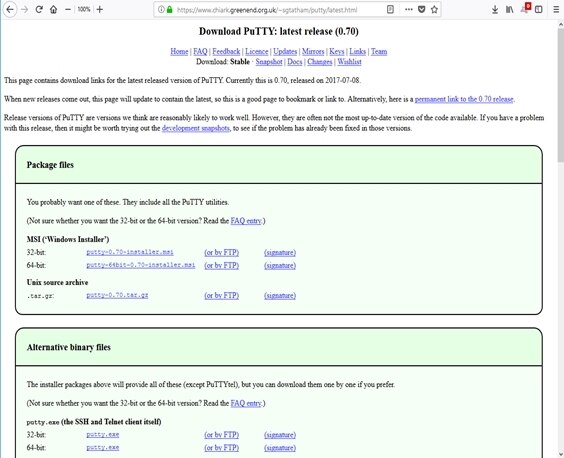
Figure 13.
After your download is complete, double click on the msi file to start the setup process. Click on the “Next” button once the following window appears (Figure 14).

Figure 14.
Click the “Next” button to accept the default installation folder (Figure 15).

Figure 15.
Click the “Install” button to begin the installation (Figure 16).
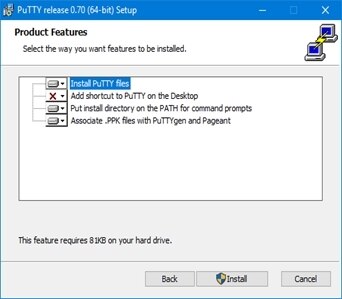
Figure 16.
The installation process displays a status window (Figure 17).
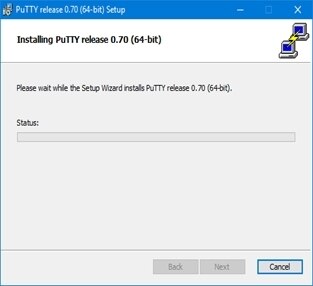
Figure 17.
The installation process displays the following window when the installation is complete. Click on the “Finish” button to close the window (Figure 18).

Figure 18.
Start the Putty program.

Figure 19.
Click on “Default Settings” in the drop down box. Then click on the “Load” button. Enter your IP address you obtained while configuring the Wi-Fi, into the “Host Name (or IP address)” input box. Set the Connection type to SSH. In the “Saved Sessions” input box, enter a short description for this connection (figure 20).
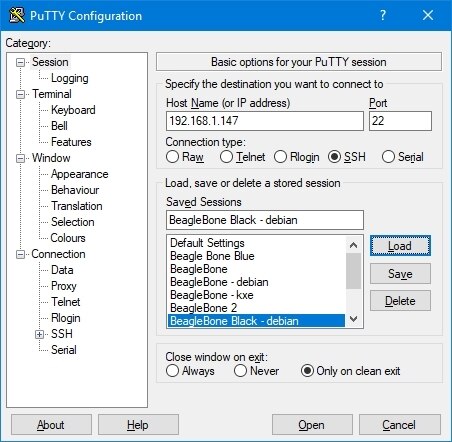
Figure 20.
Click on the Keyboard category (Figure 21). Select Control-H for the Backspace Key. Then select VT100+ under The Function keys and keypad.
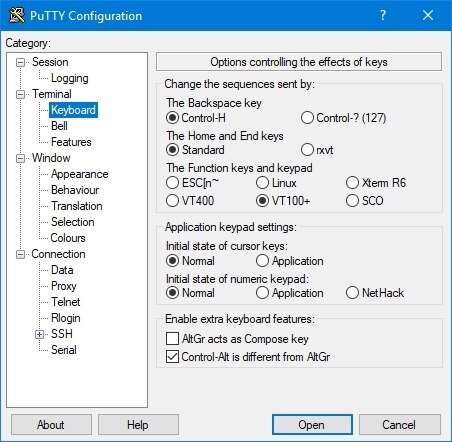
Figure 21.
Click on the Window category (Figure 22). Change the Lines of scrollback to 2000.
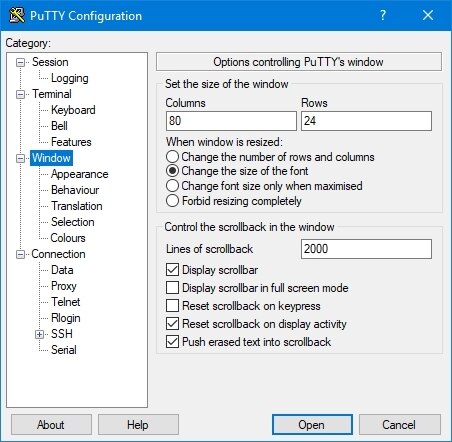
Figure 22.
Click on the Behaviour category (Figure 23). Add a Window title.
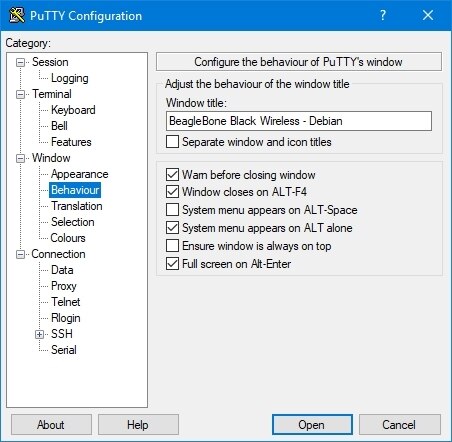
Figure 23.
Click on the Data category (Figure 24). Enter debian in the Auto-login username box.
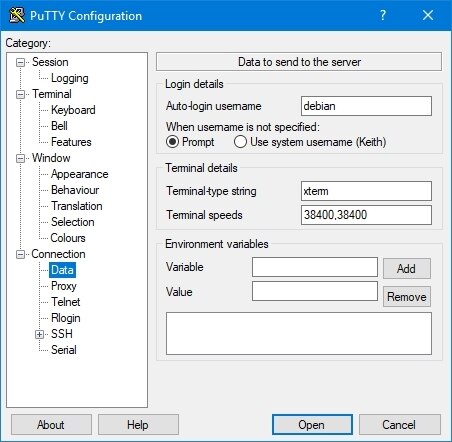
Figure 24.
Click on the Session category (Figure 25). Click on the Save button to save your configuration. Your new configuration will appear in the drop down box.
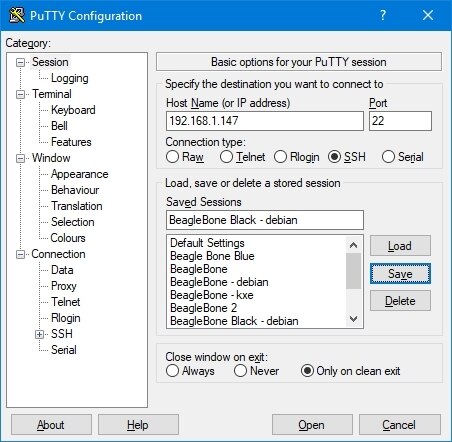
Figure 25.
To start a terminal session, start Putty, then either double click on the desired session in the Saved Sessions box or single click on the desired session in the Saved Sessions box, click on the Load button and click on the Open button.
The first time you open a terminal session to a host Putty will display a pop-up window to warn you that you have never accessed the host (Figure 26). Just press the Yes Button. Putty will open a session window (Figure 27). At the password prompt enter “temppwd”. Note that Linux does not display the password that you entered. Also, the line above contains the default password for the Debian username(temppwd).
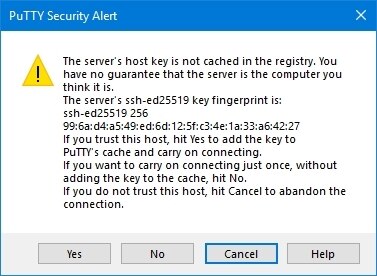
Figure 26
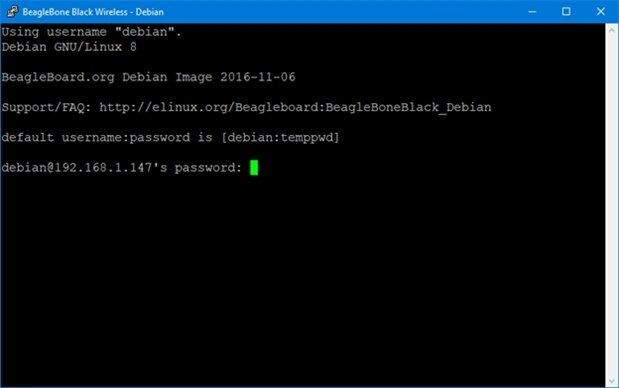
Figure 27.
Once you are logged in the Debian operating system will display the time/date you last logged in and also display the name of the host that initiated the session (Figure 28).
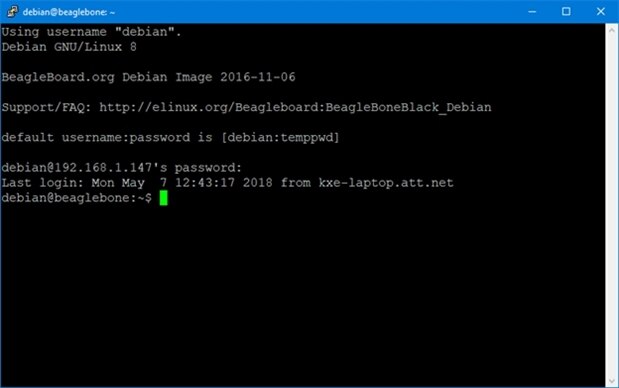
Figure 28.
Section VI – Updating the BeagleBone Black’s Software Packages
Now that we have Internet access let’s update the operating system software. First, if you closed the Putty connection, you need to start a new Putty connection. Just start Putty and double-click on the session description you created previously.
The Debian developers are constantly updating the software for the Debian operating system. We want to make sure that we have the latest updates before we start any development.
We will update the Debian software using the apt-get tool. The apt-get tool is used to update the software packages on computers that use the Debian operating system. We will use two options, update and upgrade.
The update command re-synchronizes the package index files so that your BeagleBone Black has the latest information for upgrading the Debian operating system. The upgrade command installs the newest versions of software packages on your BeagleBone Black. You must run apt-get update before running apt-get upgrade.
You must have super-user privileges to execute the apt-get tool. Therefore, whenever we execute the apt-get tool we will prefix it with the sudo utility command. sudo allows us to run a command as a superuser.
Enter “sudo apt-get update” in your terminal session. You should see something similar to the window below (Figure 29). The messages you receive will depend on how many, if any, packages were changed since the last update of your Debian system.
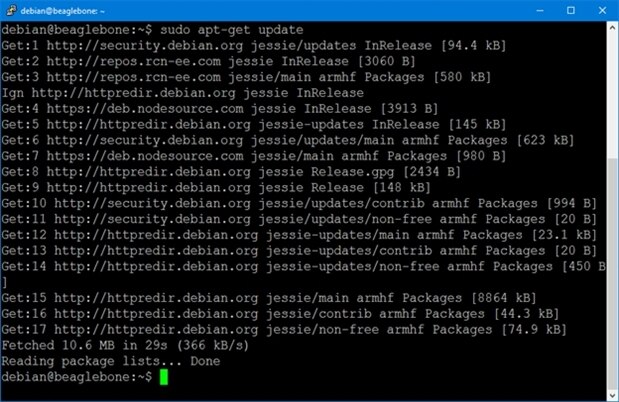
Figure 29.
Now enter “sudo apt-get upgrade” into your terminal session. You should see something similar to the window below (Figure 30). The messages you receive will depend on how many, if any, packages were changed since the last update of your Debian system. After a couple of minutes, the upgrade process will ask if it is OK to use additional disk space. Answer “Y” to the message – Do you want to continue. [Y/n]. The upgrade make run for another half an hour.
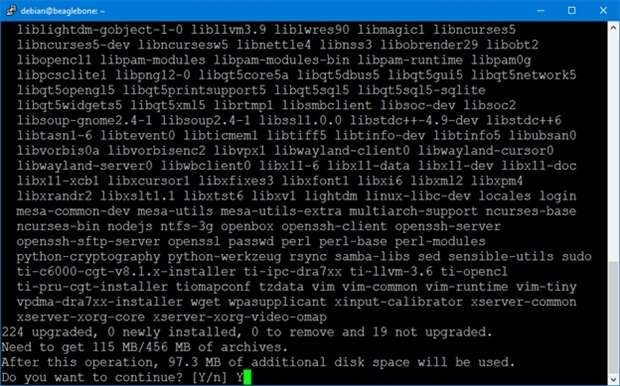
Figure 30.
Unfortunately, the upgrade may not successfully complete. Which was the case for this install. Notice that there were some unmet dependencies (Figure 31). In this case the upgrade process gave us a hint on how to fix the problem:
You might want to run `apt-get -f install` to correct these.
Enter “apt-get -f install”. Answer “Y” to the message – Do you want to continue. [Y/n] (Figure 32).
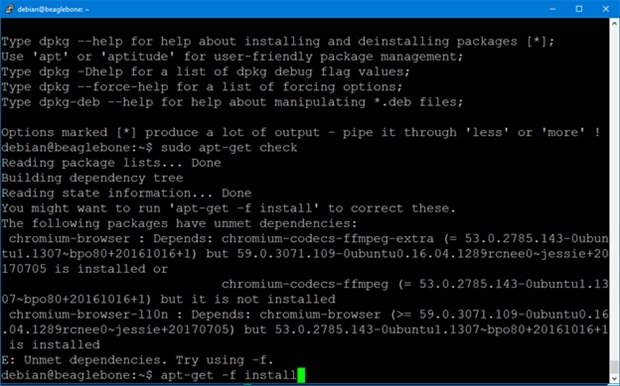
Figure 31.
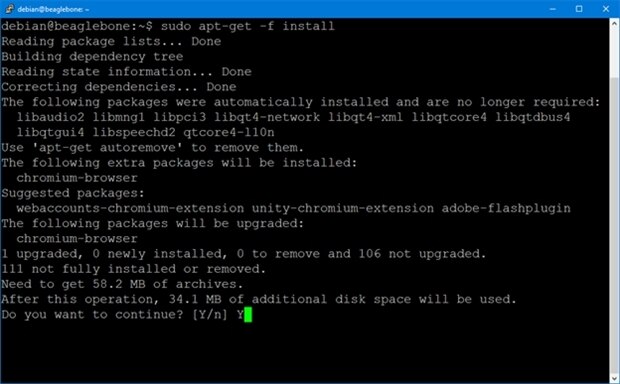
Figure 32.
After the install completes (Figure 33) run “sudo apt-get update” again (Figure 34).
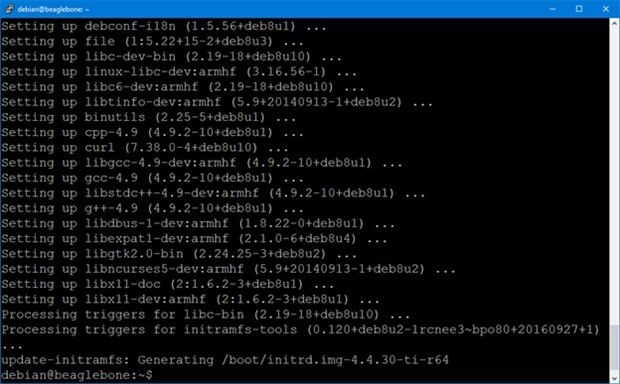
Figure 33.
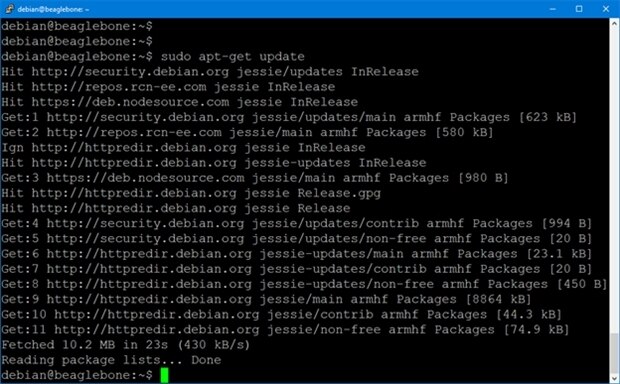
Figure 34.
Run enter “sudo apt-get upgrade” again (Figure 35).
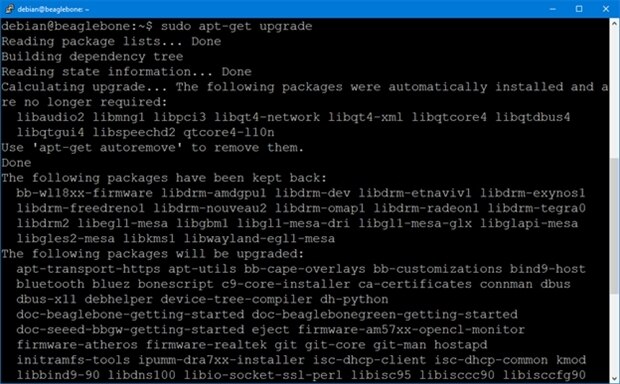
Figure 35.
Answer “Y” to the message – Do you want to continue. [Y/n] (Figure 36).
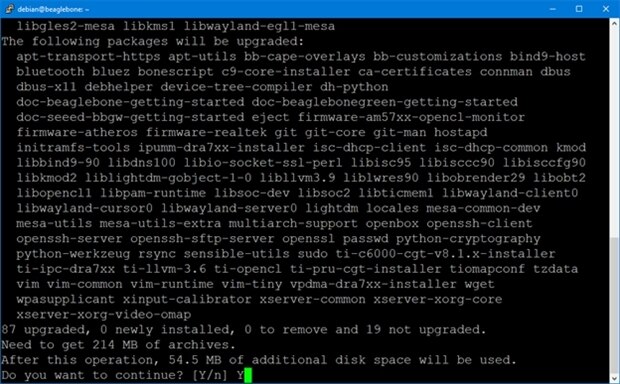
Figure 36.
The upgrade process abnormally terminated again (Figure 37). This time we are not given any hints on how to resolve the problem.
To resolve the problem, first run “sudo apt-get check” (Figure 38).
Then run “sudo dpkg -C”. dpkg gives us a suggestion: The configuration should be retired using dpkg –configure <package>.
Run “sudo dpkg –configure ti-pru-cgt-installer” (Figure 39).
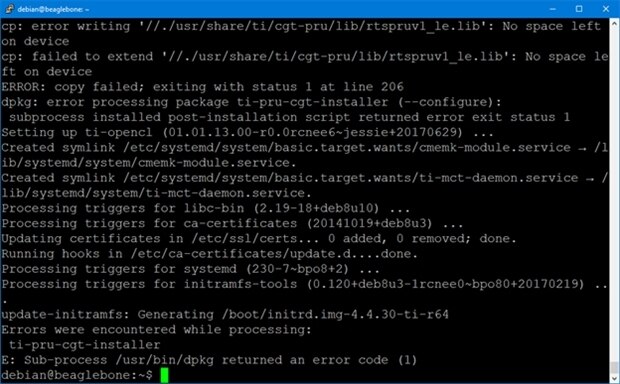
Figure 37.
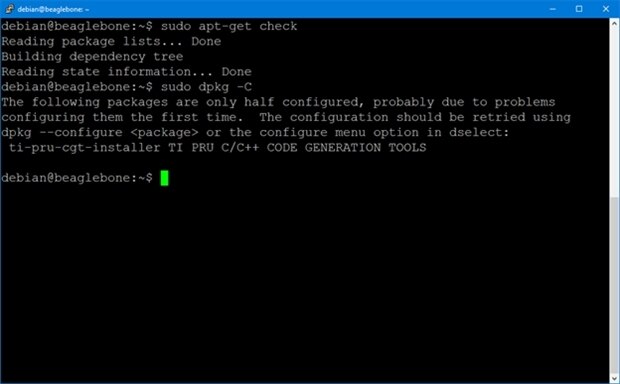
Figure 38.
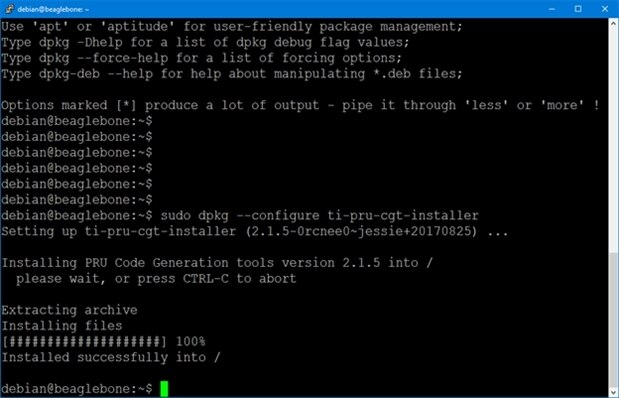
Figure 39.
run “sudo apt-get update” again (Figure 40).
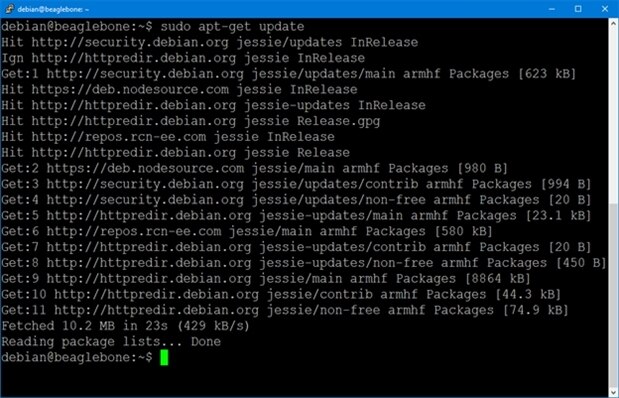
Figure 40.
Run enter “sudo apt-get upgrade” again (Figure 41).
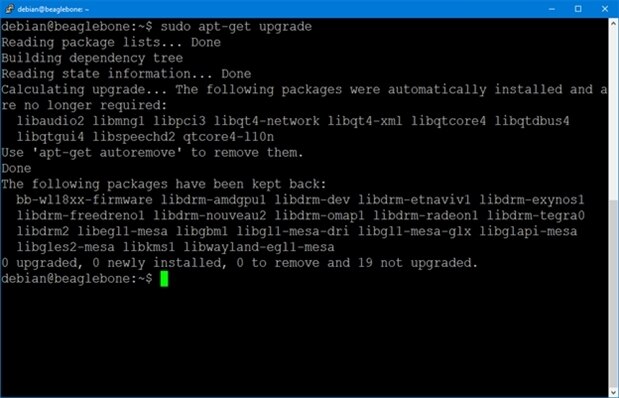
Figure 41.
Finally, we have a successful upgrade. Our system is up-to-date and ready for use.
Section VII – Creating a web Server
The BeagleBone Black contains an Apache web server. However, we are going to create our own web server using Node JavaScript. To accomplish is we need to create a socket connection. Therefore, we need to download the Node socket.io library.
Run “npm update” (Figure 42).
Run “npm config set strict-ssl false”.
Run “sudo npm install -g socket.io”.
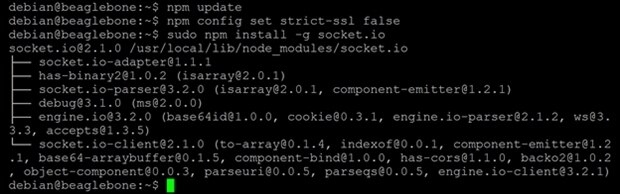
Figure 42
If you try to start the web server now (sudo node 09_01_led_control_server.js) you receive the error shown in Figure 43. The problem is that we are running an old version of node and that the module ap.js is using new ECMAScript 6 standard. We could add the –harmony option (Figure 44). However, we just get a different error.
The solution is to use a newer version of node (Figure 45). First, run:
curl -sL https://deb.nodesource.com/setup_8.x -o nodesource_setup.sh
Then run “Sudo bash nodesource_setup.sh” (Figure 45).
The setup.sh script instructs us to run apt-get install -y nodejs (Figure 46).
Run “sudo apt-get install -y nodejs” (Figure 47).
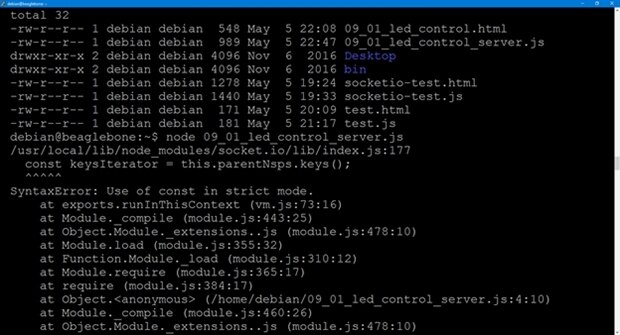
Figure 43.
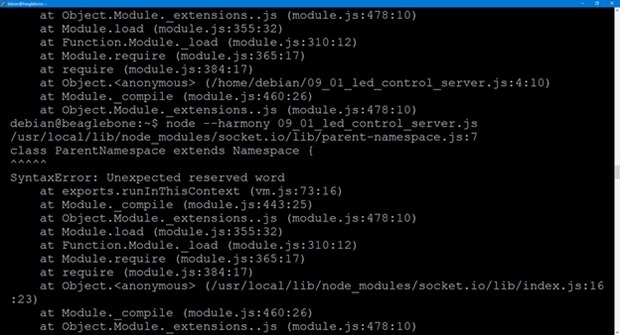
Figure 44.

Figure 45.
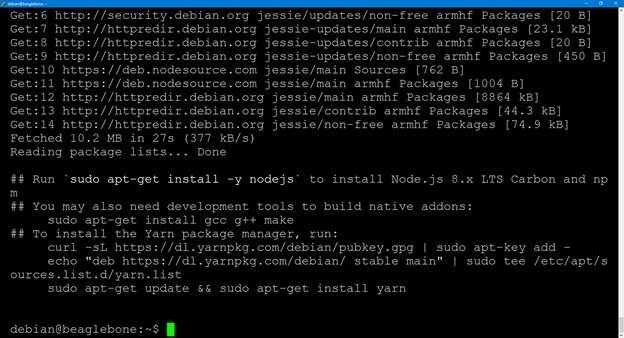
Figure 46.
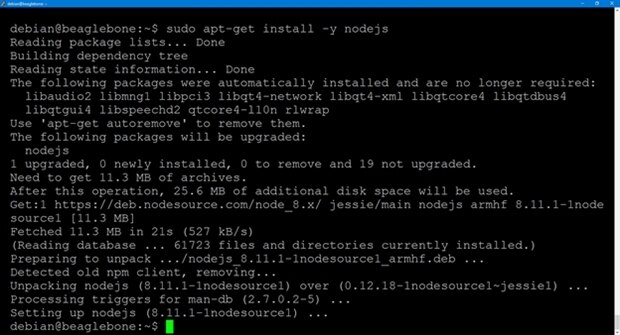
Figure 47.
If we run 09_01_led_control_server.js again we will receive a version error because Bonescript is out of sync with Node.js (Figure 48).
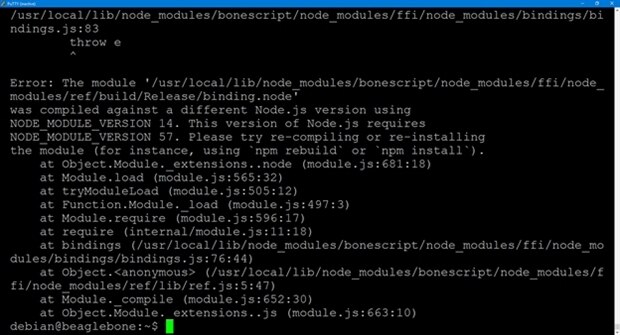
Figure 48.
To resolve the versioning problem, we need to upgrade bonescript on our BeagleBone Black.
Run:
TERM=none sudo npm install -g --prefix /usr/local --unsafe-perm bonescript (Figure 49)
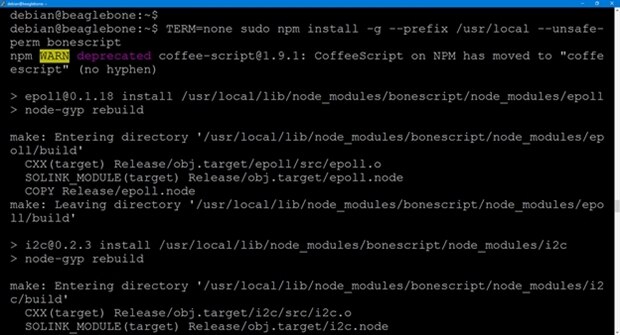
Figure 49.
Once the bonescript update is complete create a file in the home directory called 09_01_led_control_server.js. This is the code used to startup our web server.
Add the following code to the file:
var app = require('http').createServer(handler);
var io = require('/usr/local/lib/node_modules/socket.io').listen(app);
var fs = require('fs');
var bb = require('/usr/local/lib/node_modules/bonescript');
var htmlPage = '/home/debian/09_01_led_control.html'; // use this for Debian
app.listen(9090);
function handler (req, res) {
fs.readFile(htmlPage,
function (err, data) {
if (err) {
res.writeHead(500);
return res.end('Error loading file: ' + htmlPage);
}
res.writeHead(200);
res.end(data);
});
}
Then create a file called /home/debian/09_01_led_control.html. This is the HTML/Javascript code to serve up the webpage.
Add the following code to the file:
<html>
<head>
<script src = "/socket.io/socket.io.js" > </script>
<script>
var socket = io.connect();
function ledOn(){
socket.emit('digitalWrite', '{"pin":"USR3", "value":1}');
}
function ledOff(){
socket.emit('digitalWrite', '{"pin":"USR3", "value":0}');
}
</script>
</head>
<body>
<h1 style="font-size:60pt;">LED USR3</h1>
<a href="" onClick="ledOn();" style="font-size:32pt;">ON</a>
<a href="" onClick="ledOff();" style="font-size:32pt;">OFF</a>
</body>
</html>
run: “sudo node 09_01_led_control_server.js” (Figure 50).
If you do not receive any messages after a couple of seconds you know your web server is running.
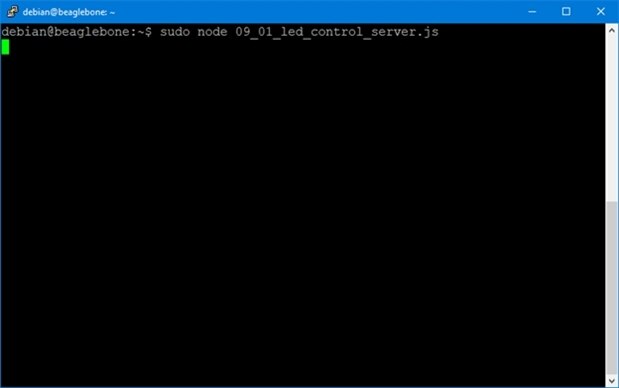
Figure 50.
Section VIII – Verifying the Web Server
Now that the web server is running we can verify that we can interface with the BeagleBone Black. Open a browser window and enter your BeagleBone Black’s IP address with a port number of 9090. i.e. http://192.168.1.147:9090/
A web page is displayed with ON and Off buttons (Figure 51). Click the ON button and the User LED3 on the BeagleBone Black will turn on. To turn off the LED click the OFF button. Note that the web server displays a message whenever it performs a function (Figure 52).
We just verified that our web server is running correctly and that we can interface with the BeagleBone black via a web page. You can shutdown the web server by pressing ctrl-C.
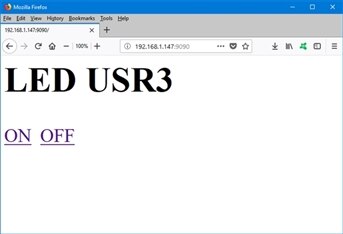
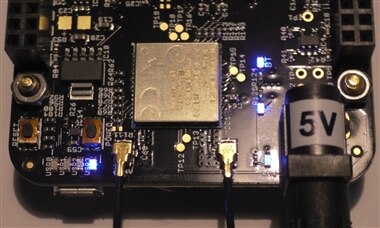
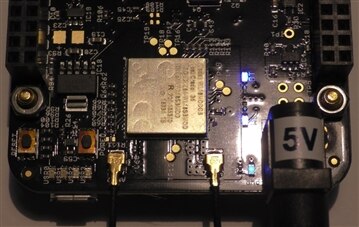
Figure 51.
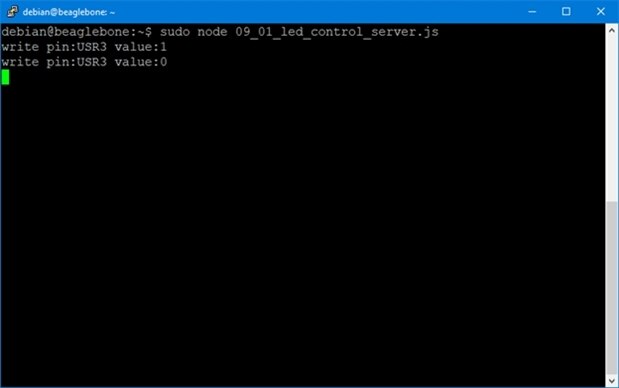
Figure 52.
Section IX – Security
Hardware and software security is beyond the scope of this project. However, since security is an important aspect of any system and part of this project deals with security, I felt that I should address some security issues.
The operating system used on the BeagleBone Black is Debian. It is a Linux operating system that is as powerful and vulnerable as the Linux operating systems on corporate servers. Users accessing this home security system will be given access to the BeagleBone Black via the Internet. Anyone accessing the Internet will have access to the BeagleBone Black. To what extent will depend upon how well the security is locked down on the BeagleBone Black, the router, and any devices connected to the BeagleBone Black or the router.
First, when configuring the Wi-Fi, I just assumed that you had a password set to gain access to your network. If you do not, add one. Restricting network access by MAC addresses is just as secure as a password.
The Debian operating system comes with a default password of “temppwd”. Change the password. Matter of fact, change the default passwords for any devices you have. To change the password on your BeagleBone Black:
Logon, then run “passwd” (Figure 53).
Enter your old password (temppwd). Note that Linux systems do not display the characters you enter when changing a password.
Enter your new password. Make sure it is a strong password.
Type in your new password again.
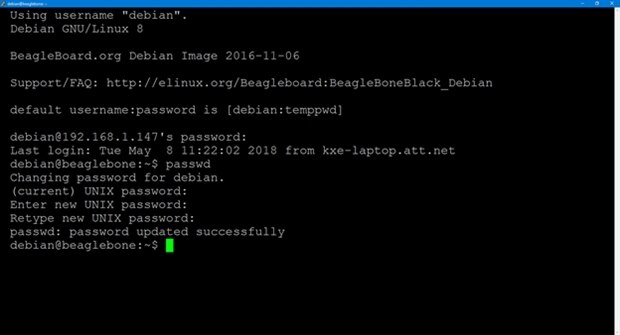
Figure 53.
Top Comments