


Introduction
This first blog post in the Smart Doorbell System series discusses why one would want a better doorbell, and introduces what will be at the heart of it - the CC2640R2 LaunchPad board, and briefly explores its microcontroller.
This blog post also discusses how an enclosure could be created using Autodesk Fusion from the circuit board CAD files. A nice enclosure is important for consumer applications.
Motivation
Most existing wireless doorbells (lets call them doorbell 1.0) seem to be built down to the lowest cost. I wanted to build Doorbell 2.0! The cheapest ones come in two parts; the bell push or transmitter portion, and the chime or receiver portion. They are a compromise. The person pressing the button actually has little idea if the chime has actually actuated if the chime is located too far, because it will be inaudible. There isn’t much feedback. Also, if the user is outside in the garden or visiting a neighbour, they may forget to take the wireless chime module with them, or it may not operate with batteries. There are versions with multiple chime modules (including battery powered versions) but they do not necessarily have a good wireless range, so one may as well just buy a version with a louder audio output perhaps and hope for the best if you’re in the garden. Finally there are existing Internet-connected solutions that can also capture video too, but they are more of an amalgamation of a doorbell, door entry system and security system, and are in a very different price ballpark too.
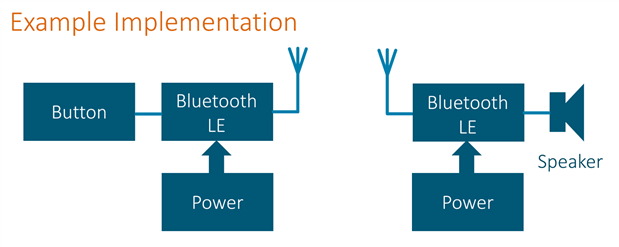
It would be interesting to use Bluetooth because then bidirectional communication is possible between the bell push, and the chime module, instead of the one-way transmission with existing low cost systems. Also, in future the system could be expanded with more functionality, such as bidirectional audio communication like an intercom. I didn’t want to do that type of thing for the first design, because then there is the risk of excessive feature creep. I’d rather implement the core doorbell features well in this design challenge, and leave future enhancements for a doorbell 2.1 for another time.
(Image source: ti.com)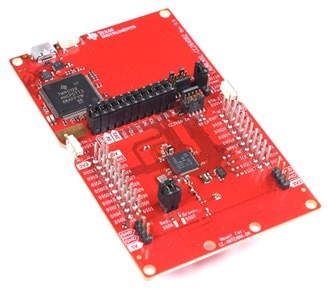
I was keen to use the Texas Instruments CC2640R2 LaunchPad board, because it uses the CC2640R2 which is really low-power. It should be ideal for both the bell push, and the chime module. However, this wasn’t the only reason. I also liked that there was the possibility of having great radio range because it supports the latest Bluetooth Low Energy (BLE or Bluetooth LE) 5.0 specification! Also, the CC2640R2 has a very powerful microcontroller inside; in fact there are several microcontrollers inside the chip. This would provide the capabilities for lots of additional functionality one day, without needing another separate microcontroller which could be difficult to fit inside a small bell push. And finally, many TI designs have a reputation for low energy. This of course is essential for the bell push which usually operates from a small battery.
My core requirements are:
- No wiring needed for the bell push (i.e. no power cabling or bell wire)
- Ability to use the chime indoors or outdoors
- A better range than typical wireless doorbells
- Ability to alert multiple chime locations from a single single doorbell
- Feedback to the caller, so they are aware that the chime is functioning
- A good service-free life, at least a year before any batteries need swapping out
On top of this, there are some additional requirements to make it a successful product, such as a ease-of-use, uncomplicated, classic look to suit most homes, interference-free, an expansion capability so that purchasers know that their investment isn’t wasted after a few years or if they move to a larger home and need longer range, and a design that is easy to expand to create many different products in the range with different chimes and alerts for instance, or with multiple buttons for use with apartments, or for controlling gates or fitted inside tables for letting the waiter know you’re ready to pay the bill. These are all scenarios where I think there could also be great benefits to using Bluetooth LE instead of proprietary RF schemes, and I’m hoping the work done in this design challenge can be applicable to a wide variety of applications.
So, while this example implementation of one possible doorbell design looks simple, I’m hoping the end result is more than flexible enough to be useful not only for different doorbell products in the range, but also for many different scenarios too.
While I’m waiting for the board to arrive, I thought it worthwhile to start digging into the online documentation to learn as much about it all as possible.
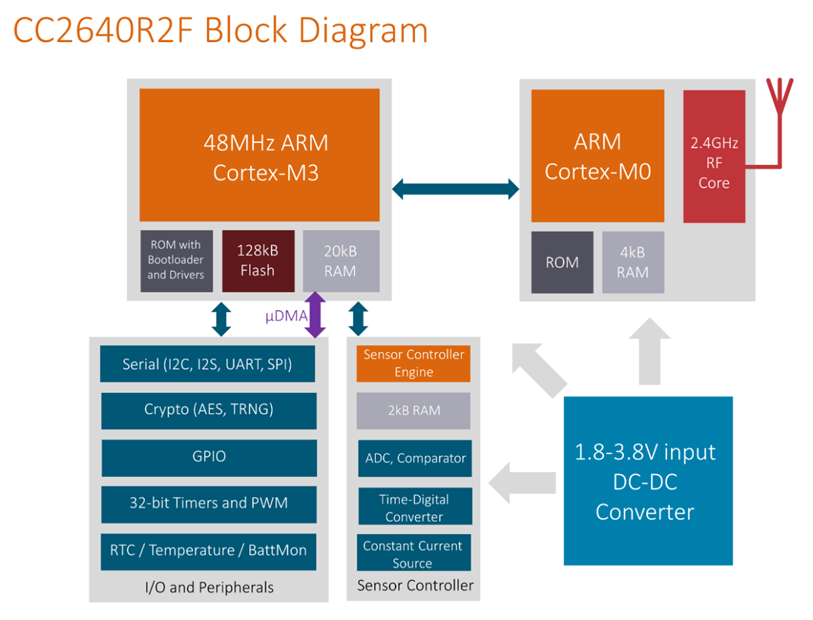
What is the CC2640R2F?
The CC2640R2F is the microcontroller that is used on the CC2640R2 LaunchPad. Internally it actually has more than one core. The main core is a powerful ARM Cortex-M3, but there is a separate Cortex-M0 that is dedicated to handling the radio tasks. Finally there is also a Sensor Controller Engine that can perform certain input-related tasks while the rest of the device is asleep! It allows for extremely low power consumption.
Getting to Know the CC2640R2 LaunchPad
The Texas Instrument LaunchPad boards and ‘BoosterPack’ boards form an ecosystem of interchangeable microcontroller boards (these are the LaunchPad boards) and add-on boards (the BoosterPacks). It is a similar concept to Arduino boards and shields for instance. This TI system relies on two 20-way header pin blocks for connections, and often the BoosterPack boards are stackable too. Templates are available to design custom BoosterPacks too, and I will probably use that to create the wireless chime hardware functionality (such as the speaker amplifier).
Another great thing about LaunchPads is that they contain an on-board debugger that allows for programming and debugging. The top half of the board contains the debugger, and the lower half has the CC2640R2 circuit. In theory the board could be chopped in half with some care, to reduce the size of it.
Unlike an Arduino, the LaunchPad boards often have a few buttons and LEDs already connected to some inputs/outputs, so that users can immediately begin coding and testing with some basic I/O capability. The LEDs can be isolated using on-board jumpers, if desired.
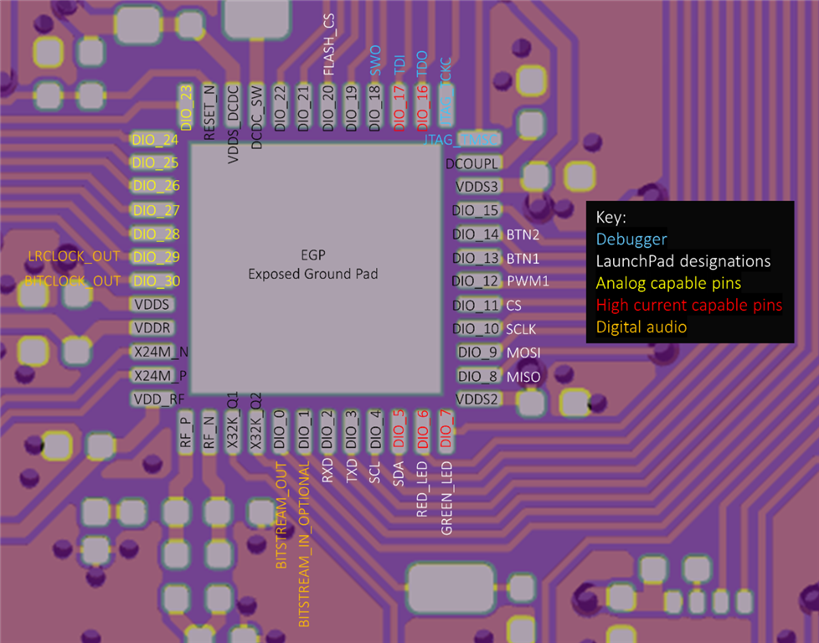
Pin Assignments
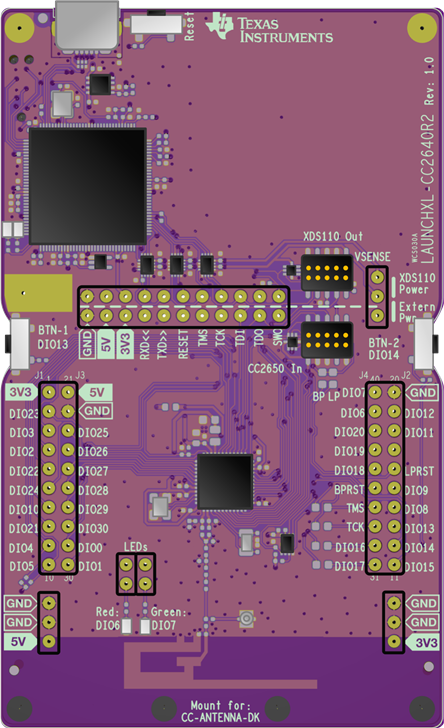
By exploring the CC2640R2 LaunchPad documentation and the CC2640R2 reference guide, it was possible to map out the pin assignments. There is a lot of flexibility; most of the input/output pins can be assigned arbitrarily to most functions. For the chime module, I may use the PWM capability to produce tones, but there is also the possibility to use the digital audio interface to produce high quality sounds. For that reason, the pins with the orange text will be assigned for digital audio. I chose these pins to be compatible with a TI audio BoosterPack in case I chose to use that during the coming weeks as the design comes together.
Making Enclosures with Autodesk Fusion
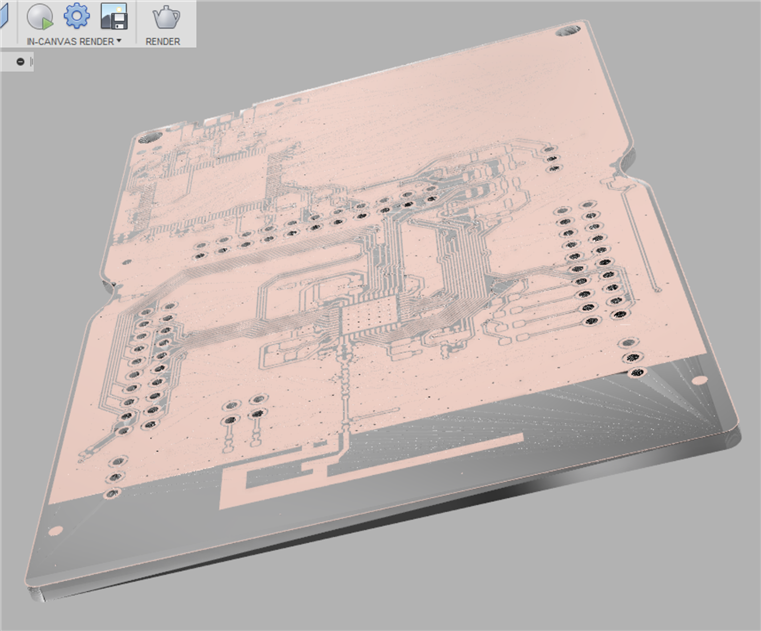
Texas Instruments provide a lot of information for their LaunchPad boards. This includes Gerber format files which define the PCB detail. It is possible to go from there into a 3D environment where an enclosure can be designed to fit the LaunchPad perfectly.
I’m not a 3D expert, but the process seemed feasible. The first part is to import the Gerber files into a viewer application. Viewmate from PentaLogix is low-cost and allows this. Next, you can export in STL format. This converts some of the information from the Gerber files into a 3D model. I used the file that contained the top copper and board outline. Using Autodesk Fusion, it was possible to import the STL file, and see all the precise data in the 3D CAD package.
For my project, I will most likely use an off-the-shelf enclosure for the chime unit. However, it is good to know that there is sufficient information to design and 3D print a custom enclosure for those who have such printers.
Also, for commercial designs, this exact same process could be used. The PCB designer can work with the enclosure designer and share the output from the PCB CAD tool, so that the enclosure can be accurately fitted, even for fancy curved outline PCBs and enclosures sometimes needed for consumer-friendly applications like chimes!
Top Comments