


Hello and welcome in my fourth blog post. Today I'm going to dive into computer vision, using OpenCV with Python on a Beagle Bone. OpenCV is a hugely popular, incredibly powerful and overwhelmingly complex computer vision library, used in dozens of open-source embedded Linux projects ranging from motion-activated photo traps to DIY pick-and-place machines. I want to use the library to provide the LED Animator with the ability to recognize the basic features of the LED lighting system (the physical layout, orientation of the strips etc). It will not be able to decipher complex shapes or curves, but will e.g. tell vertical strips from horizontal ones. This post is meant as an introduction to the concepts of OpenCV and computer vision in general, and will be followed by a description of my actual application in the next week's update.
Prepare your work environment
First, we need to get the required packages to use OpenCV within the BBW's Python environment. I had no luck using PIP to install the library, so I went the APT route instead:
sudo apt-get install python3-opencv
I'm also using a remote desktop server that comes onboard the Beagle, namely tightvnc, whose usage is as simple as:
tightvnc
On first launch you'll be asked to create a password, and then your VNC is up and running. I'm using xtightvncviewer to connect to the Beagle from my Ubuntu:
sudo apt-get install xtightvncviewer
xtightvncviewer YOUR.BBW.IP:1 &
For testing the image manipulation algorithms, we're also going to need some actual imagery. While browsing NASA public domain archives, I found a very nice image of space, with a horizontal strip of colored light going right through the middle:

This will be a nice, albeit a bit overly spectacular, substitute for my humble LED lighting system for a while. Let's see what we can get from it. Feel encouraged to use your own imagery, or at least a different pic from the Web - the real draw of computer vision is that you can process _anything_, and it's best experienced on data different from what your tutorial shows you.
First steps in OpenCV
One of the biggest questions that have always bothered me regarding computer vision is how are the different image processing methods and algorithms made to work together on images with different properties, and in particular how do we get the object recognition features to work with the overwhelming variety of real-world input. I could never imagine the methods for connecting the basic building blocks, which I assumed exist.
Turns out, there is a reason for all the OpenCV tutorials I found to start with an intro to image processing techniques - the visual information has to be filtered and simplified as much as possible to enable actual work on the images' contents. All maths in OpenCV is performed on image data as arrays of numbers - for color images with no transparency, that is three 8-bit numbers per pixel. Computation is slow for such amounts of data, so a wealth of methods is utilized to simplify the numbers before the actual analysis. Grayscale is much easier to work with than full-colour, and 1-bit colour space (100% black or 100% white) is usually even better. The 1-bit images don't have to be direct products of amplifying the light areas into whites and dark areas into blacks - colour filters may be applied beforehand, i.e. to find a solid blob of red in the image. A common robotics project I've seen in a few places is a drone following a red ball, as it's a relatively easy object to find in a camera feed. One way to do it goes like this:
1. Input the camera feed's frames to OpenCV to analyse one by one
2. Perform colour filtering - only the red pixels are left and we're working with 1-bit data
3. Elliminate all small, thin, non-solid etc. shapes. They're not interesting as we're looking for a big ball
4. Use one of OpenCV's algorithms to find circular shapes.
5. Retrieve the coordinates of the biggest one for the drone's orientation algorithms.
As you can see, we're mostly trying to make things easier for algorithms by giving them simpler maths to crunch. Only this way can we get real-time video analysis on a low-power Linux computer like a RPi or a BBW.
Enough talk, let's go and make something in Python. The first feature of OpenCV we're going to try is called thresholding, and is probably the simplest method of removing excess visual i nformation from the input image. The idea is to compare each pixel against the titular threshold, changing the pixels above it to pure white and all others to pure black. It is extremely useful as one of the steps of image transformation before the actual analysis.
#import the OpenCV module
import cv2

#read the image file
image = cv2.imread('nasa.jpg')

#convert the image to grayscale
gray = cv2.cvtColor(image, cv2.COLOR_BGR2GRAY)

#perform the actual thresholding
ret, thres = cv2.threshold(gray, 127, 255, cv2.THRESH_BINARY)

#show the original image, the BW version and the post-thresholding version
cv2.imshow('colour', image)
cv2.imshow('grayscale', gray)
cv2.imshow('threshold', thres)

#kill the windows if any key is pressed
cv2.waitKey(0)
cv2.destroyAllWindows()
The code is commented, but worth some further explanation. At the very beginning, our test image is read into an object - an array which you can actually print() to get a flood of numbers describing each pixel. Any processing of the image will create a new object for us to work on - we usually don't care about the actual numbers but it's good to know. Like in most OpenCV applications, image transformation has multiple stages - in this case we use two. First comes the cvtColor() method with the cv2.COLOR_BGR2GRAY parameter, used to turn the image to grayscale - a very common approach as it significantly reduces the amount of computation required further down the line when we don't need the actual colour information. The threshold() method comes next, and it takes the following arguments: source image, threshold value, value to give to the pixel when above the threshold, and the thresholding method - there are plenty to choose from but THRESH_BINARY works for us. The "ret" value that is the first returned value is not interesting to us at the moment, and we put our processed pixels into the "thres" object. Finally, we print the images to screen on the BBW. Here we are with our first processed images:

Not a lot, but definitely a good start. We have the interesting feature (the strip of bright light) partially highlighted and in the next few step we'll be trying to improve on it. At this point it's worth noting that OpenCV accepts video clips and feeds (camera input, screen capture etc.) just as well as static imagery, converting all video to individual frames. I'm not using this in my project so I haven't travelled down that avenue, but here's a link to the docs that explains how to use this.
Instead of turning the image to grayscale and then thresholding, we can try colour filtering to bridge the gap in the strip of light:
hsv = cv2.cvtColor(image, cv2.COLOR_BGR2HSV)
filter = cv2.inRange(hsv, np.array([70,40,150]), np.array([140,255,255]))
cv2.imshow('colour filter',filter)
The above lines should be inserted below line 11 in the code sample, and numpy module importation must be added on top:
import numpy as np
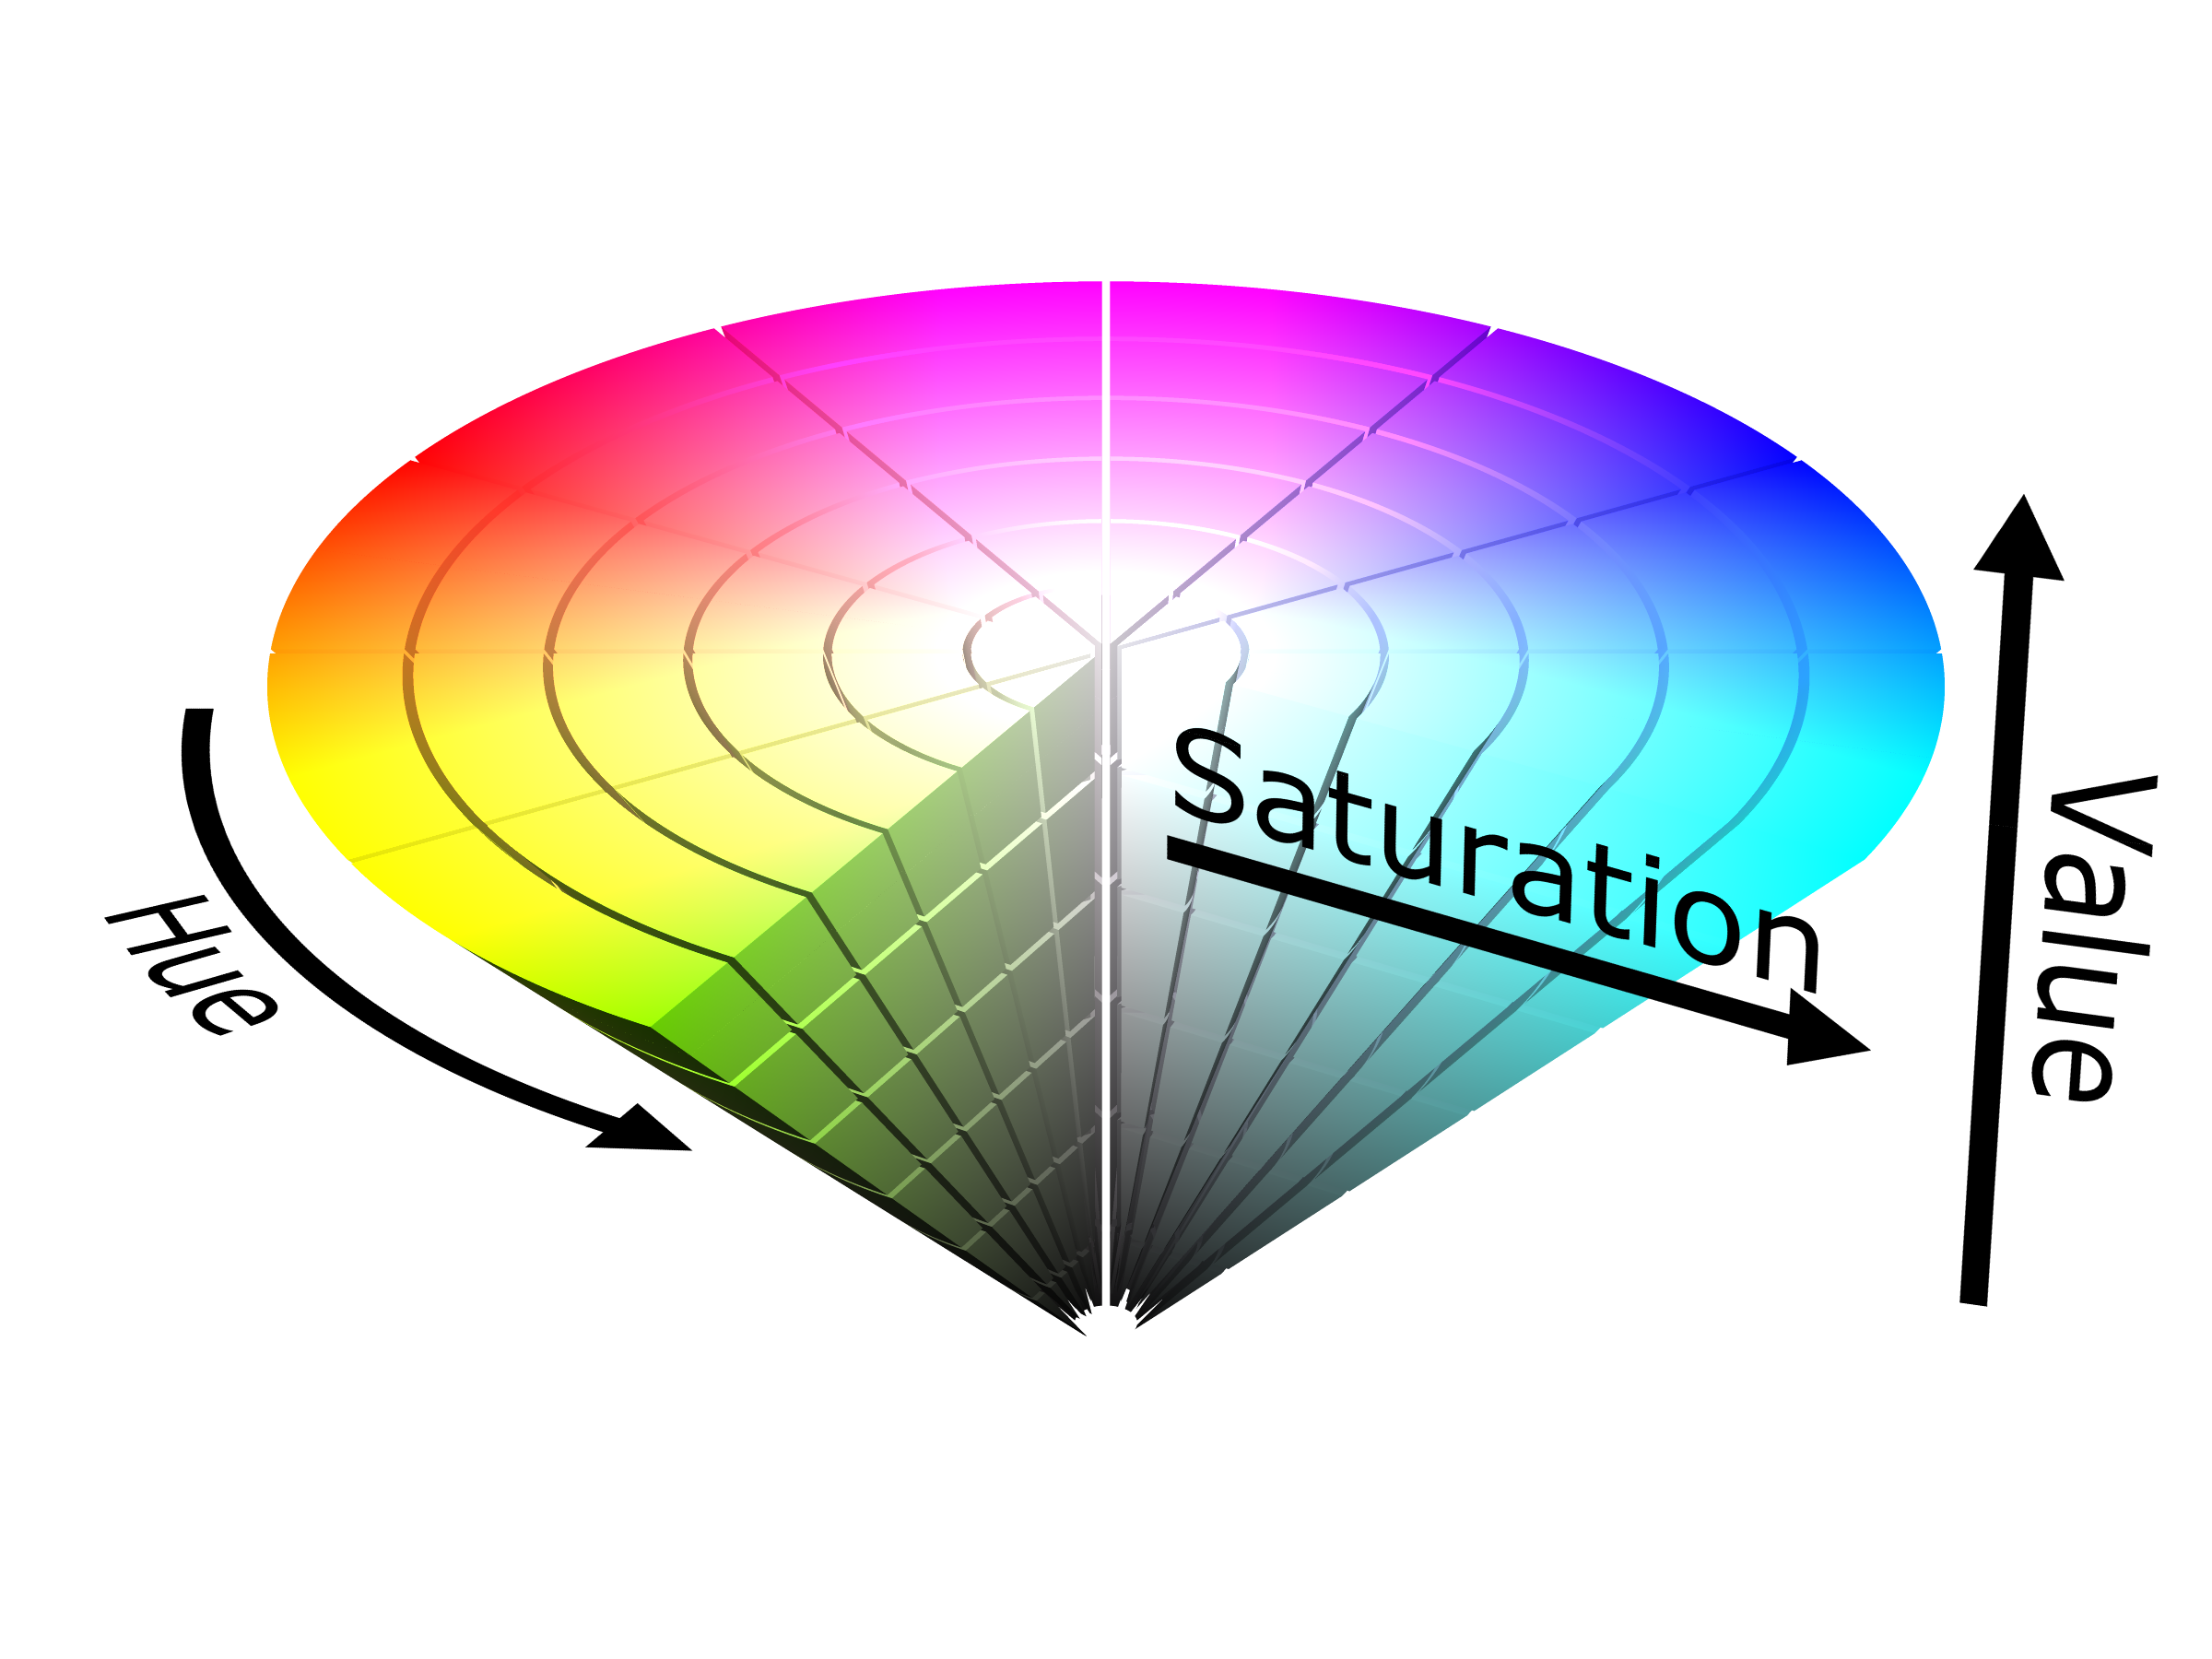
What happens here is basically a range of colours gets selected thanks to the magic of the HSV colour space. The parameters of the inRange() method are the image converted to HSV and two arrays representing HSV colours. HSV is far better for colour filtering than RGB, as it approaches colours like humans do - taking into account its Hue (actual colour), Saturation (between dull grays and rich colours) and Value (dark-light), which allows us to select a colour range based on these criteria rather than a sum of its colour coefficients, which may seem difficult to grasp at first as most of us are more familiar with RGB, but a quick look at the HSV cone should make it all clearer:
More and more algorithms
Back to our image manipulation. The result of filtering out all non-blue colour is a much thicker, but more importantly, also a longer line:

It's still far from satisfactory though. Part of the fun in OpenCV is being able to juggle the algorithms until the images begin to make sense - we can and should play with different morphing methods and their parameters, and there is an abundance to choose from. Here's our image after I used the Closing algorithm to literally close the gaps in the white shape and performed two iterations of Erosion to make the blob thinner:

The code used to create this effect is as follows:
#create a kernel for Closing and Erosion - an 8x8 matrix that will be used to 'scan' our image  for holes and edges
kernel = np.ones((8,8),np.uint8)
#apply both algorithms sequentially
closing = cv2.morphologyEx(filter, cv2.MORPH_CLOSE, kernel)
erosion = cv2.erode(closing,kernel,iterations = 2)
Better still, we can try to skeletonize the above image, getting an almost-perfect line:

The code is getting complex when we add the skeletonization code to all else:
size = np.size(erosion)
skel = np.zeros(erosion.shape,np.uint8)

element = cv2.getStructuringElement(cv2.MORPH_CROSS,(3,3))
done = False

while( not done):
    eroded = cv2.erode(erosion,element)
    temp = cv2.dilate(eroded,element)
    temp = cv2.subtract(erosion,temp)
    skel = cv2.bitwise_or(skel,temp)
    erosion = eroded.copy()

    zeros = size - cv2.countNonZero(erosion)
    if zeros==size:
        done = True

cv2.imshow('skel',skel)
And finally after one more iteration of Closing we try the nitty-gritty - Hough Lines Probabilistic Transform - to map our line:

The code used to generate the above looks like this:
#perform one more iteration of Closing
closing = cv2.morphologyEx(skel, cv2.MORPH_CLOSE, kernel)

#use Probabilistic Hough Line Transform - with those very 'tolerant' settings, it actually just maps points and short lines in the image
HoughThres = 0
minLineLength = 1
maxLineGap = 1
lines = cv2.HoughLinesP(closing,1,np.pi/180,HoughThres,minLineLength,maxLineGap)

#draw the lines and points onto our original image
for x in range(0, len(lines)):
    for x1,y1,x2,y2 in lines[x]:
        cv2.line(image,(x1,y1),(x2,y2),(0,0,255),5)

cv2.imshow('hough',image)
The line detection is almost perfect. Why almost? We'll explore the details in my next blog post, but the parameters of the Hough Transform were chosen by trial and error, and what we got here is actually a crowd of points and very short lines, which I could use but I'd rather have a single straight line.
Bonus
As an unrelated takeaway and a small teaser of OpenCV's capabilities, here's a super-quick Python script that overlays emoji on people's faces. It took 15 minutes to write (for somebody who's first used OpenCV two weeks ago), uses a Haar Cascade, which seems to be the easiest face detection method, and this StackOverflow thread helped solved alpha channel (transparency) problems. Check out the results and the code:

import numpy as np
import cv2

#cascade source https://raw.githubusercontent.com/opencv/opencv/master/data/haarcascades/haarcascade_frontalface_default.xml
face_cascade = cv2.CascadeClassifier('haarcascade_frontalface_default.xml')

img = cv2.imread('woman.png')
clown = cv2.imread('emoji.png')
gray = cv2.cvtColor(img, cv2.COLOR_BGR2GRAY)
faces = face_cascade.detectMultiScale(gray, 1.3, 5)

x_offset=faces[0][1]-10
y_offset=faces[0][2]

y1, y2 = y_offset, y_offset + clown.shape[0]
x1, x2 = x_offset, x_offset + clown.shape[1]

alpha_s = clown[:, :, 2] / 255.0
alpha_l = 1.0 - alpha_s

for c in range(0, 3):
    img[y1:y2, x1:x2, c] = (alpha_s * clown[:, :, c] +
                              alpha_l * img[y1:y2, x1:x2, c])

cv2.imshow('img',img)
cv2.waitKey(0)
cv2.destroyAllWindows()
My sources:
https://docs.opencv.org/3.4/d6/d00/tutorial_py_root.html
https://pythonprogramming.net/loading-images-python-opencv-tutorial/
Further reading:
Thresholding with OpenCV: https://docs.opencv.org/3.4/d7/d4d/tutorial_py_thresholding.html
Hough Line Transform: https://docs.opencv.org/2.4/doc/tutorials/imgproc/imgtrans/hough_lines/hough_lines.html
Top Comments