element14 Community
element14 Community
    Register Log In
  • Site
  • Search
  • Log In Register
  • About Us
  • Community Hub
    Community Hub
    • What's New on element14
    • Feedback and Support
    • Benefits of Membership
    • Personal Blogs
    • Members Area
    • Achievement Levels
  • Learn
    Learn
    • Ask an Expert
    • eBooks
    • element14 presents
    • Learning Center
    • Tech Spotlight
    • STEM Academy
    • Webinars, Training and Events
    • Learning Groups
  • Technologies
    Technologies
    • 3D Printing
    • FPGA
    • Industrial Automation
    • Internet of Things
    • Power & Energy
    • Sensors
    • Technology Groups
  • Challenges & Projects
    Challenges & Projects
    • Design Challenges
    • element14 presents Projects
    • Project14
    • Arduino Projects
    • Raspberry Pi Projects
    • Project Groups
  • Products
    Products
    • Arduino
    • Avnet Boards Community
    • Dev Tools
    • Manufacturers
    • Multicomp Pro
    • Product Groups
    • Raspberry Pi
    • RoadTests & Reviews
  • Store
    Store
    • Visit Your Store
    • Choose another store...
      • Europe
      •  Austria (German)
      •  Belgium (Dutch, French)
      •  Bulgaria (Bulgarian)
      •  Czech Republic (Czech)
      •  Denmark (Danish)
      •  Estonia (Estonian)
      •  Finland (Finnish)
      •  France (French)
      •  Germany (German)
      •  Hungary (Hungarian)
      •  Ireland
      •  Israel
      •  Italy (Italian)
      •  Latvia (Latvian)
      •  
      •  Lithuania (Lithuanian)
      •  Netherlands (Dutch)
      •  Norway (Norwegian)
      •  Poland (Polish)
      •  Portugal (Portuguese)
      •  Romania (Romanian)
      •  Russia (Russian)
      •  Slovakia (Slovak)
      •  Slovenia (Slovenian)
      •  Spain (Spanish)
      •  Sweden (Swedish)
      •  Switzerland(German, French)
      •  Turkey (Turkish)
      •  United Kingdom
      • Asia Pacific
      •  Australia
      •  China
      •  Hong Kong
      •  India
      •  Korea (Korean)
      •  Malaysia
      •  New Zealand
      •  Philippines
      •  Singapore
      •  Taiwan
      •  Thailand (Thai)
      • Americas
      •  Brazil (Portuguese)
      •  Canada
      •  Mexico (Spanish)
      •  United States
      Can't find the country/region you're looking for? Visit our export site or find a local distributor.
  • Translate
  • Profile
  • Settings
Design for a Cause - Design Challenge
  • Challenges & Projects
  • Design Challenges
  • Design for a Cause - Design Challenge
  • More
  • Cancel
Design for a Cause - Design Challenge
Blog Audio4Vision #6 - Initial prototyping with OV7670
  • Blog
  • Forum
  • Documents
  • Polls
  • Files
  • Events
  • Mentions
  • Sub-Groups
  • Tags
  • More
  • Cancel
  • New
  • Share
  • More
  • Cancel
Group Actions
  • Group RSS
  • More
  • Cancel
Engagement
  • Author Author: pranjalranjan299
  • Date Created: 30 Aug 2018 9:05 PM Date Created
  • Views 1296 views
  • Likes 4 likes
  • Comments 0 comments
Related
Recommended

Audio4Vision #6 - Initial prototyping with OV7670

pranjalranjan299
pranjalranjan299
30 Aug 2018

Welcome to our sixth blog post! Apologies for the delay in blogging, we were stuck with some logistics problem with the camera unable to be imported into India from its manufacturer. It took us a lot of time just to procure this camera and we have ordered a better and hopefully last camera for this project, which should arrive in a few days.


In this post, we will describe our experience with the OV7670 Arducam used with Arduino Uno to take pictures and save it to a computer's disk. This was more of an experiment which we tried out to see how well our model is capable of taking low-quality pictures and producing decent descriptions. The blog ends with our next step in the journey towards a better camera and compatibility with the MKR1000.


Let me begin by explaining what the OV7670 is and the reasons behind why we used it.


image


The OV7670 is a low voltage CMOS image sensor that provides the full functionality of a single chip VGA camera and image processor in a small footprint package. The OV7670 provides images in a variety of formats, controlled by the Serial Camera Control Bus (SCCB). More details about the sensor can be found on https://www.voti.nl/docs/OV7670.pdf


We have used the non FIFO camera here, so there is no buffer memory to store the pixel values taken in by the sensor. Therefore data is sent directly to storage bit by bit, so it takes longer to process an image than a camera with some memory would. The main reason to use this image sensor was that it costs just less than 5$ and can be used to quickly prototype the model on Arduino Uno to receive images on PC which is connected with the Uno. We do not intend to use this camera for the end product on the MKR, this was strictly for testing purposes to see how well our Deep Learning model does with images of low quality and black and white in color.


The pin diagram of the OV7670 connected with Arduino Uno is as follows -


Picture of Connecting the Pieces


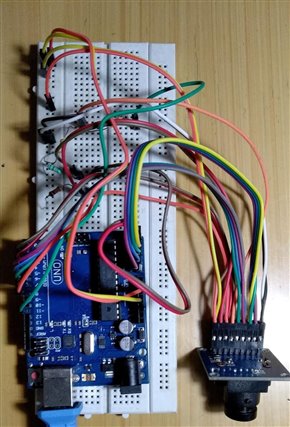
After making the correct connections, we came up with a circuit like this -

image

The procedure to get the images onto the PC's storage is a bit complicated but it has been described very well in the following instructable - https://www.instructables.com/id/OV7670-Without-FIFO-Very-Simple-Framecapture-With-/ . There is a java script which needs to be run in order to invoke the frame-grabber and it saves each frame in the folder C:/out -


image

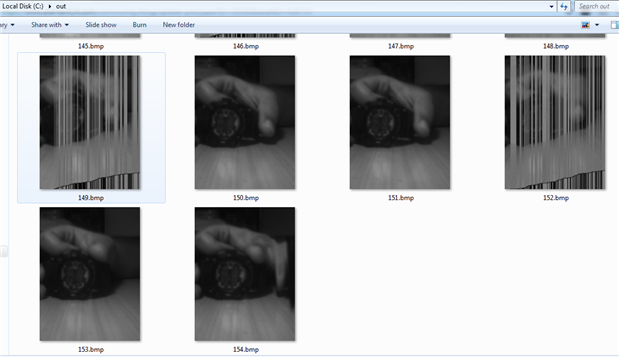
Since there is no FIFO memory with the image sensor, it takes about 6 seconds to grab every frame and save it to the above mentioned directory. The images are usually clear and undistorted but in case of movement of objects in the camera's perspective or the camera itself can cause some distortions in the images. Just to see how we our deep learning model does, we have taken a mix of images to infer the captions from them. The captured images along with their generated captions are displayed below -


image


The images despite being black and white and of size 240*320 pixels, are being captioned decently well by our DL model. Hence we are confident that with a better camera of 2 MP we will be able to generate captions for coloured images much more accurately. We have ordered the Arducam Mini 2 MP image sensor module, and it should be able to take pictures in plug and play for MKR1000. In the next blog we will be unboxing the OV2640 which is the Arducam mini 2MP, and a speaker for our text to audio output.


Thanks for reading this blog. The next one will be up soon!

  • Sign in to reply
element14 Community

element14 is the first online community specifically for engineers. Connect with your peers and get expert answers to your questions.

  • Members
  • Learn
  • Technologies
  • Challenges & Projects
  • Products
  • Store
  • About Us
  • Feedback & Support
  • FAQs
  • Terms of Use
  • Privacy Policy
  • Legal and Copyright Notices
  • Sitemap
  • Cookies

An Avnet Company © 2025 Premier Farnell Limited. All Rights Reserved.

Premier Farnell Ltd, registered in England and Wales (no 00876412), registered office: Farnell House, Forge Lane, Leeds LS12 2NE.

ICP 备案号 10220084.

Follow element14

  • X
  • Facebook
  • linkedin
  • YouTube