element14 Community
element14 Community
    Register Log In
  • Site
  • Search
  • Log In Register
  • Community Hub
    Community Hub
    • What's New on element14
    • Feedback and Support
    • Benefits of Membership
    • Personal Blogs
    • Members Area
    • Achievement Levels
  • Learn
    Learn
    • Ask an Expert
    • eBooks
    • element14 presents
    • Learning Center
    • Tech Spotlight
    • STEM Academy
    • Webinars, Training and Events
    • Learning Groups
  • Technologies
    Technologies
    • 3D Printing
    • FPGA
    • Industrial Automation
    • Internet of Things
    • Power & Energy
    • Sensors
    • Technology Groups
  • Challenges & Projects
    Challenges & Projects
    • Design Challenges
    • element14 presents Projects
    • Project14
    • Arduino Projects
    • Raspberry Pi Projects
    • Project Groups
  • Products
    Products
    • Arduino
    • Avnet & Tria Boards Community
    • Dev Tools
    • Manufacturers
    • Multicomp Pro
    • Product Groups
    • Raspberry Pi
    • RoadTests & Reviews
  • About Us
  • Store
    Store
    • Visit Your Store
    • Choose another store...
      • Europe
      •  Austria (German)
      •  Belgium (Dutch, French)
      •  Bulgaria (Bulgarian)
      •  Czech Republic (Czech)
      •  Denmark (Danish)
      •  Estonia (Estonian)
      •  Finland (Finnish)
      •  France (French)
      •  Germany (German)
      •  Hungary (Hungarian)
      •  Ireland
      •  Israel
      •  Italy (Italian)
      •  Latvia (Latvian)
      •  
      •  Lithuania (Lithuanian)
      •  Netherlands (Dutch)
      •  Norway (Norwegian)
      •  Poland (Polish)
      •  Portugal (Portuguese)
      •  Romania (Romanian)
      •  Russia (Russian)
      •  Slovakia (Slovak)
      •  Slovenia (Slovenian)
      •  Spain (Spanish)
      •  Sweden (Swedish)
      •  Switzerland(German, French)
      •  Turkey (Turkish)
      •  United Kingdom
      • Asia Pacific
      •  Australia
      •  China
      •  Hong Kong
      •  India
      •  Korea (Korean)
      •  Malaysia
      •  New Zealand
      •  Philippines
      •  Singapore
      •  Taiwan
      •  Thailand (Thai)
      • Americas
      •  Brazil (Portuguese)
      •  Canada
      •  Mexico (Spanish)
      •  United States
      Can't find the country/region you're looking for? Visit our export site or find a local distributor.
  • Translate
  • Profile
  • Settings
Energy Harvesting Design Challenge
  • Challenges & Projects
  • Design Challenges
  • Energy Harvesting Design Challenge
  • More
  • Cancel
Energy Harvesting Design Challenge
Blog Carbon Monoxide Detector Power Consumption
  • Blog
  • Forum
  • Documents
  • Files
  • Mentions
  • Sub-Groups
  • Tags
  • More
  • Cancel
  • New
  • Share
  • More
  • Cancel
Group Actions
  • Group RSS
  • More
  • Cancel
Engagement
  • Author Author: gelmi
  • Date Created: 25 Apr 2013 6:22 PM Date Created
  • Views 2590 views
  • Likes 1 like
  • Comments 3 comments
  • low_power
  • heat
  • low_energy
  • thermal_energy
  • temperature
  • enery_efficiency
  • energy_harvesting
  • thermal
  • efm32
  • peltier
  • energy_micro
  • self_powered
  • kit
  • energy_saving
  • energy_harvesting_challenge
  • energy_harvesting_source
Related
Recommended

Carbon Monoxide Detector Power Consumption

gelmi
gelmi
25 Apr 2013

Prolog

I have measured the power consumption of this detector, that I got recently. Many of you have already checked the energyAware Profiler application from Simplicity Studio and know how to use it, but it is also possible to monitor the power consumption of any of your external applications with the STK, even if your external device does not run EFM32 chip. OK, so maybe not all external applications but the ones that can be power supplied from VMCU domain on STK. Also remember that the maximum measurable current with the AEM and Profiler is 50 mA. I hope this will be helpful to other roadtesters.

Initial Setup

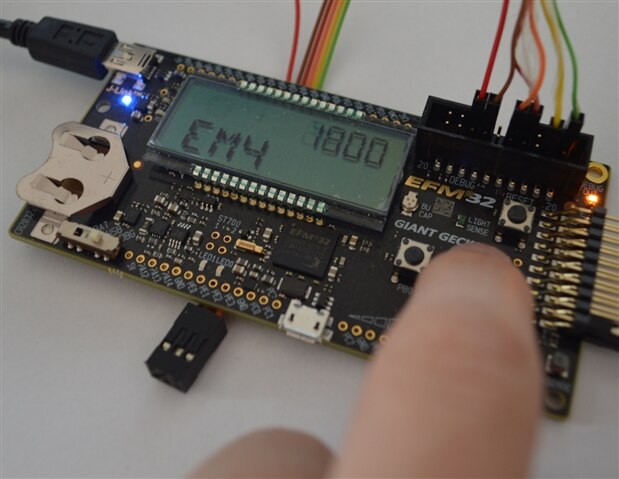
First you have to have your dev or STK board from Energy Micro and Simplicity Studio installed and updated. Since you will be plugging an external device to the VMCU domain pins and measure the power consumption, you need to minimize the current consumption of all components which are on the STK in the VMCU domain, in order to get the most reliable readings for your external device. The greatest VMCU’s current consumer is of course the EFM. So, you have to put it into the best energy saving mode – that is EM4. The quickest way to do that is to flash it with ‘emode demo’ file from Simplicity Studio. After it is programmed and you reset the chip, you will have 4 seconds to set the proper energy mode with user buttons – set the EM4 on the display and wait for the counter to go down from 4000 to 0000 ms. That is it. You are ready to go. You can check the current consumption with the Profiler – it should be on the level of noise, some nAs.


image

Measurements

I replaced the batteries in my detector with short cables from STK’s EXP port pins – GND (pin 1) and VMCU (pin 2).

image

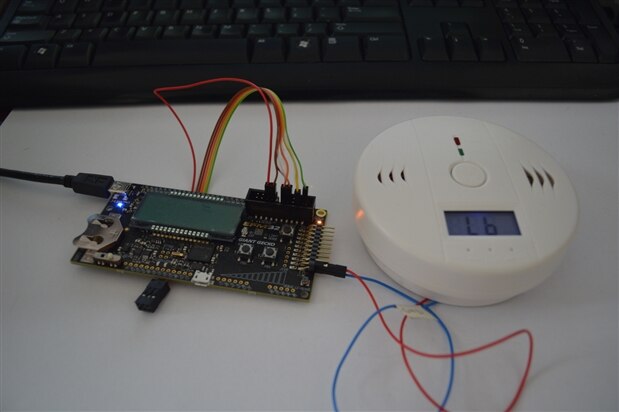
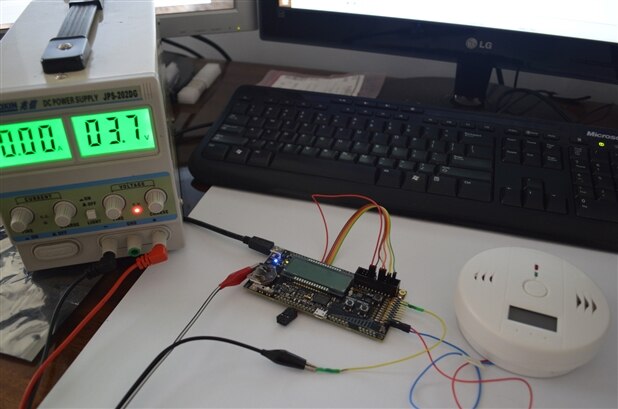
The device started and I saw the current consumption in Profiler … but there was one problem. On the detector’s LCD there was ‘Lb’ sign, meaning that the voltage is too low. I was a little bit surprised, because I had checked the detector with the laboratory power supply, by decreasing the supply voltage from 5 V to 3,2 V and everything was working great on 3,2 V level.

image

I realized that the detector can work with 3,3 V from VMCU but it cannot start from this voltage level. So, I have started to think how to omit this problem.

The solution was simple. There is the battery case on the STK and you can select the power source for VMCU with the switch. You can choose if it is battery case, USB or power from debugger (another USB). So, I had connected 3,7 V as the battery, started the detector and quickly changed the position of the switch to DBG to get 3,3 V from USB to the VMCU. Capacitors did the job and now I have the detector working from 3,3 V from VMCU and the Profiler is ready to monitor the power consumption.

The average current consumption is about 500 uA (@3,3 V). There is the periodic peak of current consumption once in the while, when the ‘Operation LED’ blinks. Of course, the power consumption is greater when I test the device, due to the blue backlight of the LCD, but this feature can be disabled … by pliers.


image

Epilog

I have checked that the program which is run on the EFM32 when testing the harvester (the one that displays temperature) is using about 2 mA (@3,3 V). That is 4 times more that my detector. In conclusion, I believe that with TEGs (not one, but 3-4 connected in series) I will be able to provide and store in a supercap enough energy to run this detector without batteries. Why more than one TEG? The difference between the wall temperature and the ambient temperature is much less that the difference between the ambient and hand temperature. Thus, I would need couple TEG connected in series to get the harvester started (it needs minimum of 20 mV) and to provide enough energy.

If you have some questions about my project or about monitoring the power consumption of your external application, please ask in the comments.

image

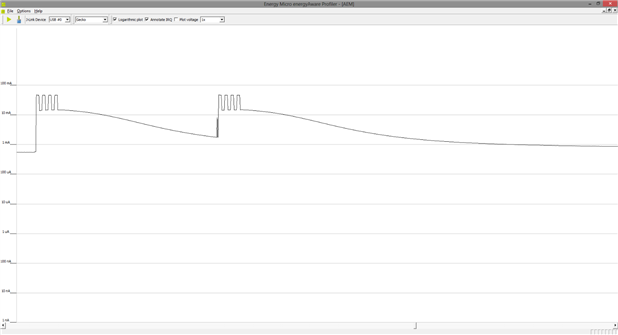
Profiler plot - just after the test button push.


image

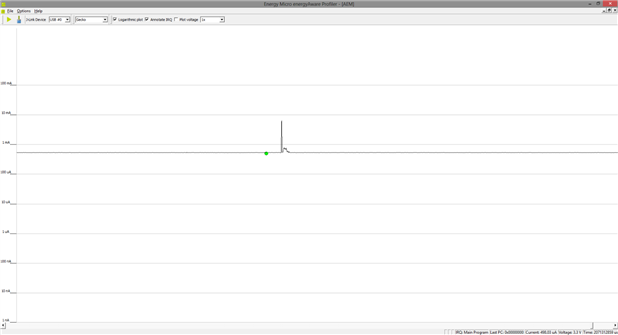
Profiler plot - continous work with current peak when the ‘Operation LED’ blinks.

  • Sign in to reply
  • Nate1616
    Nate1616 over 12 years ago in reply to gelmi

    Hey Wojciech

    First of all i would like to say i like to project idea.  I know one area in your home that would have objects with large temps would be if you have access to your mechanical room.  This would also be nice as most if not all of the carbon monoxide would be from this area since this is were the furnace, water heater, washer and dryer are typically.


    Nate

    • Cancel
    • Vote Up 0 Vote Down
    • Sign in to reply
    • More
    • Cancel
  • gelmi
    gelmi over 12 years ago in reply to vsluiter

    I agree. Board is a nice demo, but changing anything is really a pain. I haven't tried to use '4 to 20mA' with TEG yet. I have to unsolder the Peltier cables to do that. Still, I think I will need more than one module to compensate the power consumption for the detector. Most days of the next week in Poland are holiday days, but I will try to at least setup the device to measure temperature difference between the wall and ambient in couple of places at home - when I get this data (over long period of time) I will be able to access if my idea is doable with Peltier modules.

    • Cancel
    • Vote Up 0 Vote Down
    • Sign in to reply
    • More
    • Cancel
  • vsluiter
    vsluiter over 12 years ago

    Hello Wojciech,


    Have you also looked at getting using the '4 to 20mA' converter (LTC3105)? I've been trying it out for harvesting energy out of motion, and it works at a very low starting voltage. The datasheet also describes circuits with Peltier elements.

    For these reasons I think the board is indeed more a demo board than a development board; it would be nice to be able to swap the sources around, and have some jumpers to solder resistors to. Although you can see now how small the circuits can be, it is a bit daunting to patch the circuits.


    Good post by the way on using the development kit as a current measurement tool; hadn't thougt of that yet.

    • Cancel
    • Vote Up 0 Vote Down
    • Sign in to reply
    • More
    • Cancel
element14 Community

element14 is the first online community specifically for engineers. Connect with your peers and get expert answers to your questions.

  • Members
  • Learn
  • Technologies
  • Challenges & Projects
  • Products
  • Store
  • About Us
  • Feedback & Support
  • FAQs
  • Terms of Use
  • Privacy Policy
  • Legal and Copyright Notices
  • Sitemap
  • Cookies

An Avnet Company © 2025 Premier Farnell Limited. All Rights Reserved.

Premier Farnell Ltd, registered in England and Wales (no 00876412), registered office: Farnell House, Forge Lane, Leeds LS12 2NE.

ICP 备案号 10220084.

Follow element14

  • X
  • Facebook
  • linkedin
  • YouTube