


Table of Contents
Life finds a way
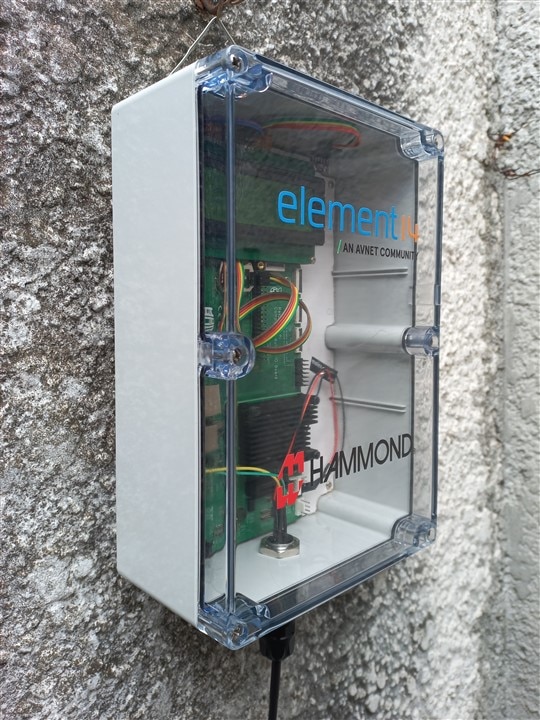
When I signed up for this challenge, I didn't think one of the conditions i should account for when testing the Hammond enclosure would be life growing either in it or on it, but both plants and animals made this enclosure their home:
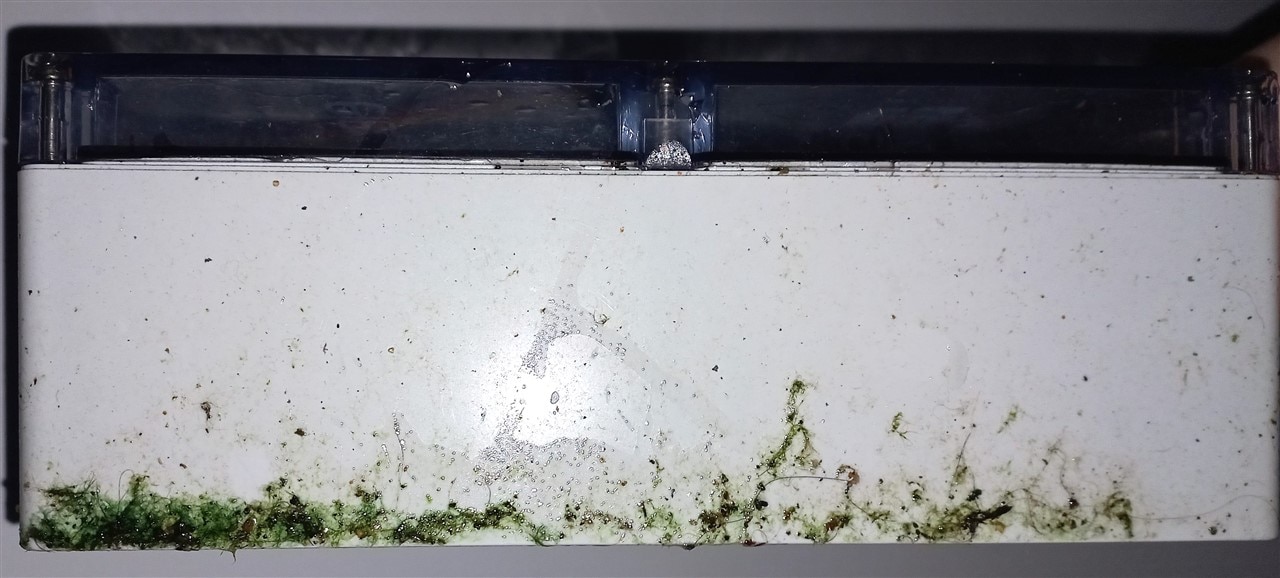
The enclosure spent almost a month continuously outside, exposed to direct sunlight and rain, on the sunny days, the sun shone on it for about 6 hours, and when it rained, there wasn't anything between it and the clouds to shield it from the water either. When I took it inside this week to complete this project, I found it as you see in the picture above, covered in algae on three sides, and when I took a closer look, I also saw some tiny little creatures living in the lip under the lid:
When I opened the enclosure, a very strong chemical-y smell hit me. That was unexpected, since the enclosure's datasheet mention it being UV stabilized. The smell was definitely plastic-y, but since there were other plastic things inside(cables, heatshrink tubing, pin header separators) I'm going to trust it wasn't the enclosure decomposing but one of those other things, since they don't have any UV rating that i could find.
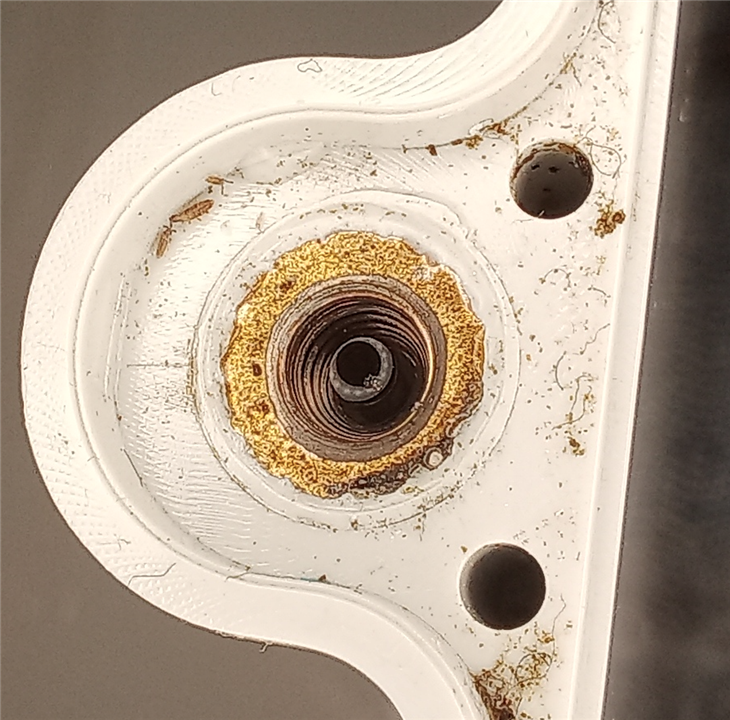
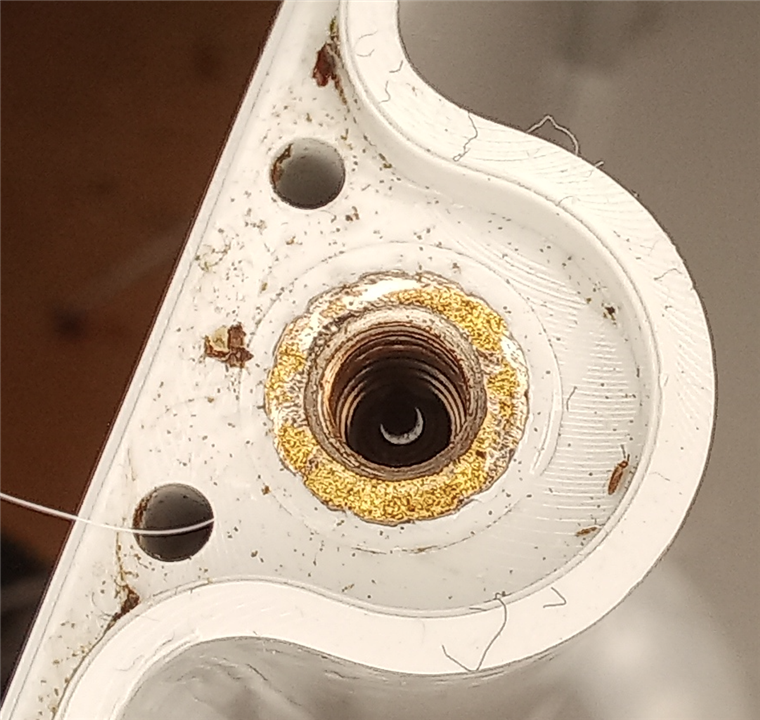
Another thing I found interesting was what happened to the stickers inside the enclosure:

It's clear the stickers were affected by the conditions the enclosure was subjected to, so let's take a look at what those conditions were:
Initial testing of the components
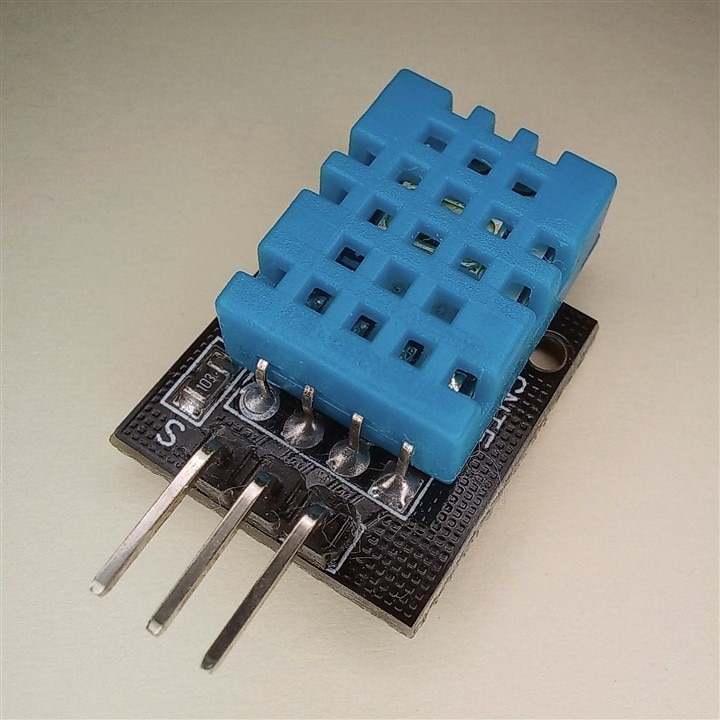
When I received the kit, I grabbed the only temperature sensor I had in my parts box, which was the DHT11:
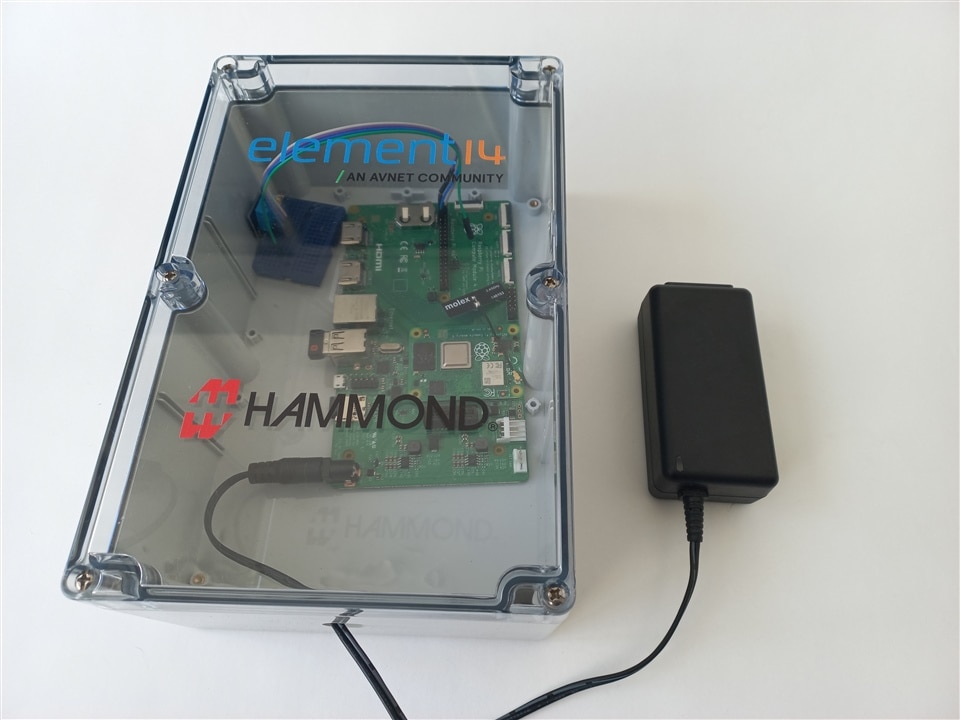
I used a breadboard and some jumper wires, grabbed a 12V power brick and placed everything in the enclosure like this:
I had prepared the SD card for the Pi with Raspberry Pi OS bookworm and Adafruit's DHT library. I found a very simple script to read the DHT11 from RandomNerdTutorials.com, and modified it so it would write the temperature, CPU temperature, and humidity to a text file like so:
# Complete Project Details: https://RandomNerdTutorials.com/raspberry-pi-dht11-dht22-python/
# Based on Adafruit_CircuitPython_DHT Library Example

import time
import board
import adafruit_dht
from gpiozero import CPUTemperature

# Sensor data pin is connected to GPIO 4
#sensor = adafruit_dht.DHT22(board.D4)
# Uncomment for DHT11
sensor = adafruit_dht.DHT11(board.D4)
filename = "day2-" + time.strftime('%H-%M-%S')+".txt"
file = open(filename, 'w')
file.write('Time, CPU Temp, Air Temp, Humidity\n')

while True:
    try:

        temperature_c = sensor.temperature
        humidity = sensor.humidity
        cpu = CPUTemperature()
        # Print the values to the serial port
        print("CPU Temp: ",cpu.temperature,"°C")
        print("Temp={0:0.1f}ºC, Humidity={1:0.1f}%".format(temperature_c, humidity))
        print("---------")
        file.write(time.strftime('%H:%M:%S')+','+str(cpu.temperature)+','+str(temperature_c)+','+str(humidity)+'\n')

    except RuntimeError as error:
        # Errors happen fairly often, DHT's are hard to read, just keep going
        print(error.args[0])
        time.sleep(2.0)
        continue
    except Exception as error:
        sensor.exit()
        raise error

    time.sleep(30.0)
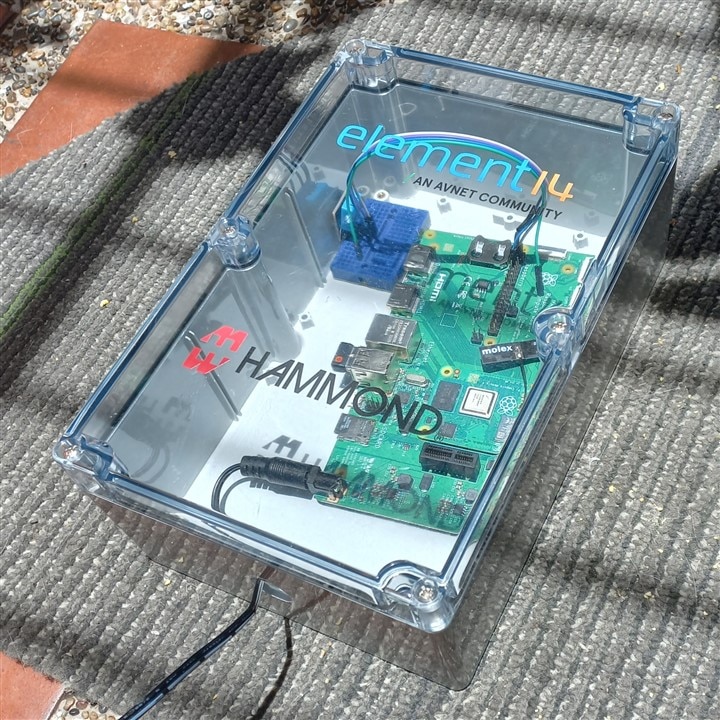
I then placed the whole thing in the sun, and let it bake for about half an hour:
and this was the result of that very quick test:
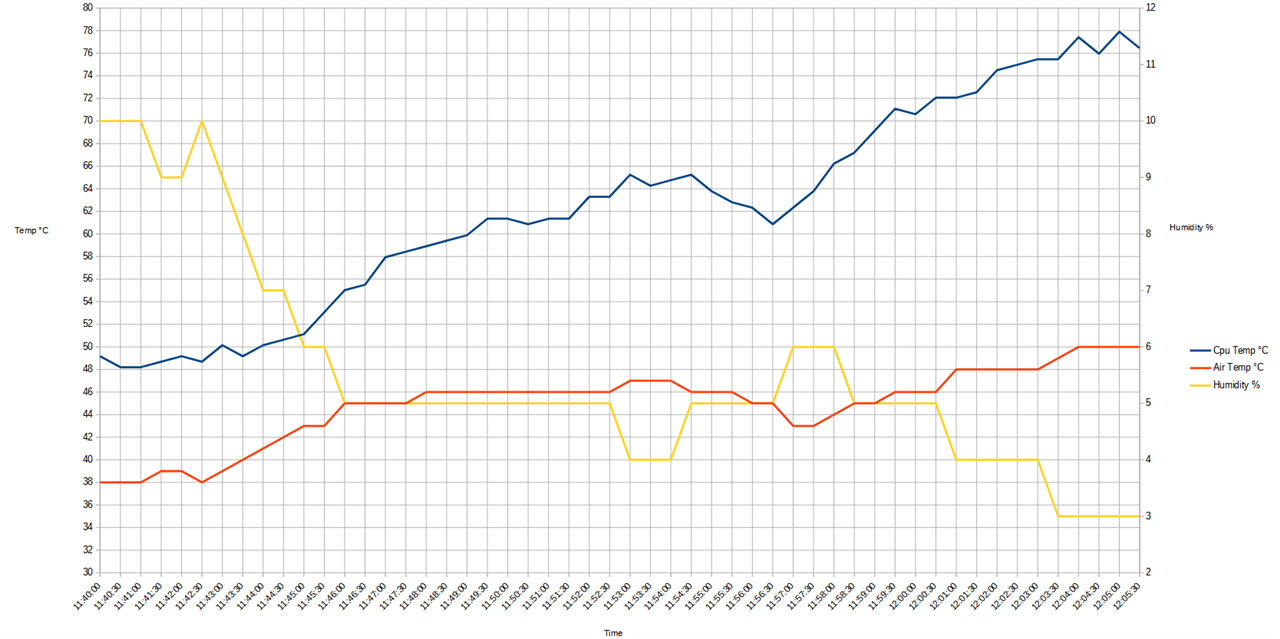
It became immediately apparent that if i wanted to run this setup 24/7 exposed to the elements, I would need a heatsink for the Pi. This test was also done with the hole for the connector open, so the lack of airflow once the connector was in place could get the inside temperature even higher. The humidity reading didn't feel right, as it was claiming about 10% before i put it in the sun, which is the same as the first data point in that graph, I live in a very humid environment, but had never measured humidity, so I just thought maybe my sense of humidity was off and went with this data. The temperature reading was right, which i confirmed with a multimeter and a thermocouple. the ambient temperature inside the house that day was about 32°C.
As I waited for the heatsink for the CM4 to arrive, I got different environmental sensors to test, a DHT20, a pair of BME280, a pair of BME680, a pair of HDC1080. My idea was to decide which pair of sensors to use, one to have inside the enclosure, and one outside. A few quick undocumented tests were conducted on the bench, where I used a TEC module to test the lower range of the temperature sensors, and my hot air station to test the upper range, compared to the readings from my multimeter with a thermocouple. I ended up going with the BME280 and BME680, both of them reading very close to each other, as close as the extra modules of the same model, and using the two different ones made for easy I2C handling. That the readings were close under the same conditions was important as I wanted to compare the temperature inside the enclosure with the temperature inside house.
A bit over a week had passed since the test with the DHT11, and now rainy season had started, with most days being cloudy and with lots of rain. To use the newly selected sensors it was time for...
The connector and cable build
Now that I wanted to compare outside with inside, and with the rains not stopping, I couldn't use just the PI chucked inside the enclosure with a hole open for water ingress, so I built the cable-connector assembly:
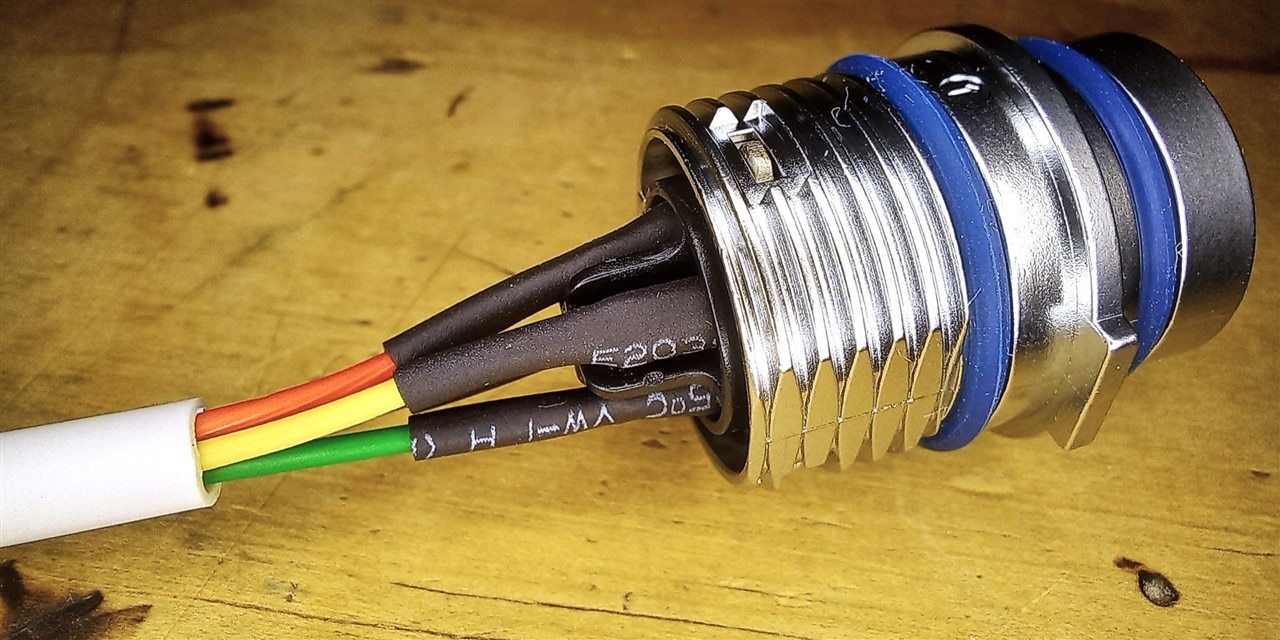
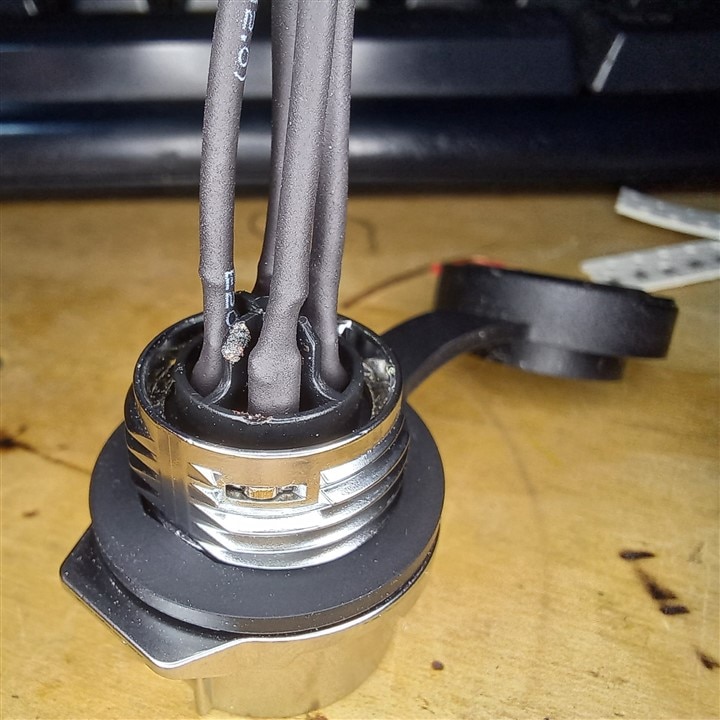
Bit of an oopsie on the panel mount connector with my clunky soldering iron, but functionally it's still ok.
So I put that together with the enclosure, added a BME680 inside it and took the whole thing outside, the Pi and the BME280 in a room near the patio:

New sensor data, a full day
With the new sensors attached to the Pi, I again took a premade script from Adafruit, as well as the adafruit libraries for the BME280 and 680, and the resulting script was this:
# Complete Project Details: https://RandomNerdTutorials.com/raspberry-pi-dht11-dht22-python/
# Based on Adafruit_CircuitPython_DHT Library Example

import time
import board
#import adafruit_dht
import adafruit_bme680
from adafruit_bme280 import basic as adafruit_bme280
from gpiozero import CPUTemperature
i2c = board.I2C()
sensor = adafruit_bme680.Adafruit_BME680_I2C(i2c)
bme280 = adafruit_bme280.Adafruit_BME280_I2C(i2c)
temperature_c = sensor.temperature
humidity = sensor.humidity
pressure = sensor.pressure
#out means outside the enclosure
temperature_out = bme280.temperature
humidity_out = bme280.relative_humidity
pressure_out = bme280.pressure
cpu = CPUTemperature()
print("ignore these:")
print("CPU Temp: ",cpu.temperature,"°C, Time: ",time.strftime('%H:%M:%S'))
print("Temp={0:0.1f}°C, Humidity={1:0.1f}%, Pressure={2:0.1f}hPa, Temp out={3:0.1f}°C,  Humidity out={4:0.1f}%, Pressure out={5:0.1f}hPa".format(temperature_c, humidity, pressure, temperature_out, humidity_out, pressure_out))
print("--------")
# Sensor data pin is connected to GPIO 4
#sensor = adafruit_dht.DHT22(board.D4)
# Uncomment for DHT11
#sensor2 = adafruit_dht.DHT11(board.D4)
#filename = "day2-" + time.strftime('%H-%M-%S')+".txt"
#file = open(filename, 'w')
#file.write('Time, CPU Temp, Air Temp, Humidity\n')
it=1
while True:
        # Print the values to the serial port
        #temperature_c = sensor.temperature
        #humidity = sensor.humidity
        #cpu = CPUTemperature()
        #print("CPU Temp: ",cpu.temperature,"°C")
        #print("Temp={0:0.1f}ºC, Humidity={1:0.1f}%".format(temperature_c, humidity))
        #print("---------")
        #file.write(time.strftime('%H:%M:%S')+','+str(cpu.temperature)+','+str(temperature_c)+','+str(humidity)+'\n')
        print("iteration: ",it,'\n')
        filename = "Full-Day-" + time.strftime('%m-%d-%H-%M-%S')+".txt"
        file = open(filename, 'w')
        file.write('Time, CPU Temp, Air Temp, Humidity, Pressure, Temp out, Humidity out, Pressure out\n')
        for count in range(180):
            temperature_c = sensor.temperature
            humidity = sensor.humidity
            pressure = sensor.pressure
            temperature_out = bme280.temperature
            humidity_out = bme280.relative_humidity
            pressure_out = bme280.pressure
            cpu = CPUTemperature()
            print("CPU Temp: ",cpu.temperature,"°C, Time: ",time.strftime('%H:%M:%S'))
            print("Temp in ={0:0.1f}°C, Humidity in ={1:0.1f}%, Pressure in ={2:0.1f}hPa".format(temperature_c, humidity, pressure))
            print("Temp out={0:0.1f}°C, Humidity out={1:0.1f}%, Pressure out={2:0.1f}hPa".format(temperature_out, humidity_out, pressure_out))
            print("--------")
            #filename = time.strftime('%m-%d-%H-%M-%S')+"txt"
            #file = open(filename, 'w')
            #file.write('Time, CPU Temp, Air Temp, Humidity\n')
            file.write(time.strftime('%H:%M:%S')+','+str(cpu.temperature)+','+str(temperature_c)+','+str(humidity)+','+str(pressure)+','+str(temperature_out)+','+str(humidity_out)+','+str(pressure_out)+'\n')
            #time.sleep(3.0)


            time.sleep(120.0)
        it = it+1
Software development is one of my big weaknesses. What I like about electronics, analog electronics in particular is how close hardware design is to the fundamental laws of the universe in the sense that what you're dealing with are very fundamental things like charges, moving charges around, dealing with electromagnetic fields with components that can be "easily" characterized by how they interact with charges and fields, where software development feels like dealing with black boxes all over. In the end, software running tickles the electromagnetic field, but there are too many layers of abstraction for my liking. All that to say that not understanding how any one line of code turns individual transistors on and off makes me want to stay away from writing software, and because of that, I wanted to leave the comments in the code I pasted above, to show how the script evolved from the DHT11 script to the BME280 one.
What that script does that is new is that it writes text files with 180 lines of data. I did this so that if at some point the Pi reset, I wouldn't lose an entire's day worth of data, which happened a few times during testing, and this solution was good enough for my purpose, and the fastest way to do it with what i know about programming.
I then started it at 00:00 one day in april and let it run until 23:58 and this is the result:
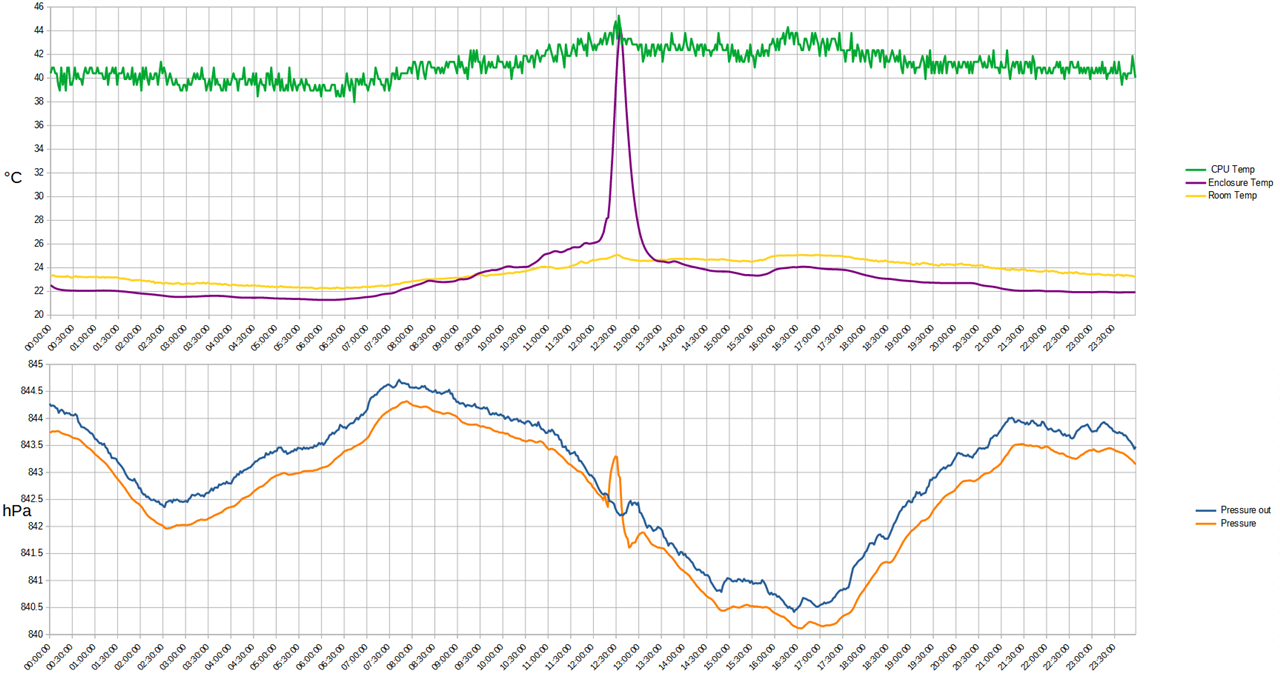
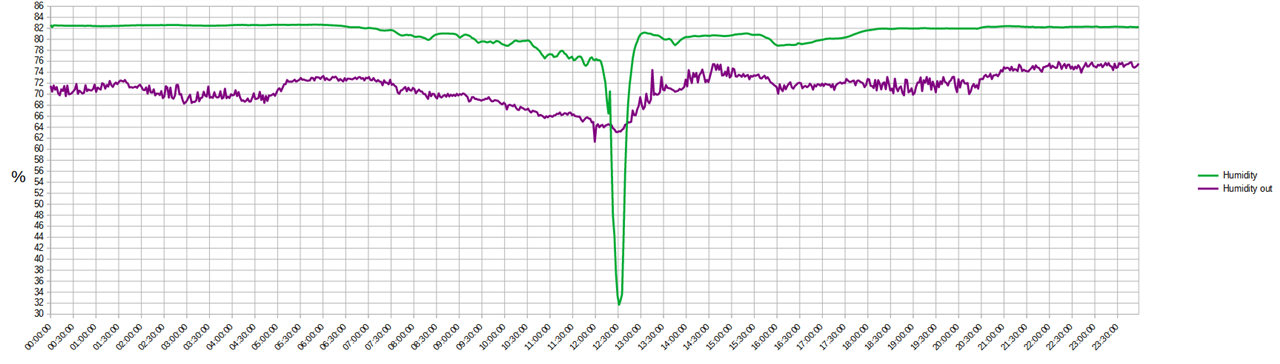
It was raining every day for a good portion of the day, but this particular one had a sunny morning. We can see temperature inside the enclosure was about a degree lower than the room's temperature at night, and the enclosure's temperature responded a lot quicker to the changes in temperature outside than the room's temperature did, which was to be expected, but it was interesting to see that actually being the case. Around noon there were no clouds in the sky at all and the enclosure received direct sunlight which brought the temperature inside to 44°C within minutes. As the enclosure was now sealed, it was quite interesting to observe the pressure increasing inside it as well. curiously, the pressure inside the enclosure was always lower than the local air pressure, except for that moment around noon, when obviously as the air inside the enclosure heated up, it expanded, and having nowhere to go... you know how pressure works.
Still waiting for the heatsink to arrive, I moved on to the next component in the kit,
Interfacing with the LCD
Around the time the kit arrived I was exploring the components' datasheets, and when it came to the LCD, I didn't know where to start from. I asked on the forum if anyone had any idea, and soon after javagoza commented with a link to his python lybrary for driving the display. It was very easy to use, and so I decided to use it for this project.
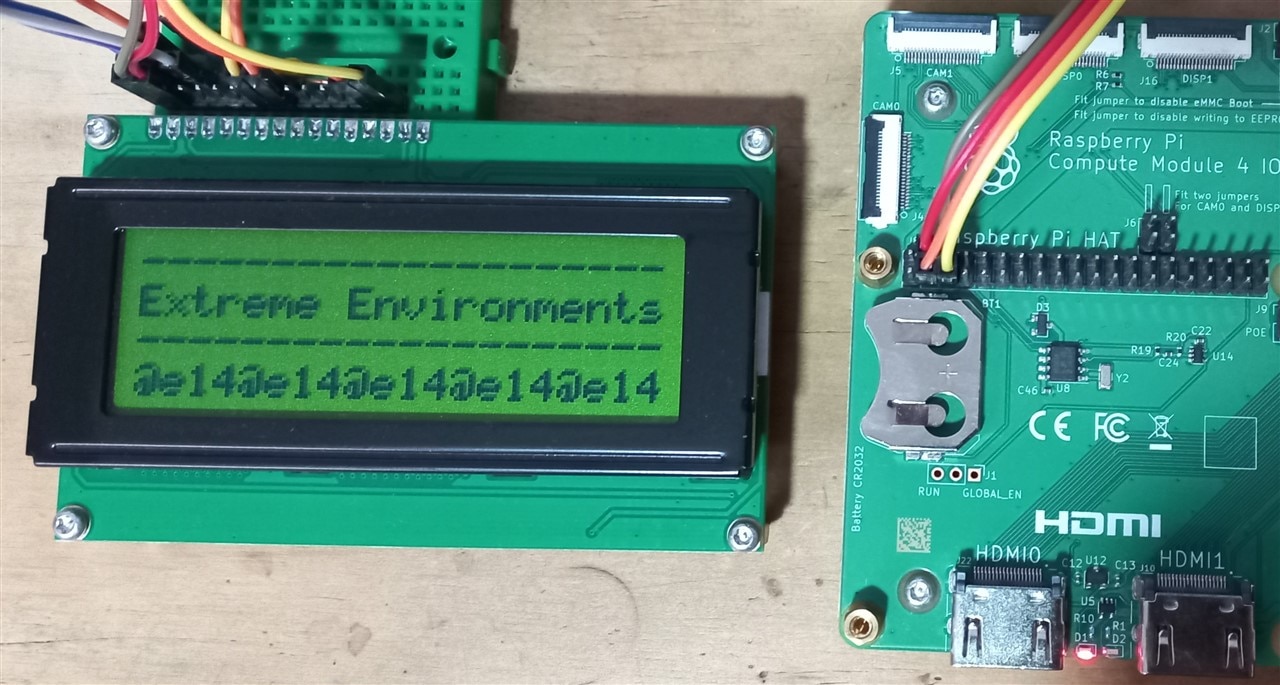
I tested it with javagoza's test script, and then I wrote a completely simplified test script to just display some static text:
import lcdrw1063 as LCD

display = LCD.Lcd()

display.lcd_display_string("--------------------", 1)
display.lcd_display_string("Extreme Environments", 2)
display.lcd_display_string("--------------------", 3)
display.lcd_display_string("@e14@e14@e14@e14@e14", 4)
Worked just as expected! so I went and added some lines to the previous sensor script:
import time
import board
import lcdrw1063 as LCD
import adafruit_bme680
from adafruit_bme280 import basic as adafruit_bme280
from gpiozero import CPUTemperature
display = LCD.Lcd()
i2c = board.I2C()
sensor = adafruit_bme680.Adafruit_BME680_I2C(i2c)
bme280 = adafruit_bme280.Adafruit_BME280_I2C(i2c)
temperature_c = sensor.temperature
humidity = sensor.humidity
pressure = sensor.pressure
temperature_out = bme280.temperature
humidity_out = bme280.relative_humidity
pressure_out = bme280.pressure
cpu = CPUTemperature()
print("ignore these:")
print("CPU Temp: ",cpu.temperature,"°C, Time: ",time.strftime('%H:%M:%S'))
print("Temp={0:0.1f}°C, Humidity={1:0.1f}%, Pressure={2:0.1f}hPa, Temp out={3:0.1f}°C, Humidity out={4:0.1f}%, Pressure out={5:0.1f}hPa".format(temperature_c, humidity, pressure, temperature_out, humidity_out, pressure_out))
print("--------")
display.lcd_display_string("--------------------", 1)
display.lcd_display_string("Extreme Environments", 2)
display.lcd_display_string("--------------------", 3)
display.lcd_display_string("@e14@e14@e14@e14@e14", 4)
time.sleep(3.0)
it=1
while True:
print("iteration: ",it,'\n')
filename = "Full-Day-" + time.strftime('%m-%d-%H-%M-%S')+".txt"
file = open(filename, 'w')
file.write('Time, CPU Temp, Air Temp, Humidity, Pressure, Temp out, Humidity out, Pressure out\n')
for count in range(180):
temperature_c = sensor.temperature
humidity = sensor.humidity
pressure = sensor.pressure
temperature_out = bme280.temperature
humidity_out = bme280.relative_humidity
pressure_out = bme280.pressure
cpu = CPUTemperature()
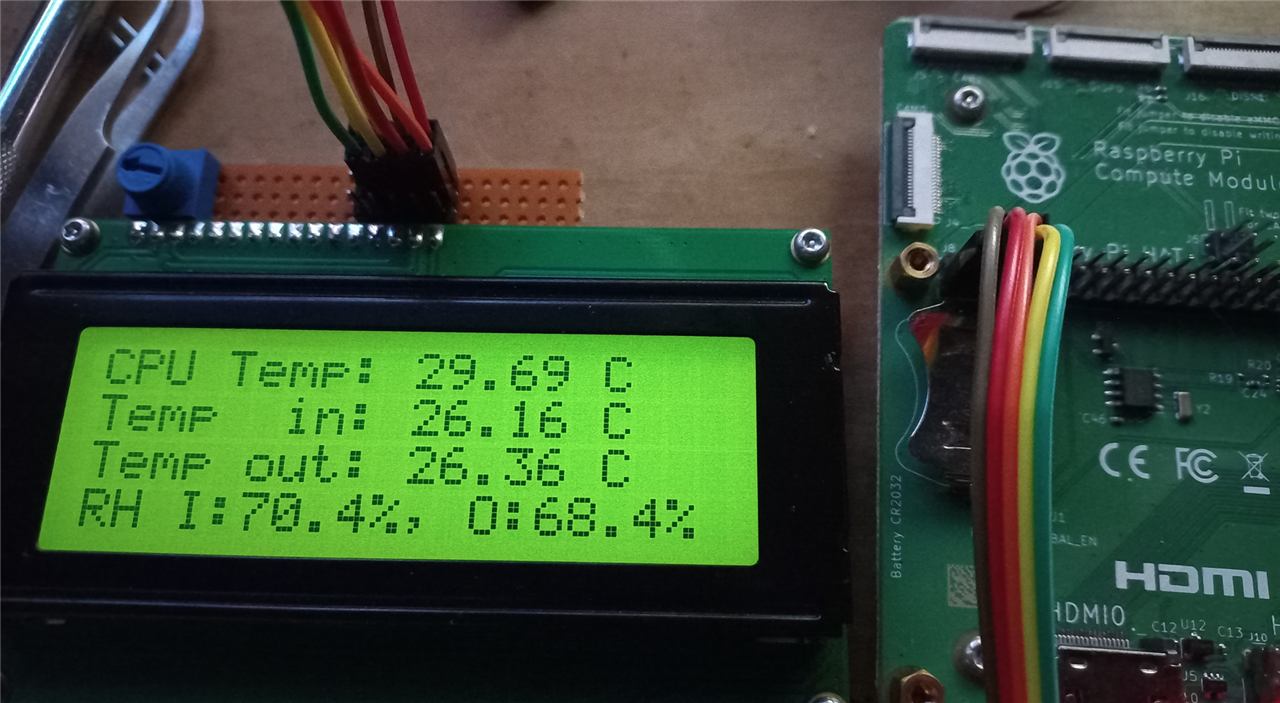
Disp1=("CPU Temp: "+str("%.2f" % cpu.temperature)+" C")
Disp2=("Temp in: "+str("%.2f" % temperature_c)+" C")
Disp3=("Temp out: "+str("%.2f" % temperature_out)+" C")
Disp4=("RH I:"+str(round(humidity, 1))+"%, O:"+str(round(humidity_out, 1))+"%")
print("CPU Temp: ",cpu.temperature,"°C, Time: ",time.strftime('%H:%M:%S'))
print("Temp in ={0:0.1f}°C, Humidity in ={1:0.1f}%, Pressure in ={2:0.1f}hPa".format(temperature_c, humidity, pressure))
print("Temp out={0:0.1f}°C, Humidity out={1:0.1f}%, Pressure out={2:0.1f}hPa".format(temperature_out, humidity_out, pressure_out))
print("--------")
display.lcd_clear()
display.lcd_display_string(Disp1, 1)
display.lcd_display_string(Disp2, 2)
display.lcd_display_string(Disp3, 3)
display.lcd_display_string(Disp4, 4)
file.write(time.strftime('%H:%M:%S')+','+str(cpu.temperature)+','+str(temperature_c)+','+str(humidity)+','+str(pressure)+','+str(temperature_out)+','+str(humidity_out)+','+str(pressure_out)+'\n')
time.sleep(120.0)
it = it+1
And here's how it looks like on the LCD:

Building time
Then I used a universal PCB to make it more pernanent, and also added a resistor for the backlight. I don't like super bright lights, so i used a 50 ohm resistor, and this is what it looks like in the dark:
It's not complete darkness, and you can see the backlit text clearly, so that's perfect.
I then went to print a template to cut a mounting "plate" out of thick cardboard:

But this looked a little bit too small, even if i used the dimensions provided in the datasheet, so i peeled the template off and placed it inside the enclosure to confirm, and unfortuantely it did end up being too small:
As this part was done today as the printing shops were about to close, I'm going to have to wait til tomorrow to get a new panel printed.
This was all I was able to do in the end, but I'm going to continue updating this post through the night with the rest of the build, and the media server portion of the project.
In the meantime, thanks to element14 and Hammond for this challenge!
A new day
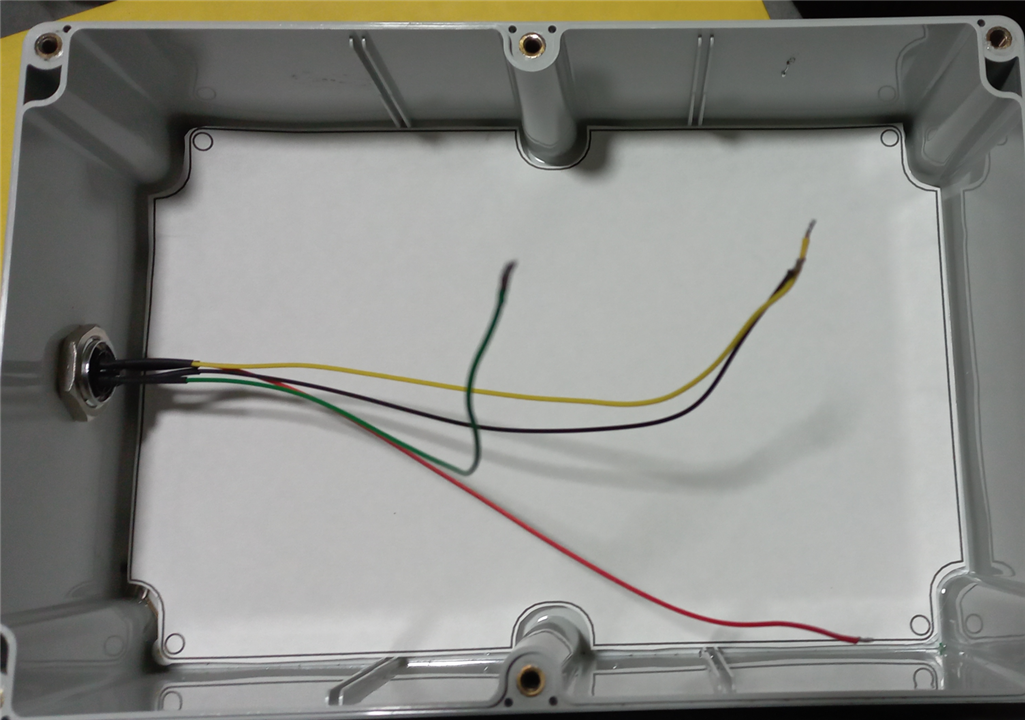
Continuing with the build, it was time to test the components inside the enclosure, now sealed, so I prepared this board which supplies the 3.3V to the BME680 sensor, 12V to the Pi through the enclosure connector, and the data from the BME680:
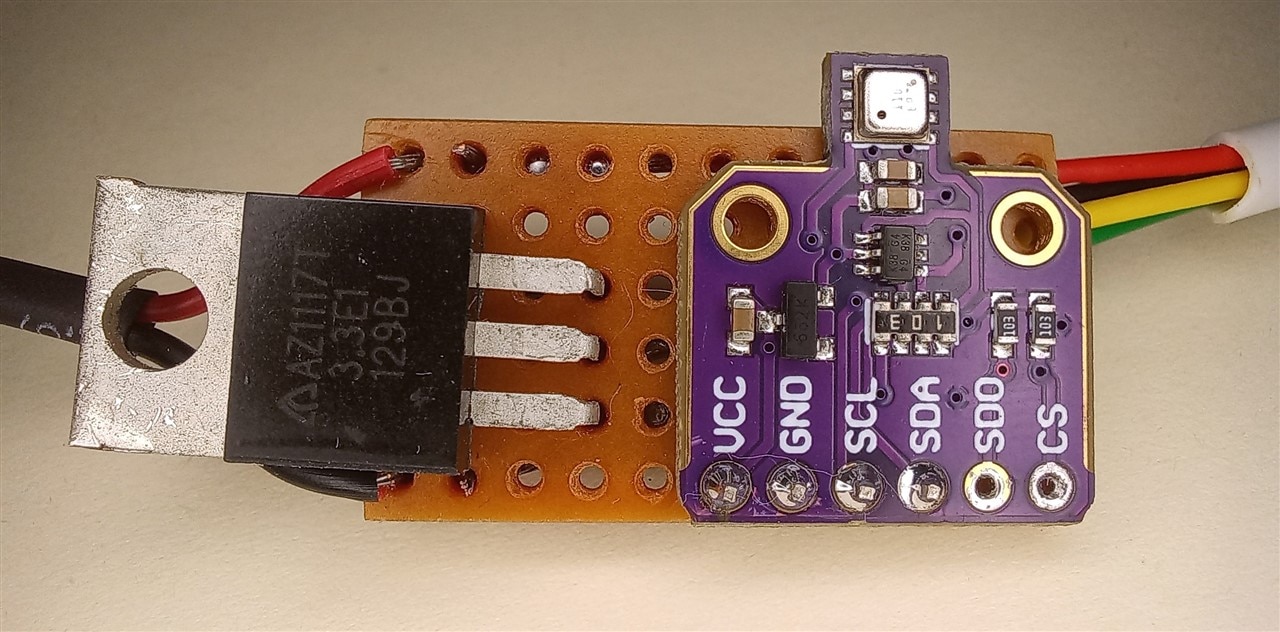
This of course will be on the outisde of the enclosure, and will be the environment temperature and humidity sensor.
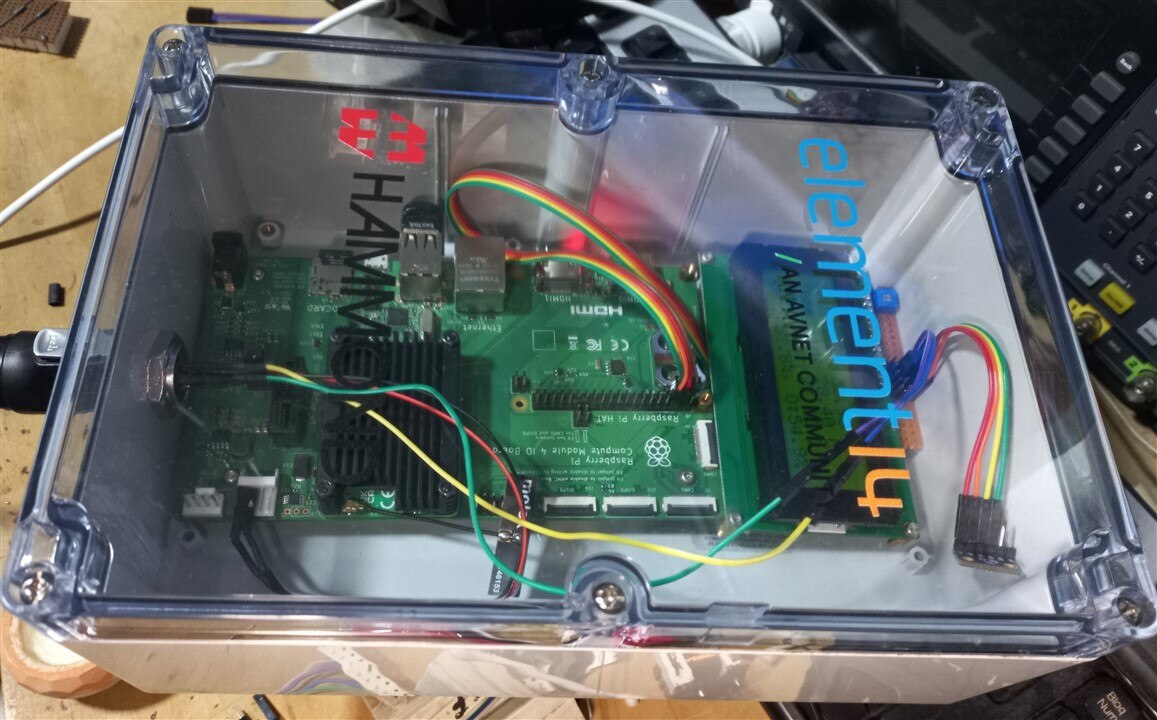
I then added connectors to the cables inside the enclosure, and put it together like this:
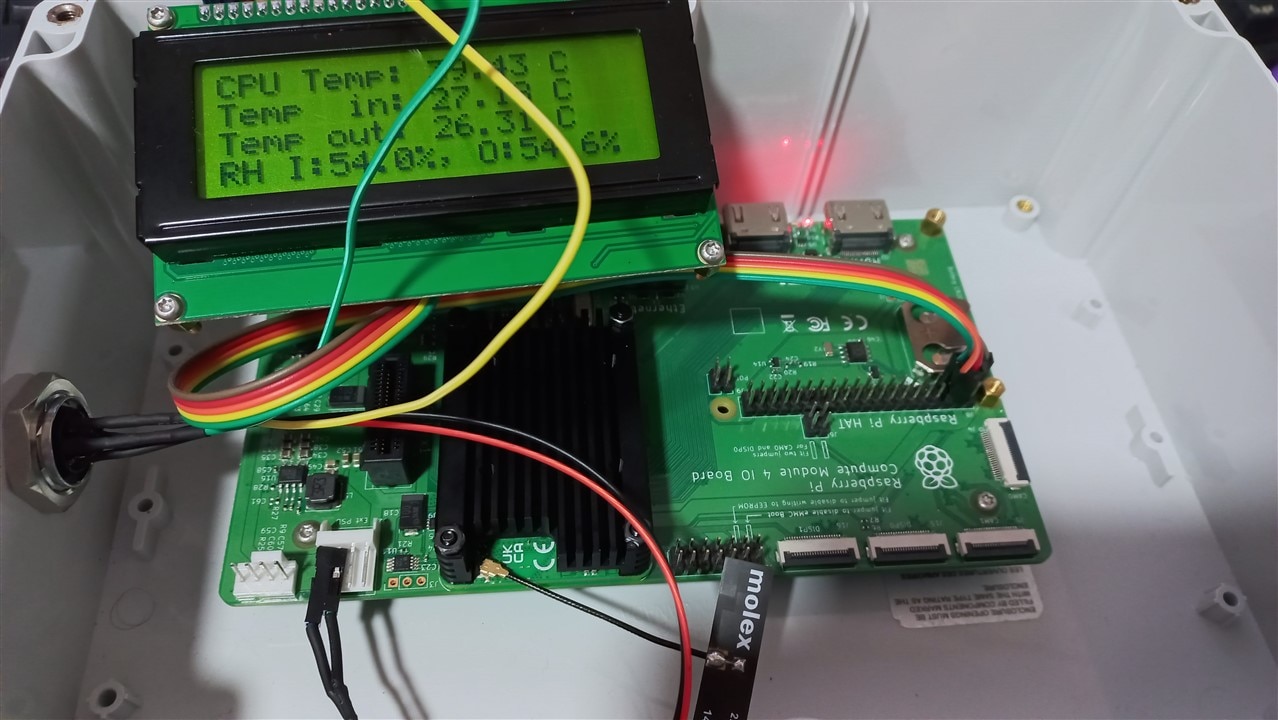
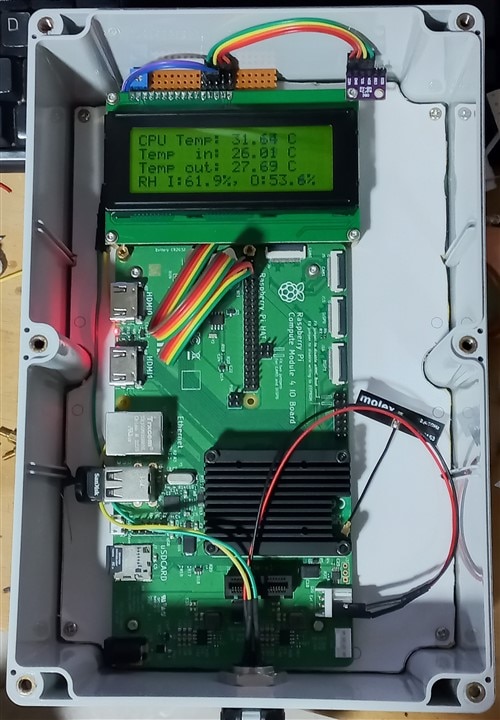
Upon verifying that everything was working fine, i placed the electronics inside the enclosure and screwed the lid on. Curiously, after doing this, the BME680 outside started reporting very different temperatures right away(It's the one labelled as "In" this time, I'll change the labels in software to match the location of the sensors). I have no idea why. I opened the enclosure and placed both sensors within centimeters of each other, and the BME680 kept reporting slightly higher temperature. I thought maybe it was the LDO, but if that was the case, it would have started reporting the higher temperatures before I placed the Pi inside the enclosure, as that circuit had been powered on for about an hour already, and the LDO doesn't feel hot enough to cause that 2-3 degree difference. Anyway, here's how I placed the electronics inside:
Another strange thing I noticed was the CPU temprature difference. It jumped up 10° from just being placed inside the enclosure, just placed in it, no lid on or anything. No idea what happened, as the power consumption remained the same, as one would expect.
Now I was able to get a template the right size, and I cut the cardboard, and mounted it inside the enclosure for a test fit. I don't know what happened but the pictures of the template and cardboard cutout are gone, so here's the final result inside the enclosure:
And here it is mounted on the patio wall:
finally, the
Media server, a simple implementation
Initially I wanted to set up a local network internet radio, with multiple stations, playing all my music constantly, each station being a genre or an artist, and I would just load up the stream and listen to it as if it was old school radio, no skipping, no choosing my own song, just whatever was playing at the moment on the network broadcast.
I couldn't find a simple way to do this fast, so I opted for the simplest media share I could think of: a samba share. I have vlc installed on my phone, so I can access the library, which is on the USB drive you may have noticed plugged into the Pi, and play my music as if it was on my phone.
First thing I did was install samba, nautilus and nautilus-share using the following commands:
sudo apt-get install samba

sudo apt-get install nautilus

sudo apt-get install nautilus-share
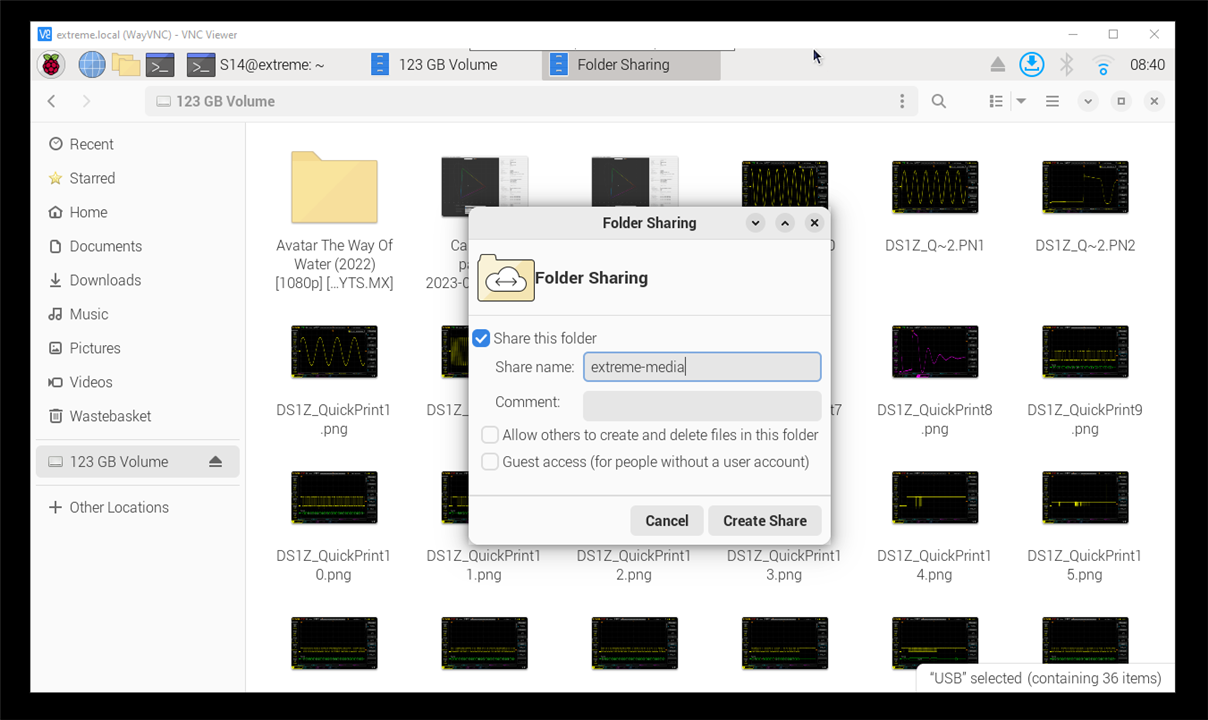
Then I opened nautilus, found the folder I wanted to share and created a share:
Then I assigned a password for the samba user:

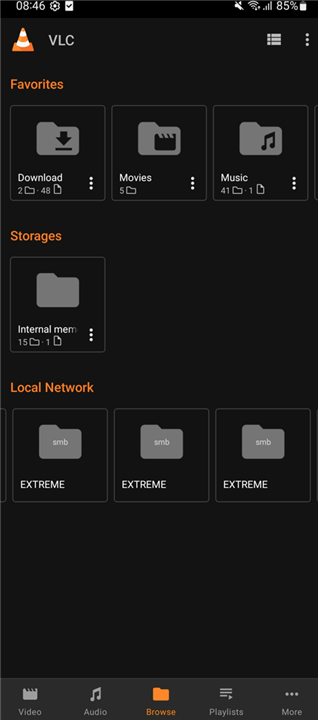
And then I verified on my phone that the share was visible:
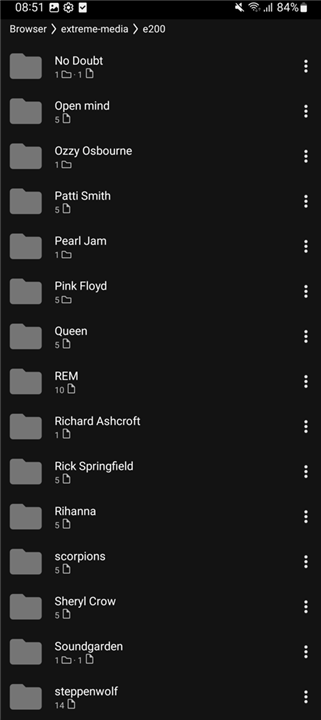
And that the content was accesible:
And that's it!
A very simple media share, which can be an anything share, but my usage of it is for music.
Now I can say that this is done.
Thanks again to element14 and Hammond for this challenge!
