Inspired by the recent E14 LabView RoadTest I have decided to test Octave (open source Matlab replacement) Arduino integration for capacitor measurement.
Having obtained LattePanda v.1 during previous design challenge, I have decided to use it for this project. Theoretically, it is ideal candidate as it has Arduino board integrated with Intel Atom based SBC.
It is some sort of trade-off of course - main board has limited performance (using low-powered Intel Atom CPU) and using integrated Arduino Leonardo board raises cost of possible damage: standalone Arduino can be cheaply replaced, but damage to the builtin Arduino is not easy to repair.
Considering this I have decided to use hybrid approach at first - using Panda with external Arduino Uno. This way, if something happens to the board during development, it can be easily replaced, with the option to use integrated Arduino Leonardo when design stabilizes.
From the state described in "Experimenting with Waterproof Connectors" I have upgraded installed Ubuntu Linux all the way to 22.04 LTS (long time support version), that has gone seamless until the last step: upgrade from 20.04 to 22.04, when - it seems - refusal of upgrade process to upgrade kernel version have made my SBC unbootable (kernel was not seeing proper initrd file and system was not starting). Booting from rescue media and manually installing current kernel have resolved the issue. There is still problem with local X11 login (introduced during first upgrade - from 16.04 to 18.04), but as I am doing X11 forwarding through ssh sessions (and not logging in into GUI using local terminal) it has low priority for now.
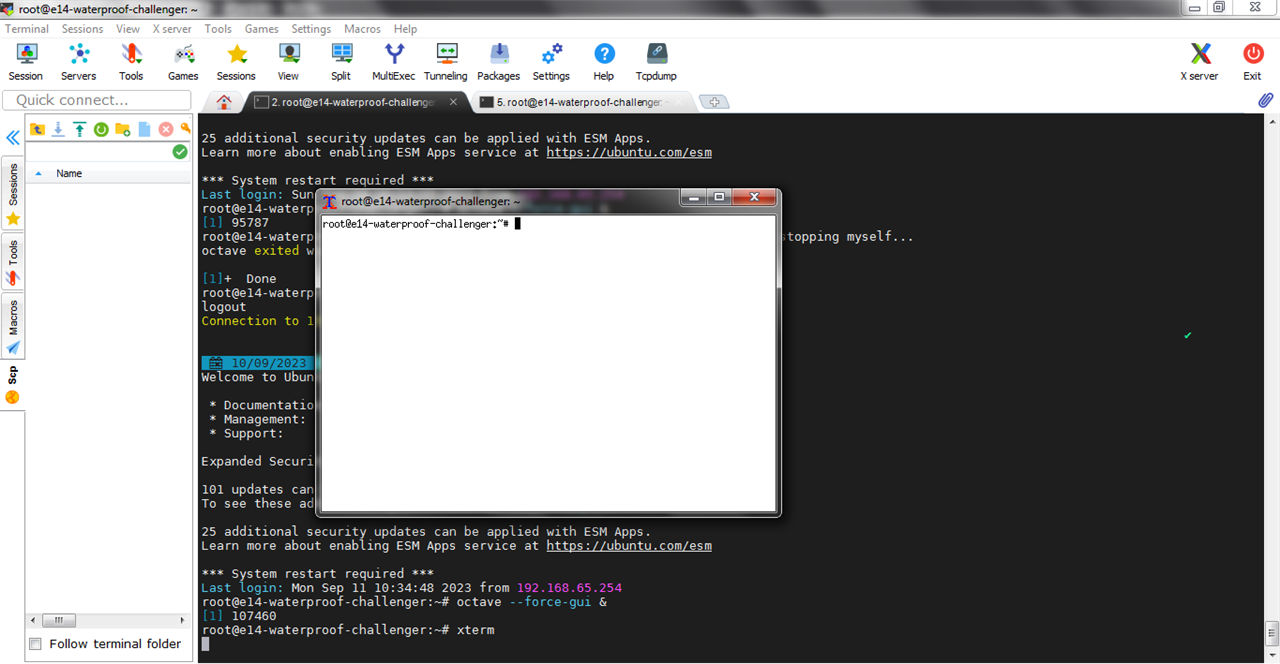
As X11 server for MS Windows I am using MobaXterm - I find it a much better choice to - for example - Cygwin: it is portable, standalone application, not installing all sort of stuff to the machine. Screenshot below shows X11 forwarding using mobaXterm - after connecting using SSH, GUI applications (in this example - xterm) can be directly executed and they are displayed in separate windows on local machine (no need to forward full desktop as in - for example - VNC).

To get Octave from official Ubuntu repositories one can issue following command (logging as root or execting sudo -s first to get access to the root shell):
#apt-get install octave octave-arduino octave-optim
This command installs Octave v. 6.4 - slightly dated but working better for my purpose than brand new 8.3 - that for some reason stops recognizing Arduino board after each script run, forcing manual reconnection on my MS Windows laptop.
Octave can be started in GUI mode (it defaults to the CLI when started without parameters in my setup) using following command:
#octave --force-gui&
Now it is time to prepare Arduino board for use by programming it with required code.
Full documentation of Arduino integration for Octave can be found at https://wiki.octave.org/Arduino_package
To flash Arduino board with correct firmware one can issue from inside Octave command prompt following command:
>>arduinosetup
which starts locally installed Arduino IDE with required stretch. One is supposed to select a connected (and supported by the software) Arduino board, then flash it, but first an additional library needs to be installed (compilation will fail without downloading and installing Servo library from within Arduino IDE).
When flashing is finished, Arduino is accessible from Octave and can be used as data source.
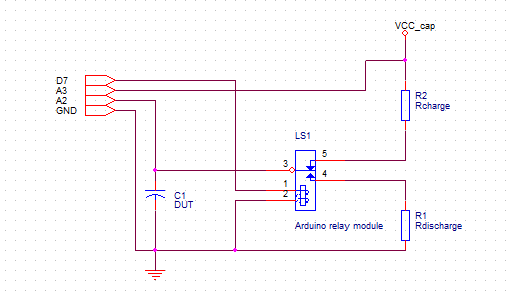
For example, using following schematics (where relay is in fact relay module for arduino - complete with overvoltage protection diode and a driving circuit)

and Octave script like below
pkg load arduinoar = arduino;
switch_pin="D7"input_pin= "A2"power_pin="A3"step=0.1iterations = 500
[...]
#read supply voltage
power_voltage = readVoltage(ar, power_pin)
in = readVoltage(ar, "A2");
#switch to charging modewriteDigitalPin(ar, switch_pin, 0);tic();
#charging cycle
while (i < iterations) in = readVoltage(ar, "A2"); t2=toc(); if in < power_voltage * 0.632 t_ch = t2; v_ch = in; endif data_chr = [data_chr, in]; x1_axis = [x1_axis, t2]; pause (step); i = i + 1;endwhile
[...]
plot(x1_axis, data_chr, x2_axis, data_dis);
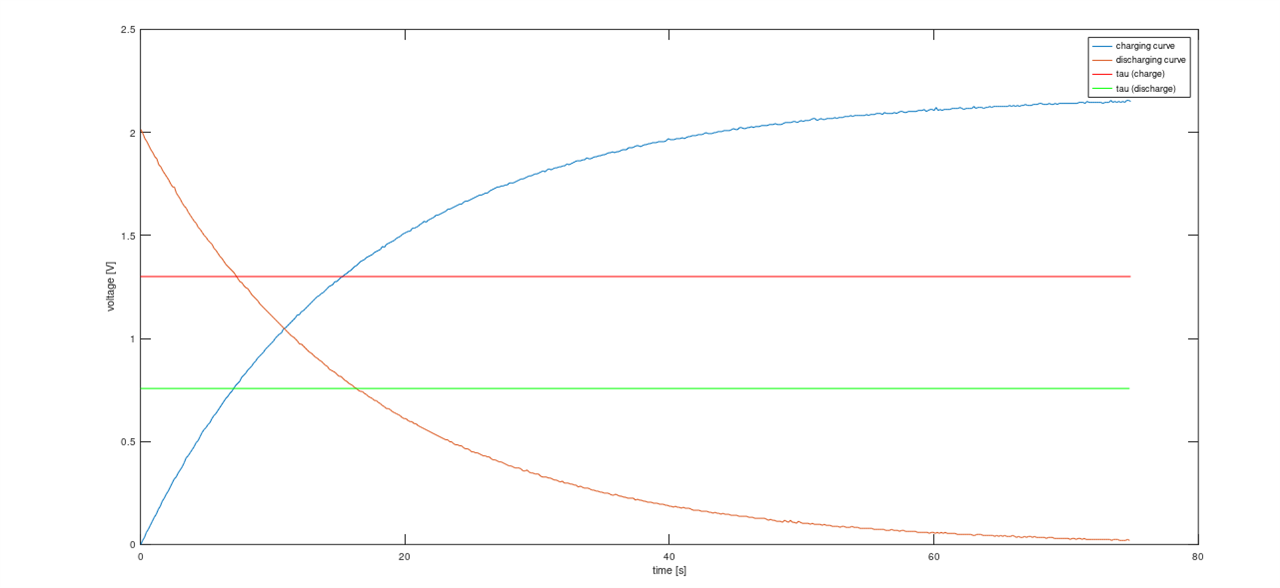
one can get charge/discharge plots of capacitor (like below), giving foundation for more advanced experiments.


![Supercapacitor energy storage system - extra credit blog 3 ([another] capacitance meter)](https://community-storage.element14.com/communityserver-components-secureimagefileviewer/communityserver/blogs/components/weblogfiles/00/00/00/04/19/0654.chrg_curve.png-1440x400x2.png?sv=2016-05-31&sr=b&sig=8s8KlVWoyiRK%2BJSX8hkLUTDsWQPdr289A9T5GNjR5rs%3D&se=2026-02-27T23%3A59%3A59Z&sp=r&_=sFrrIxJc5VFiFjjIU7/hpA==)