


1. ARDU TEMP #1 - The project: building a battery powered temperature beacon
2. ARDU TEMP #2 -The kit, Arduino, NodeMCU, ThingSpeak
3. ARDU TEMP #3 - Testing the beacon
================================================
The kit
I received the thermal switches nicely packed in a plastic case, with the bins inside labeled. A sheet of paper with the inventory was attached, so it was easy to identified the components. Much to my surprise, there was no infrared thermometer in the kit. (I was under the impression that a thermometer will also be provided. Actually the IR thermometer does appear in one image of the kit on element14 challenge site but does not appear in the kit list anymore.)
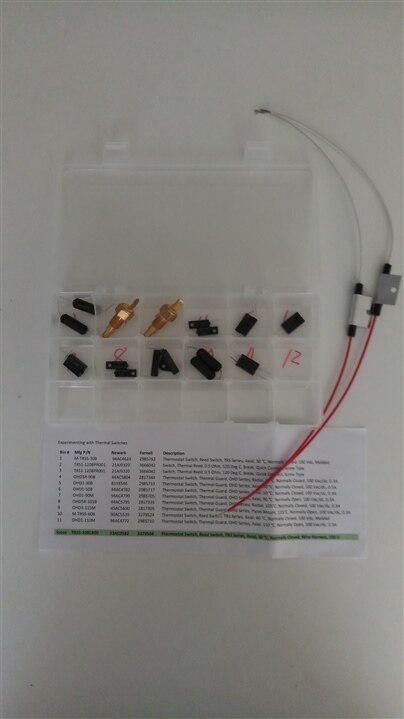
I picked up a few normally closed and normally open switches (rated 30C, 60C and 90C) and connected them to an ohmmeter, then I used my SMD rework station heat gun to warm up the switches from a distance of about 5 cm while monitoring the meter. All the switches I tested behaved the way they were supposed to. Since I did not have an accurate meter handy, I could not check the actual temperature at which each switch operated. One thing I noticed was that if I moved away the heat gun right after the switch triggered, it only took a few seconds for the switch to get back to its normal state. Fast response. Nice.
The experiment
My proposed experiment with the thermal switch was to use a NodeMCU to send alarm messages to an IoT monitoring platform (Thingspeak) when temperature exceeds 90C. In order to do that I selected an OHD1-90M switch (normally open, 90C). The idea was to connect the thermal switch in series with the power supply so that when the temperature threshold is reached (90+/-5C), the NodeMCU is powered and starts sending alarm messages to Thingspeak. As long as the temperature stays over the 90C threshold, the switch will be closed and the node MCU will remain powered up.
NodeMCU
Next step was to write an Arduino program for NodeMCU that sends a beacon message every 60 seconds. Every 60 seconds the program sends the values “100”, "200" and "300" for three measurements fields. (For the purpose of my test, one would be enough, but I just wanted to see how the ThingSpeak dashboard would look like if I decide to connect some sensors to my NodeMCU in the future. I used a NodeMCU V3.

Here’s the Arduino program:
/*
   Thingspeak
   a33333
   2022
   MIT License
*/

#include <Arduino.h>

#include <ESP8266WiFi.h>
#include <ESP8266WiFiMulti.h>
#include "ThingSpeak.h"

//NodeMCU WiFi
ESP8266WiFiMulti WiFiMulti;
const char accessPointName[]     = "your_ap_name";
const char accessPointPassword[] = "your_ap_passwd";

//Thingspeak
int status  = WL_IDLE_STATUS;
WiFiClient  client;
unsigned long myChannelNumber = your_channel_no;
const char * myWriteAPIKey = "your_api_key";

#define LOOP_TIME 60000
long int loopCounter = 0;

void setup() {

  //init serial port
  Serial.begin(9600);

  //init WiFi
  WiFiMulti.addAP(accessPointName, accessPointPassword);

  //init ThingSpeak
  WiFi.begin(accessPointName, accessPointPassword);
  ThingSpeak.begin(client);
}

void loop() {
  loopCounter++;
  updateThingSpeak();
  delay(LOOP_TIME);
}

void updateThingSpeak() {
  Serial.println("Write data to ThingSpeak");
  ThingSpeak.setField(1, 100);
  ThingSpeak.setField(2, 200);
  ThingSpeak.setField(3, 300);
  // Write the fields that you've set all at once.
  ThingSpeak.writeFields(myChannelNumber, myWriteAPIKey);
}
ThingSpeak
ThingSpeak is an IoT platform. For those who are not familiar with it, here’s a link .
On ThingSpeak, I created a new channel with 3 fields. The channel number and the writeAPI key match the values in the Arduino program.
Initial test
I did a quick test with my NodeMCU powered over the USB cable.

The program seems to work OK: as long as nodeMCU is powered, every 60 seconds, my ThingSpeak channel receives the values 100, 200 and 300 for the three fields. I also created an alert, so that when a message is received the indicator light turns red. Here is how my ThingSpeak dashboard looks like after the initial setup:


The next blog will deal with testing the thermal switch.