


As I have already described in my last blog, we will be testing and recording the temperature and magnetic field values for all the sensors where the
state changes from make to break or vice-versa.
For cooling purposes, I'm using a compressed liquid nitrogen can. For heating, I'm using a soldering iron, a hot gun and also a lighter.
The use of the Grove module helped me to reduce the wiring mess I already have 2 sensors and 2 actuators.
But while experimenting I found a funny thing in the grove sensor kit which wasted my 2 hours. I was blaming my Arduino uno for not working, later
by cleaning up the code and writing for one sensor at a time I found the issue in the I2C based sensor unit. There was an open connection between A4, A5 of Arduino Uno and
I2C breakouts of the grove shield. I had to solder the jumper to complete the connection. Without this I2C connection, I observed spurious behaviour of the microcontroller such as not
resetting etc. 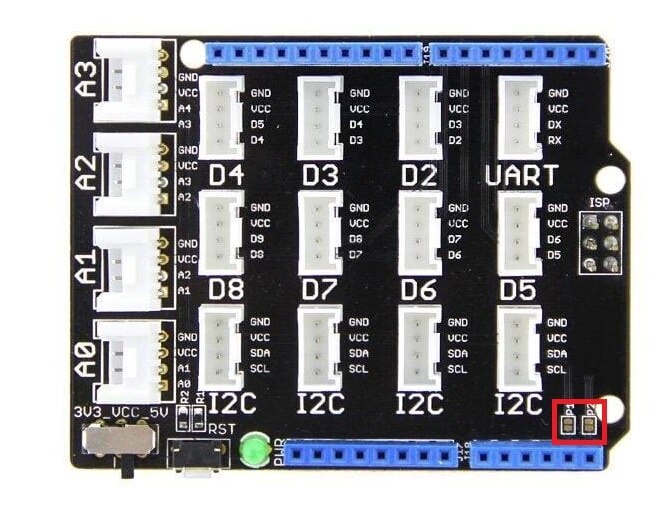
This is provided because in case someone wants to connect the shield to Arduino mega etc, there the I2C might be different eg 20 and 21.
After bridging that jumper everything worked without any issue. Here's a code to test this simple experimental setup.
Pre requisites:
#include "TLV493D.h"
#include <Wire.h>
#include "rgb_lcd.h"
#include <math.h>

int a;
float temperature;
int B = 3975;                //B value of the thermistor
float resistance;
rgb_lcd lcd;

const int colorR = 255;
const int colorG = 10;
const int colorB = 200;
TLV493D sensor1;


const int sensor1_pwr_pin = A3;
const int i2c_sda = A4;
const int buttonPin = 7;     // This is where we connect our sensor across the pushbutton
const int buzzPin =  8;
int buttonState = 0;
void setup()
{
  Serial.begin(9600);
  lcd.begin(16, 2);
  pinMode(buttonPin, INPUT);
  pinMode(buzzPin, OUTPUT);
  pinMode(A0, INPUT);
  lcd.setRGB(colorR, colorG, colorB);
  pinMode(sensor1_pwr_pin, OUTPUT);
  pinMode(i2c_sda, OUTPUT);

  delay(500);

  //init sensor1
  digitalWrite(sensor1_pwr_pin, HIGH);
  digitalWrite(i2c_sda, HIGH); //0x5E
  delay(500);
  Wire.begin(); // Begin I2C wire communication
  sensor1.init(HIGH);
}

void loop()
{

  buttonState = digitalRead(buttonPin);

  // check if the pushbutton is pressed. If it is, the buttonState is HIGH:
  if (buttonState == HIGH) {
    lcd.clear();
    lcd.setCursor(0, 0);
    // Serial.print("sensor1: 0x");
    lcd.print("Connected");
    sensor1.update();
    a = analogRead(A0);
    resistance = (float)(1023 - a) * 10000 / a; //get the resistance of the sensor;
    temperature = 1 / (log(resistance / 10000) / B + 1 / 298.15) - 273.15; //convert to temperature via datasheet ;
    // Serial.print("Current temperature is ");
    Serial.println(temperature);
    lcd.setCursor(0, 1);
    lcd.print("T:");
    lcd.print(temperature, 2);
    Serial.println(sensor1.m_dBz);
    lcd.setCursor(7, 1);
    lcd.print("B:");
    lcd.print(sensor1.m_dBz);
    lcd.print("mT");
    digitalWrite(buzzPin, HIGH);
    delay(2000);
  } else {
    // turn buzzer off:
    lcd.setCursor(0, 0);
    lcd.print("Disconnected");
    digitalWrite(buzzPin, LOW);
    sensor1.update();
    a = analogRead(A0);
    resistance = (float)(1023 - a) * 10000 / a; //get the resistance of the sensor;
    temperature = 1 / (log(resistance / 10000) / B + 1 / 298.15) - 273.15; //convert to temperature via datasheet ;
    lcd.setCursor(0, 1);
    lcd.print("T:");
    Serial.println(temperature);
    lcd.print(temperature, 2);
    lcd.setCursor(7, 1);
    lcd.print("B:");
    Serial.println(sensor1.m_dBz);
    lcd.print(sensor1.m_dBz);
    lcd.print("mT");
  }


}
Code is self-explanatory. The void loop consists of an if function to check whether there is a connection in the thermal switch.
If yes then it will update the display, updates the temperature reading and buzzes the buzzer. The magnetic field required to make the connection
complete is measured by moving the magnet on the scale and recording the distance and measuring the magnetic field experienced by the sensor at
the same distance. Thereby we can calculate both magnetic and thermal thresholds or tipping points.
Here's a table of recorded values.
| Sl.No | MPN | Temperature( °C) | Magnetic Field (mT) | Distance(mm) |
| 1 | M-TRS5-30B | 29.1 | 15 | 7 |
| 2 | TRS1-120BPR001. | 118.5 | ||
| 3 | OHD5R-90B | 89.4 | ||
| 4 | OHD1-30B | 30.04 | 7 | 10 |
| 5 | OHD1-50B | 49.8 | 16.1 | 6 |
| 6 | OHD1-90M | 90.1 | 14.3 | 8 |
| 7 | OHD5R-105B | 104.7 | ||
| 8 | OHD3-115M | 115.6 | 6.3 | 11 |
| 9 | M-TRS5-60B | 59.8 | ||
| 10 | OHD1-110M | 109.6 | 5.68 | 12 |
| 11 | TRS5-30BLR00 | 29.41 | 5.09 | 14 |
The higher temperature temperature sensor's magnetic field could not be measured since they were conductive in room temperature.
Here is a graph showing the same data.

Here we can see that the increase in the distance between the magnet and the sensor decreases the magnetic field effect on the sensor.
Here's a complete demo video explaining the setup and the experiment

Thermal runaway causing E vehicle to catch fire Source: The financial express
Application of this would be
1. Thermal Run Away protection to prevent events like this, electric vehicle fire accident that happened recently in India
For a healthy and long life of Li-ion batteries, it has to be kept cool to do that we can use these thermal switches to
do actions like turning on the fan or Peltier cooling tiles etc.
2. In the semiconductor industry
3. In the heavy electrical industry to reduce power loss due to resistance increase (due to increased temperature)
4. Prevent CPUs and other devices from overheating using simple NOT gate based FAN control circuits
Thanks for reading.

