Hello everyone!
This is another blog of mine for the Experimenting with Waterproof Connectors challenge.
In the introduction, I would like to say why I thought of adding a soil moisture sensor to the project. Plants need an environment with adequate humidity to be able to grow, develop and maintain life. It is not by chance that agriculture has developed so much, the lack of water, climate changes, global warming, without irrigation systems the yield of production would decrease more and more. There are quite a few project ideas with the theme of home irrigation system, through which the user wants to monitor soil moisture for a plant, and why not, this system should also be automated, by automatically starting a small water pump.
This project can be considered a DIY, but which can develop nicely, thanks to the waterproof connectors and enclosure.
Given the fact that the humidity sensor will always be in the flower pot, it is exposed to increased humidity, water drops, and for this reason it is recommended to adopt a protective measure to extend its life. We could well go ahead and use hot glue, to cover the electronic components sensitive to water, this method would be more at hand and it is cheaper, but at the same time we know that hot glue yields over time, due to temperature or other factors.
Regarding the performance of a soil moisture sensor, well, the results are not perfect, but they are encouraging. It is recommended to calibrate the sensor before use, regardless of the type of soil. A type of soil causes the sensor to read different data, it is normal.
How could we do the calibration? Well, a plant expert would study the composition of the respective soil, but I'm not like that, so I went with a more common method, namely, I noticed when the soil in the pot is drier, and I inserted the sensor into the soil to record the specific values. This would be a low soil moisture value. Then, in order to know what value the sensor would return for a soil with higher moisture, I poured water into the pot and the sensor measured the right amount. Based on these measurements, I established with a precision accepted by me, the minimum and maximum values for moisture in the flower pot I have.
I also found out that there are three thresholds for soil moisture, 0-300 dry soil, 300-700 wet soil, 700-900 when the sensor is in water, but I don't know the exact conditions, type of soil, type of sensor, etc. .
Speaking once again about the sensor and its quality, it is a bit difficult to have a benchmark because from a constructive point of view there are many solutions, the most common type of soil moisture sensor is the one with two legs like electrodes, they are actually surfaces exposed copper. Perhaps the most common problem encountered with this sensor model is that over time the sensor loses its foot plate (constructive reasons, chemistry, who knows).
The soil moisture sensor model that I have offers an analog output in relation to the measured value, and it has simpler electronics on board, the more water is found on the two legs, the smaller the analog output is.

Other possible causes that can affect the quality of the measurements, simply the supply voltage of the sensor, there are differences between measurements with the sensor powered at 5V and at 3V3 for example. The resolution of the ADC in uC, if the sensor used does not have a digitally interpretable output, then the option is to use the ADC, we expect to see some differences between the mousers on an 8bit and a 16bit ADC.
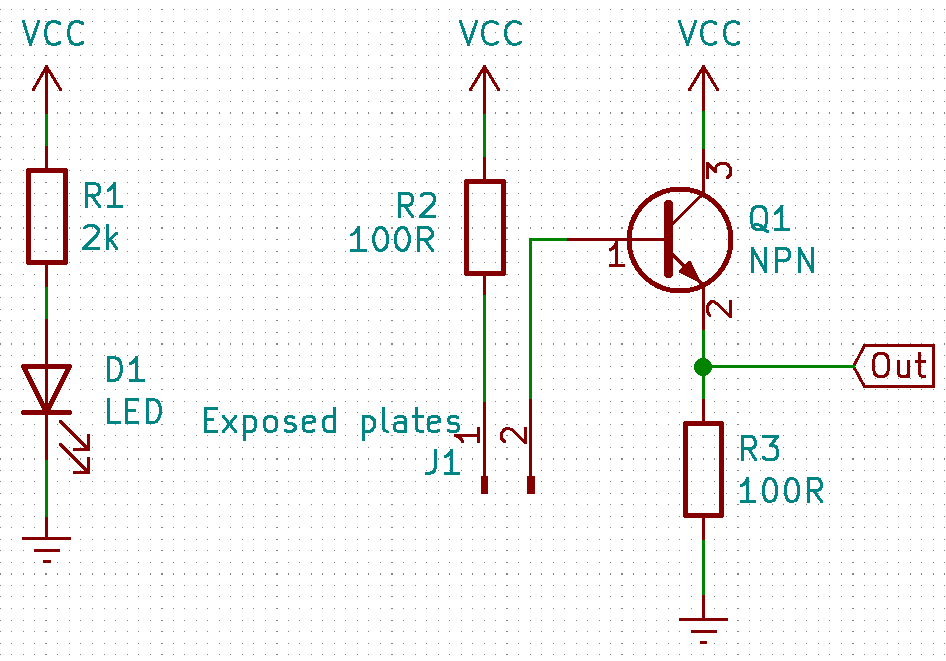
How does this simple soil moisture sensor work? As I said, it has a simplistic electronics, on the circuit there is a small transistor and some resistors. The electronic scheme would be this:

One of the two legs has a resistance connected in series. Through this resistance, the connection is made with VCC, and it also has a protective role. The other leg from the sensor is connected to the base of the transistor. As I said, high soil moisture produces a low output value. We could also say that a small current will be found at the base of the transistor, but when we have high soil moisture, the transistor goes into conduction. The latter will amplify the signal from the base. The output size is represented by the voltage drop on the resistor connected to the emitter pin, this voltage drop depends on the amplification factor of the transistor.
As the module has only three pins, two for power and one for data, the connections with a uC are very few. I did a test with this sensor and an Arduino board, because it is at hand and on LattePanda we have the possibility to use Arduino Leonardo.
/*
# 0~300 dry soil
# 300~700 humid soil
# 700~950 in water
*/
void setup(){
Serial.begin(57600);
}
void loop(){
Serial.print("Moisture Sensor Value:");
Serial.println(analogRead(0));
delay(100);
}
With the sensor in the air, I recorded 0 moisture, that's logical. I put the sensor in a container with water, maxmum data moisture is 580. Once again I bring into consideration the fact that it is recommended that such a sensor be calibrated on a dry, normal, and a wet soil. We can enter the calibration in the software program, that is, knowing the values that the sensor returns in the case of the 3 soil conditions (dry, normal, wet) we can set certain thresholds, one of which can be the one at which the water pump starts example (if we have).


That's about it for the moment. Another blog is coming, I'm doing electronic tests with the enclosure and the jacks.
Thank you. Have a nice day!
