element14 Community
element14 Community
    Register Log In
  • Site
  • Search
  • Log In Register
  • About Us
  • Community Hub
    Community Hub
    • What's New on element14
    • Feedback and Support
    • Benefits of Membership
    • Personal Blogs
    • Members Area
    • Achievement Levels
  • Learn
    Learn
    • Ask an Expert
    • eBooks
    • element14 presents
    • Learning Center
    • Tech Spotlight
    • STEM Academy
    • Webinars, Training and Events
    • Learning Groups
  • Technologies
    Technologies
    • 3D Printing
    • FPGA
    • Industrial Automation
    • Internet of Things
    • Power & Energy
    • Sensors
    • Technology Groups
  • Challenges & Projects
    Challenges & Projects
    • Design Challenges
    • element14 presents Projects
    • Project14
    • Arduino Projects
    • Raspberry Pi Projects
    • Project Groups
  • Products
    Products
    • Arduino
    • Avnet Boards Community
    • Dev Tools
    • Manufacturers
    • Multicomp Pro
    • Product Groups
    • Raspberry Pi
    • RoadTests & Reviews
  • Store
    Store
    • Visit Your Store
    • Choose another store...
      • Europe
      •  Austria (German)
      •  Belgium (Dutch, French)
      •  Bulgaria (Bulgarian)
      •  Czech Republic (Czech)
      •  Denmark (Danish)
      •  Estonia (Estonian)
      •  Finland (Finnish)
      •  France (French)
      •  Germany (German)
      •  Hungary (Hungarian)
      •  Ireland
      •  Israel
      •  Italy (Italian)
      •  Latvia (Latvian)
      •  
      •  Lithuania (Lithuanian)
      •  Netherlands (Dutch)
      •  Norway (Norwegian)
      •  Poland (Polish)
      •  Portugal (Portuguese)
      •  Romania (Romanian)
      •  Russia (Russian)
      •  Slovakia (Slovak)
      •  Slovenia (Slovenian)
      •  Spain (Spanish)
      •  Sweden (Swedish)
      •  Switzerland(German, French)
      •  Turkey (Turkish)
      •  United Kingdom
      • Asia Pacific
      •  Australia
      •  China
      •  Hong Kong
      •  India
      •  Korea (Korean)
      •  Malaysia
      •  New Zealand
      •  Philippines
      •  Singapore
      •  Taiwan
      •  Thailand (Thai)
      • Americas
      •  Brazil (Portuguese)
      •  Canada
      •  Mexico (Spanish)
      •  United States
      Can't find the country/region you're looking for? Visit our export site or find a local distributor.
  • Translate
  • Profile
  • Settings
Forget Me Not Design Challenge
  • Challenges & Projects
  • Design Challenges
  • Forget Me Not Design Challenge
  • More
  • Cancel
Forget Me Not Design Challenge
Blog Cam-e-lot - Round 7 - Man vs GPIOs
  • Blog
  • Forum
  • Documents
  • Files
  • Events
  • Mentions
  • Sub-Groups
  • Tags
  • More
  • Cancel
  • New
  • Share
  • More
  • Cancel
Group Actions
  • Group RSS
  • More
  • Cancel
Engagement
  • Author Author: amgalbu
  • Date Created: 11 Sep 2014 12:22 PM Date Created
  • Views 422 views
  • Likes 1 like
  • Comments 0 comments
Related
Recommended

Cam-e-lot - Round 7 - Man vs GPIOs

amgalbu
amgalbu
11 Sep 2014

In this post I will talk a little about GPIOs.

There are a lot of libraries that make using of GPIOs really easy.

I decided to use the PIGPIO library, available here


http://abyz.co.uk/rpi/pigpio


The PIGPIO has a lot of features

  • sampling and time-stamping of gpios 0-31 between 100,000 and 1,000,000 times per second
  • provision of PWM on any number of the user gpios simultaneously: this is a great features because you don't need to use an hardware PWM pin, making the hardware design much effective. For this project in particular, the enOcean board connector covers most of the pins
  • provision of servo pulses on any number of the user gpios simultaneously.
  • callbacks when any of gpios 0-31 change state (callbacks receive the time of the event accurate to a few microseconds).
  • notifications via pipe when any of gpios 0-31 change state.
  • callbacks at timed intervals.
  • reading/writing all of the gpios in a bank (0-31, 32-53) as a single operation.
  • individually setting gpio modes, reading and writing.
  • socket and pipe interfaces for the bulk of the functionality in addition to the underlying C library calls. For this project, I will use the C interface
  • the construction of arbitrary waveforms to give precise timing of output gpio level changes (accurate to a few microseconds).


Installation

Installing PIGPIO is very easy

  1. 1.       make a directory where the zipped library will be downloaded

               cd /home/pi

               mkdir pigpio

  1. 2.       download the zipped library

               wget http://abyz.co.uk/rpi/pigpio/pigpio.zip

  1. 3.       unzip the library

unzip pigpio.zip

  1. 4.       change to the source directory

cd PIGPIO

  1. 5.       make the files

make

make install


Use of the library

Using the library is as easy as installing.

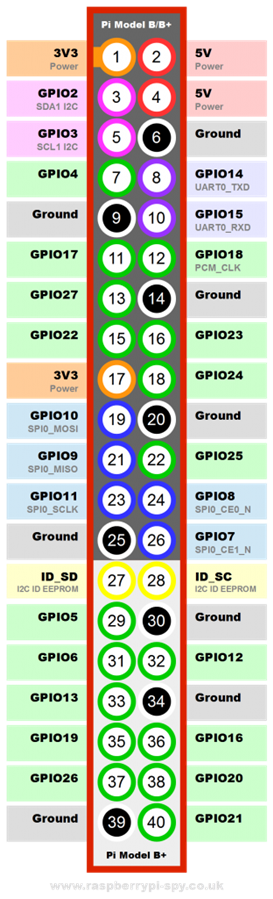
All GPIOs are identified by their Broadcom number. Details about the pinout of the Raspberry Pi B+ board can be found here


http://www.raspberrypi-spy.co.uk/2014/07/raspberry-pi-b-gpio-header-details-and-pinout/


The Broadcom number is the number written in the cyan label. For example if you connect a LED to the pin 40 of the connector, you can see in the diagram below that the cyan label says "GPIO21". So you should invoke PIGPIO function passing 21 for the "gpio" parameter.

image


The basic steps to build a C application are

  1. 1.       invoke gpioInitialise to initialize library
  2. 2.       to drive a digital output (for example a LED), use the gpioWrite(unsigned gpio, unsigned level). You don't need to explicitly invoke the gpioSetMode function because the gpioWrite automatically sets the proper pin mode
  3. 3.       to drive a servo, use the gpioServo(unsigned gpio, unsigned pulseWidth). The pulse width can be 0 (to switch PWM off) or any value from 500 (servo rotate in the most anti-clockwise position) to 2500 (servo in the most clockwise position)
  4. 4.       invoke gpioTerminate to finalize the library and release all the resources


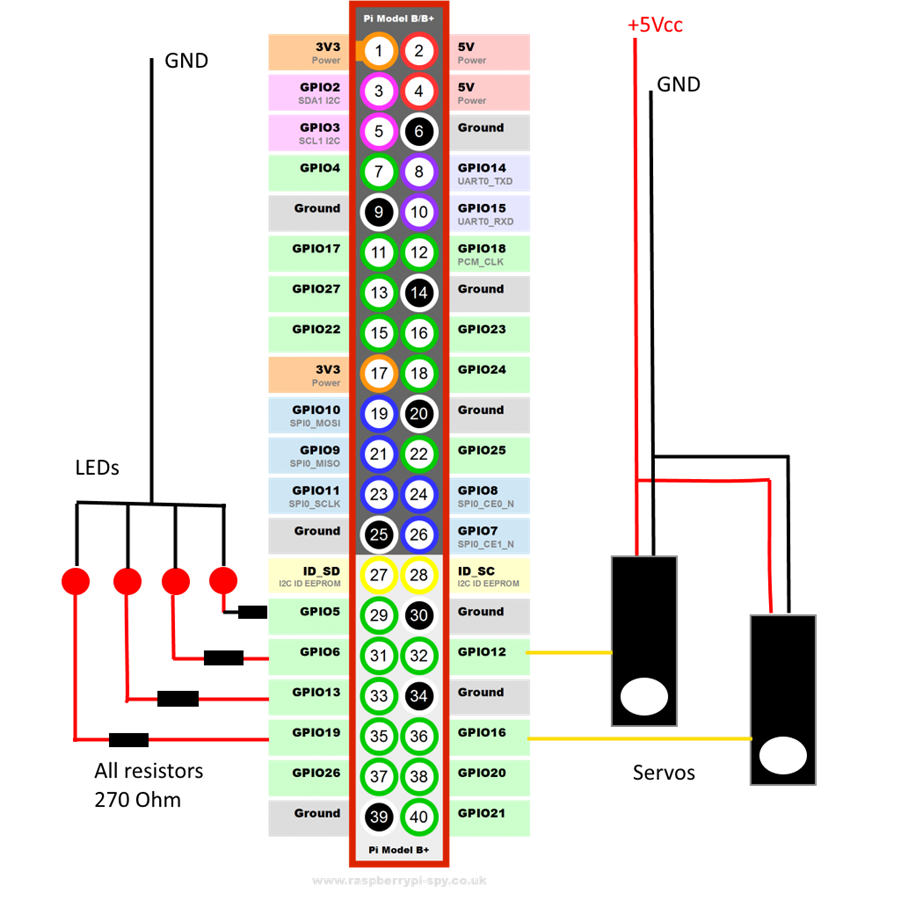
Hardware connections


image


Sample application

Attached to this post is a sample application that drives two servos and 4 LED. Application is self-explicatory: using 'a' and 'z' keys you can drive first servo and with 's' and 'z' keys


You don't have permission to edit metadata of this video.
Edit media
x
image
Upload Preview
image

Attachments:
servo.zip
  • Sign in to reply
element14 Community

element14 is the first online community specifically for engineers. Connect with your peers and get expert answers to your questions.

  • Members
  • Learn
  • Technologies
  • Challenges & Projects
  • Products
  • Store
  • About Us
  • Feedback & Support
  • FAQs
  • Terms of Use
  • Privacy Policy
  • Legal and Copyright Notices
  • Sitemap
  • Cookies

An Avnet Company © 2025 Premier Farnell Limited. All Rights Reserved.

Premier Farnell Ltd, registered in England and Wales (no 00876412), registered office: Farnell House, Forge Lane, Leeds LS12 2NE.

ICP 备案号 10220084.

Follow element14

  • X
  • Facebook
  • linkedin
  • YouTube