


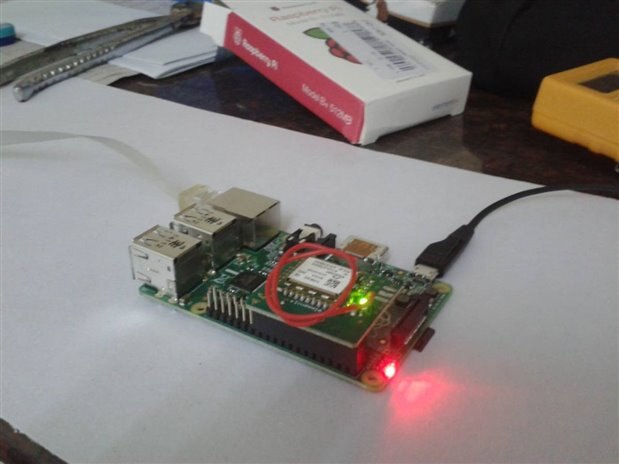
Happy news this week is I received raspberry Pi, EOP 350 programmer and the extra serving of Pi  . I have already tested openHAB and enocean Pi with my PC, so now it's time to move everything to raspberry Pi. These are some pics of my Pi mounted with enocean Pi, running openHAB.


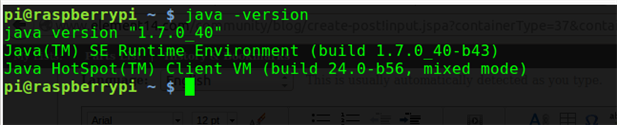
This tutorial assumes that you already have a working Pi installed with latest version of raspbian operating system with a working internet connection. The standard raspbian 7.0(Wheezy) also includes java components required to run openHAB. You can check whether java is installed by executing in your raspberry pi command line.
java -version
and you should be able to see some thing similar to this :
Now we have to do the following steps:
1. Disable serial debugging console in raspberry pi
2. Download and install openHAB
3. Configure openHAB and create your site for enocean devices.
1. Disabling serial debugging console
Raspbian comes prebuilt with a feature to use the serial port available in raspberry pi for some debugging purposes. First thing we have to do is to disable this serial communication as it can interfere with the working enocean Pi. There is a nice script available in web to disable the feature. What you have to do is to download the script and place it in proper place. This can be done with these two commands
sudo wget https://raw.github.com/lurch/rpi-serial-console/master/rpi-serial-console -O /usr/bin/rpi-serial-console
rpi-serial-console disable
Now you need to restart you rPi for the effect to take change.
2. Download and install openHAB
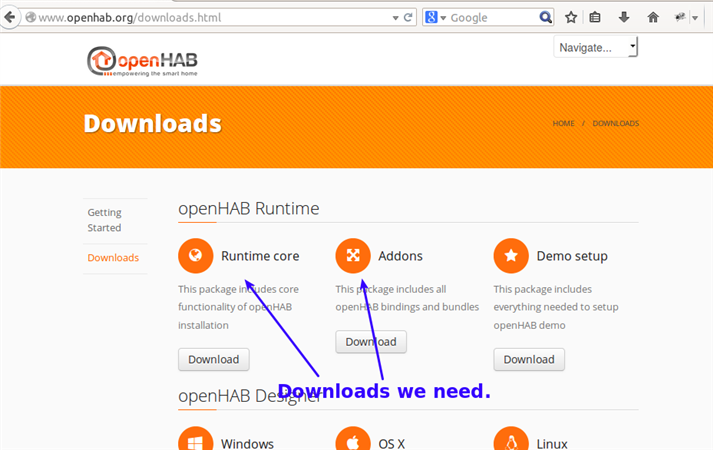
Once your rPi is restarted, we can go ahead with openHAB installation. OpenHAB downloads section offers a variety of downloads. From that we need openhab-runtime and openhab-addons to be installed in our rPi.
I would recommend you to install openHAB in '/opt/openHAB/' folder, even though it will work even if you set it up under '/home/opehHAB' or anywhere for that matter. I go ahead with installing it under '/opt/openHAB/1_5' folder. First we have to make the directories :
cd /opt
sudo mkdir openHAB
sudo chown -R pi:pi /opt/openHAB

mkdir 1_5/runtime
Now your pi terminal should look like this :

If you have already downloaded runtime and addons zip-packs in your PC, you can possibly copy this to rPi either using a pendrive or using your network( details under the section ***** ). If you haven't, then you can execute the following commands in rPi's terminal :
wget https://github.com/openhab/openhab/releases/download/v1.5.0/distribution-1.5.0-runtime.zip -O /home/pi
wget https://github.com/openhab/openhab/releases/download/v1.5.0/distribution-1.5.0-addons.zip  -O /home/pi

unzip /home/pi/distribution-1.5.0-runtime.zip -d /opt/openHAB/1_5/runtime
unzip /home/pi/distribution-1.5.0-addons.zip -d /opt/openHAB/1_5/runtime/addons
Now you have successfully installed openHAB in your raspberry Pi.
3. Configure openHAB
After you install openHAB, now we have to configure openHAB. First we have to create a configuration file. There is already a configuration file present in the standard runtime download. We'll rename and use it as our config file.
cp /opt/openHAB/1_5/runtime/configurations/openhab_default.cfg /opt/openHAB/1_5/runtime/configurations/openhab.cfg
We need to edit a few things before getting started. If you are using rPi with a monitor or through a VNV viewer, you can use any text editor of your choice to make the changes. If you are using rPi headless, you can use nano to edit the config file. To start nano, use
nano -c /opt/openHAB/1_5/runtime/configurations/openhab.cfg
Nano window will look some thing like this :
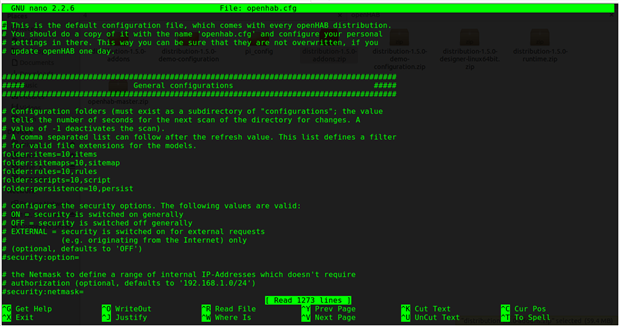
We have to configure enocean sensors in this file. Approximately at line 956, you have to make this edit.
enocean:serialPort=/dev/ttyAMA0

Press Ctrl+X to exit nano and while asking for saving the changes, give 'y'.
Now edit start.sh script and add the following at the last line of it :
-Dgnu.io.rxtx.SerialPorts=/dev/ttyAMA0

Save your change and close nano.
Now its time to start openHAB. Navigate to '/opt/opanHAB/1_5' and issue these commands :
chmod +x start.sh
./start.sh
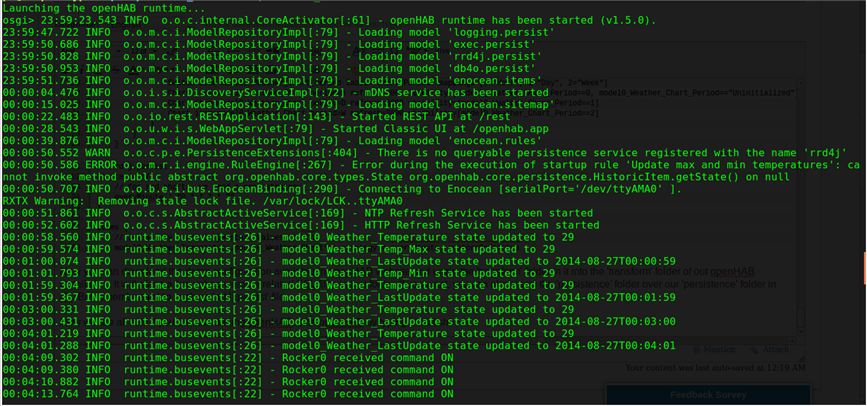
Now you should be able to see some thing like this :

At this point, openHAB just sits there and blinks. We didn't configured any 'sites' for openHAB.
Okay, now what?
We will go ahead and create a openHAB site for enocean devices. For this you need openHAB designer. You can install designer in your PC and connect to rPi to create/edit sites. First we will create some files for this pupose. Execute these commands in your rPi terminal :
touch /opt/openHAB/1_5/runtime/configurations/items/enocean.items
touch /opt/openHAB/1_5/runtime/configurations/rules/enocean.rules
touch /opt/openHAB/1_5/runtime/configurations/sitemaps/enocean.sitemaps
touch /opt/openHAB/1_5/runtime/configurations/persistence/rrd4j.persist
Opening rPi in openHAB designer( in a linux PC )
If you are in a linux system, you can follow these steps.
First you have to connect to raspberry pi from your PC's filemanager. I'm using nautilus( in Ubuntu ) and it have an option 'Connect to server' under 'File' menu. It will show a window similar to this.
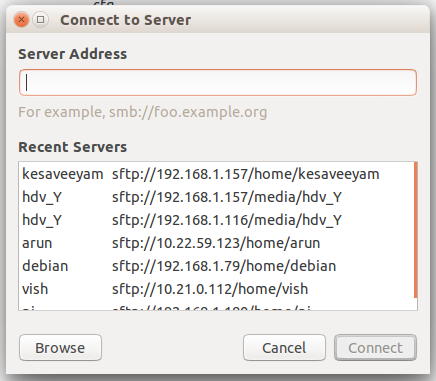
1. In the 'Server Address' space type 'sftp://<raspberryPi_IP>
2. Give username and password when promted.
Now you will be able to view your home folder in Pi. Also you can notice in your file manager that under 'Network' section, your Pi had appeared.
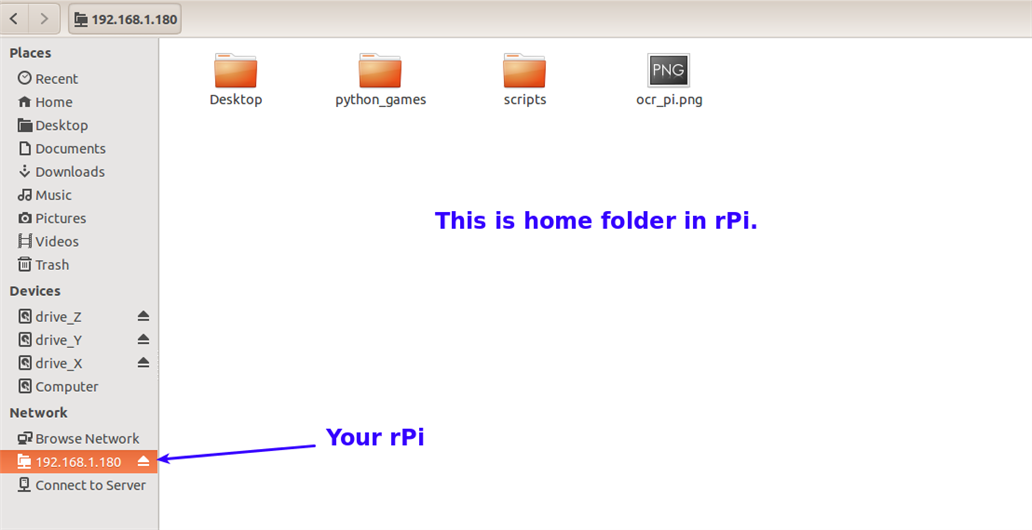
Press Ctrl+L. Now your file manager will allow you to edit the location address. Give '<rPi_IP_address>/opt/openHAB/1_5/' and you will land on our openHAB installation.
Now open openHAB designer from your PC and select the configurations folder in your raspberry pi.
Now your openHAB designer will look like this :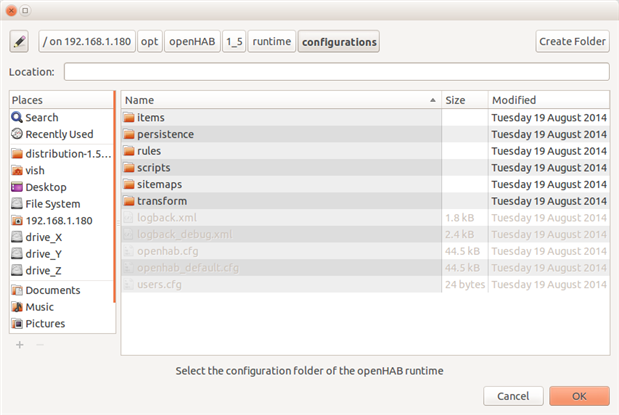

Now add the following contents to each of the files
// enocean.items

Group All
Group model0_Weather    (All)

// EnOcean devices
Switch Rocker0 (All) {enocean="{id=00:00:00:00, eep=F6:02:01, channel=B}"}
Switch Rocker1 (All) {enocean="{id=00:00:00:00, eep=F6:02:01, channel=A}"}
Contact myWindow "Bay Window [MAP(en.map):%s]" <contact> (All) {enocean="{id=00:00:00:00, eep=D5:00:01, parameter=CONTACT_STATE}" }
Number TempEnocean "Room Temperature [%.1f °C]" <temperature> (All) {enocean="{id=00:00:00:00, eep=A5:02:05, parameter=TEMPERATURE}"}

Group model0_Weather_Chart                                                    (model0_Weather)
Number model0_Weather_Temperature         "Outside Temperature [%.1f °C]"    <temperature> (model0_Weather_Chart) { http="<[http://weather.yahooapis.com/forecastrss?w=2295424&u=c:60000:XSLT(yahoo_weather_temperature.xsl)]" }
Number model0_Weather_Temp_Max         "Todays Maximum [%.1f °C]"    <temperature> (model0_Weather_Chart)
Number model0_Weather_Temp_Min         "Todays Minimum [%.1f °C]"    <temperature> (model0_Weather_Chart)
Number model0_Weather_Chart_Period        "Chart Period"
DateTime model0_Weather_LastUpdate        "Last Update [%1$ta %1$tR]"    <clock>
Remember to replace the ids with your enocean device ids.
// enocean.sitemap
sitemap model0 label="Main Menu" {
    Frame label="Enocean Devices" {
        Switch item=Rocker0 label="Rocker 0 Channel B"
        Switch item=Rocker1 label="Rocker 1 Channel A"
        Text   item=TempEnocean valuecolor=[>25="orange",>15="green",>5="orange",<=5="blue"]
        Text item=myWindow
    }

    Frame label="Weather" {
        Text item=model0_Weather_Temperature valuecolor=[model0_Weather_LastUpdate=="Uninitialized"="lightgray",model0_Weather_LastUpdate>90="lightgray",>25="orange",>15="green",>5="orange",<=5="blue"] {
            Frame {
                Text item=model0_Weather_Temp_Max valuecolor=[>25="orange",>15="green",>5="orange",<=5="blue"]
                Text item=model0_Weather_Temp_Min valuecolor=[>25="orange",>15="green",>5="orange",<=5="blue"]
                Text item=model0_Weather_LastUpdate visibility=[Weather_LastUpdate>30] valuecolor=[Weather_LastUpdate>120="orange", Weather_LastUpdate>300="red"]
            }
            Frame {
                Switch item=model0_Weather_Chart_Period label="Chart Period" mappings=[0="Hour", 1="Day", 2="Week"]
                Chart item=model0_Weather_Chart period=h refresh=600 visibility=[model0_Weather_Chart_Period==0, model0_Weather_Chart_Period=="Uninitialized"]
                Chart item=model0_Weather_Chart period=D refresh=3600 visibility=[model0_Weather_Chart_Period==1]
                Chart item=model0_Weather_Chart period=W refresh=3600 visibility=[model0_Weather_Chart_Period==2]
            }
        }
    }
}
// rrd4j.persist
Strategies {
    // for rrd charts, we need a cron strategy
    everyMinute : "0 * * * * ?"
}

Items {
    // let's only store temperature values in rrd
    model0_Weather_Temperature,model0_Weather_Chart* : strategy = everyMinute, restoreOnStartup
}
// enocean.rules
import org.openhab.core.library.types.*


rule "Update max and min temperatures"
when
  Item model0_Weather_Temperature changed or
  Time cron "0 0 0 * * ?" or
  System started
then
  postUpdate(model0_Weather_Temp_Max, model0_Weather_Temperature.maximumSince(now.toDateMidnight).state)
  postUpdate(model0_Weather_Temp_Min, model0_Weather_Temperature.minimumSince(now.toDateMidnight).state)
end


// Creates an item that stores the last update time of this item
rule "Records last weather update time"
when
  Item model0_Weather_Temperature received update
then
  postUpdate(model0_Weather_LastUpdate, new DateTimeType())
end
Now you can download the demo configuration available in openHAB website and unzip the 'transform' folder in it into the 'transform' folder of out openHAB installation. It will place a few yahoo weather related XSL files in that folder. If you want, you can also unzip the 'persistence' folder over our 'persistence' folder in rPi. But remember not to replace 'rrd4j.persist' file.
Now we are all set!! If you are not running openHAB, start openHAB by typing './start.sh'.
Now open Chrome and type in the address : http://<raspberry_pi>:8080/openhab.app?sitemap=enocean
and ........
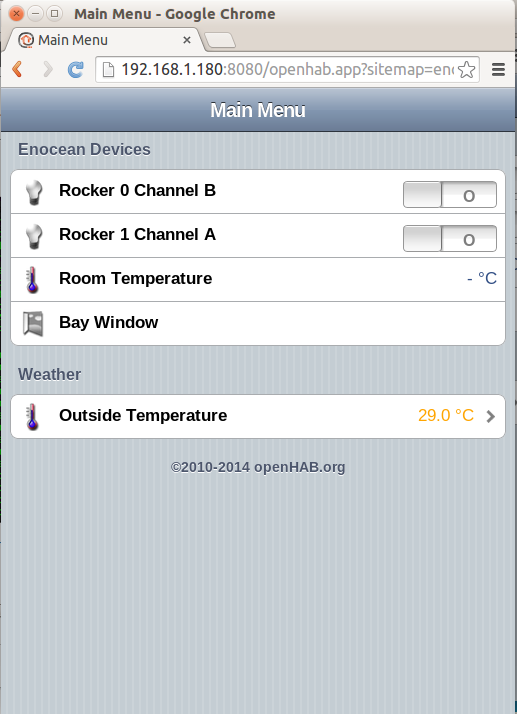
openHAB home page
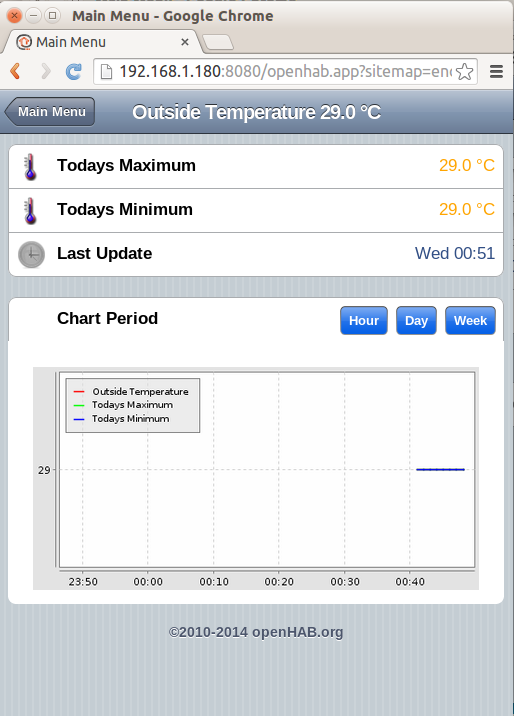
weather chart
Hopefully you can tinker around the files I provided and add a few more visualizations and additional devices.
Happy tinkering,
vish


