element14 Community
element14 Community
    Register Log In
  • Site
  • Search
  • Log In Register
  • About Us
  • Community Hub
    Community Hub
    • What's New on element14
    • Feedback and Support
    • Benefits of Membership
    • Personal Blogs
    • Members Area
    • Achievement Levels
  • Learn
    Learn
    • Ask an Expert
    • eBooks
    • element14 presents
    • Learning Center
    • Tech Spotlight
    • STEM Academy
    • Webinars, Training and Events
    • Learning Groups
  • Technologies
    Technologies
    • 3D Printing
    • FPGA
    • Industrial Automation
    • Internet of Things
    • Power & Energy
    • Sensors
    • Technology Groups
  • Challenges & Projects
    Challenges & Projects
    • Design Challenges
    • element14 presents Projects
    • Project14
    • Arduino Projects
    • Raspberry Pi Projects
    • Project Groups
  • Products
    Products
    • Arduino
    • Avnet Boards Community
    • Dev Tools
    • Manufacturers
    • Multicomp Pro
    • Product Groups
    • Raspberry Pi
    • RoadTests & Reviews
  • Store
    Store
    • Visit Your Store
    • Choose another store...
      • Europe
      •  Austria (German)
      •  Belgium (Dutch, French)
      •  Bulgaria (Bulgarian)
      •  Czech Republic (Czech)
      •  Denmark (Danish)
      •  Estonia (Estonian)
      •  Finland (Finnish)
      •  France (French)
      •  Germany (German)
      •  Hungary (Hungarian)
      •  Ireland
      •  Israel
      •  Italy (Italian)
      •  Latvia (Latvian)
      •  
      •  Lithuania (Lithuanian)
      •  Netherlands (Dutch)
      •  Norway (Norwegian)
      •  Poland (Polish)
      •  Portugal (Portuguese)
      •  Romania (Romanian)
      •  Russia (Russian)
      •  Slovakia (Slovak)
      •  Slovenia (Slovenian)
      •  Spain (Spanish)
      •  Sweden (Swedish)
      •  Switzerland(German, French)
      •  Turkey (Turkish)
      •  United Kingdom
      • Asia Pacific
      •  Australia
      •  China
      •  Hong Kong
      •  India
      •  Korea (Korean)
      •  Malaysia
      •  New Zealand
      •  Philippines
      •  Singapore
      •  Taiwan
      •  Thailand (Thai)
      • Americas
      •  Brazil (Portuguese)
      •  Canada
      •  Mexico (Spanish)
      •  United States
      Can't find the country/region you're looking for? Visit our export site or find a local distributor.
  • Translate
  • Profile
  • Settings
Forget Me Not Design Challenge
  • Challenges & Projects
  • Design Challenges
  • Forget Me Not Design Challenge
  • More
  • Cancel
Forget Me Not Design Challenge
Blog "Remember me always!" - Part 001
  • Blog
  • Forum
  • Documents
  • Files
  • Events
  • Mentions
  • Sub-Groups
  • Tags
  • More
  • Cancel
  • New
  • Share
  • More
  • Cancel
Group Actions
  • Group RSS
  • More
  • Cancel
Engagement
  • Author Author: COMPACT
  • Date Created: 4 Aug 2014 10:42 PM Date Created
  • Views 275 views
  • Likes 0 likes
  • Comments 0 comments
  • forget_me_not
  • remember_always
Related
Recommended

"Remember me always!" - Part 001

COMPACT
COMPACT
4 Aug 2014

"Remember me always"

image

I bought a Raspberry Pi (RPi) when it was first released and I've only turned it on once or twice.

This "Forget Me Not" design challenge is a great opportunity to put it to good use.


"Now where did I put it?"

(Looking around) "There it is."

(Grab the box) The box is a bit light isn't it?

(Open box and gasp!) "Empty! Now what did I do with it."

(Looking around some more) "There it is! It's in a Zen state in the Qi area"


It's time for it to transcend and do some real work (until the Model B+ arrives).

Now following the RPi Getting Started Guide

  • Find a candidate 8GB SDCard (I used a 8GB SanDisk Extreme III)
  • Download SD Card Formatter (from sdcard.org)
  • Download the latest NOOBS.zip file (from RPi)
  • Format SD Card
  • Extract and copy the files and folders from  NOOBS.zip to SD Card
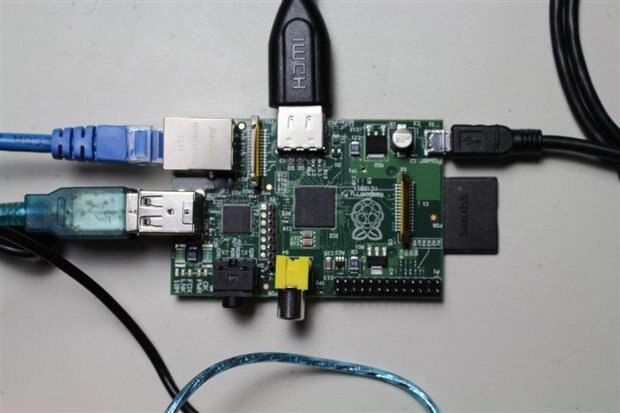
  • Plug SDCard into the RPi
  • Connect Keyboard (via USB) to RPi
  • Connect Mouse (via USB) to RPi
  • Connect to Monitor (via HDMI) to RPi
  • And connect to Power (via - micro USB)


BOOF??????


Nope, the RPi springs into life with a colourful image and a boot menu appears.

As per the Getting Started Guide I selected Raspian (with Scratch) and clicked the install

The RPi merrily installs it.


Upon reboot I eventually am presented with the Scratch application.

With the initial testing completed it is now time to configure the RPi for use with OpenHAB.

According to the OpenHAB site, the wheezy Raspian image is required.

https://github.com/openhab/openhab/wiki/Hardware-FAQ


To do this;

  • Download Win32 DiskImager
  • Download Wheezy Raspian Image
  • Use Win32 DiskImager create image.


Insert SDCard into RPi and boot up

It boots up with an options menu - I selected Expand Filesystem and rebooted.

Logon as pi, raspberry and startx for GUI.


With it all working I'll just get side tracked for the moment and connect the RPi to my private IOT network and see if I can connect and control my PSoC 4 based IOT device.

  • Assign a compatible IP address and associated parameters
  • Connect RPi Ethernet to Ethernet Switch
  • Ping IOT device
  • Send command to IOT device


With it all working it's now time to install OpenHAB.

  • Sign in to reply
element14 Community

element14 is the first online community specifically for engineers. Connect with your peers and get expert answers to your questions.

  • Members
  • Learn
  • Technologies
  • Challenges & Projects
  • Products
  • Store
  • About Us
  • Feedback & Support
  • FAQs
  • Terms of Use
  • Privacy Policy
  • Legal and Copyright Notices
  • Sitemap
  • Cookies

An Avnet Company © 2025 Premier Farnell Limited. All Rights Reserved.

Premier Farnell Ltd, registered in England and Wales (no 00876412), registered office: Farnell House, Forge Lane, Leeds LS12 2NE.

ICP 备案号 10220084.

Follow element14

  • X
  • Facebook
  • linkedin
  • YouTube