element14 Community
element14 Community
    Register Log In
  • Site
  • Search
  • Log In Register
  • About Us
  • Community Hub
    Community Hub
    • What's New on element14
    • Feedback and Support
    • Benefits of Membership
    • Personal Blogs
    • Members Area
    • Achievement Levels
  • Learn
    Learn
    • Ask an Expert
    • eBooks
    • element14 presents
    • Learning Center
    • Tech Spotlight
    • STEM Academy
    • Webinars, Training and Events
    • Learning Groups
  • Technologies
    Technologies
    • 3D Printing
    • FPGA
    • Industrial Automation
    • Internet of Things
    • Power & Energy
    • Sensors
    • Technology Groups
  • Challenges & Projects
    Challenges & Projects
    • Design Challenges
    • element14 presents Projects
    • Project14
    • Arduino Projects
    • Raspberry Pi Projects
    • Project Groups
  • Products
    Products
    • Arduino
    • Avnet Boards Community
    • Dev Tools
    • Manufacturers
    • Multicomp Pro
    • Product Groups
    • Raspberry Pi
    • RoadTests & Reviews
  • Store
    Store
    • Visit Your Store
    • Choose another store...
      • Europe
      •  Austria (German)
      •  Belgium (Dutch, French)
      •  Bulgaria (Bulgarian)
      •  Czech Republic (Czech)
      •  Denmark (Danish)
      •  Estonia (Estonian)
      •  Finland (Finnish)
      •  France (French)
      •  Germany (German)
      •  Hungary (Hungarian)
      •  Ireland
      •  Israel
      •  Italy (Italian)
      •  Latvia (Latvian)
      •  
      •  Lithuania (Lithuanian)
      •  Netherlands (Dutch)
      •  Norway (Norwegian)
      •  Poland (Polish)
      •  Portugal (Portuguese)
      •  Romania (Romanian)
      •  Russia (Russian)
      •  Slovakia (Slovak)
      •  Slovenia (Slovenian)
      •  Spain (Spanish)
      •  Sweden (Swedish)
      •  Switzerland(German, French)
      •  Turkey (Turkish)
      •  United Kingdom
      • Asia Pacific
      •  Australia
      •  China
      •  Hong Kong
      •  India
      •  Korea (Korean)
      •  Malaysia
      •  New Zealand
      •  Philippines
      •  Singapore
      •  Taiwan
      •  Thailand (Thai)
      • Americas
      •  Brazil (Portuguese)
      •  Canada
      •  Mexico (Spanish)
      •  United States
      Can't find the country/region you're looking for? Visit our export site or find a local distributor.
  • Translate
  • Profile
  • Settings
Forget Me Not Design Challenge
  • Challenges & Projects
  • Design Challenges
  • Forget Me Not Design Challenge
  • More
  • Cancel
Forget Me Not Design Challenge
Blog "Remember me always!" - Part 023
  • Blog
  • Forum
  • Documents
  • Files
  • Events
  • Mentions
  • Sub-Groups
  • Tags
  • More
  • Cancel
  • New
  • Share
  • More
  • Cancel
Group Actions
  • Group RSS
  • More
  • Cancel
Engagement
  • Author Author: COMPACT
  • Date Created: 16 Oct 2014 11:58 AM Date Created
  • Views 1034 views
  • Likes 0 likes
  • Comments 1 comment
  • forget_me_not
  • remember_always
Related
Recommended

"Remember me always!" - Part 023

COMPACT
COMPACT
16 Oct 2014

The Master of a Million Disguises!

image

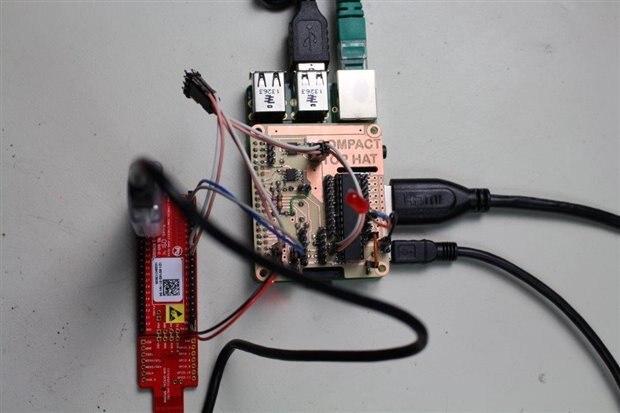
Figure 1. Initial PSoC4 tests using a CY8CKIT-049 4200 with the Compact TOP HAT with concurrent UART and I2C interfaces active.

(The blurry lead is a MiniProg3 used for single step debugging.)


My Compact HAT enables a PSoC to be easily connected.

The design has a PSoC connected to the Raspberry Pi's Serial Port, I2C, SPI port and some GPIOs.

The intention is to have;

  • SPI port as an interface option
  • I2C port as an interface option
  • Serial Port as an interface option or a program load interface for the PSoC
  • GPIOs as interrupt and auxillary inputs or outputs between the Raspberry Pi from the PSoC
  • The remaining PSoC pins remain free for the user's design


These are native interfaces with the Raspian and require very little configuration.

Although possible I did not consider using a parallel interface to the RPi because I did not have an immediate need for it and it required some LKM (Loadable kernel modules) written for it..


I could have laid out the prototype to include a PSOC but that would have tied me down to a single option. Instead I provided ordered connection points to provide more flexibility and choice such as using a PSoC5LP.

The CY8CKIT-049 42xx provides very easy access to its PSoC pins making it perfect for prototype development without the hassle of hand soldering TQFPs. It also allows a direct plug in connection for a MiniProg3 or other PSoC debugger.


Are you Serialous!

By default the Raspberry Pi's Serial port is assigned for use as a Console port. To use this port for your own purposes it is recommended that this assignment is removed otherwise you may get unwanted interaction (from the Console subsystem).

This is done quite easily by:

1. Editing the /etc/inittab file and commenting out the line containing /dev/ttyAMA0.

2. Granting users access to the serial port using sudo chmod 777 /dev/ttyAMA0.


Step 1. requires a reboot to take effect - so reboot your Raspberry Pi with sudo shutdown -r 0


Now with that done and dusted, you can log back in and now configure the Raspberry Serial Port's baud rate to suit your purpose.

This can be done by stty -F /dev/ttyAMA0 <baudrate>

So for a baud rate of 9600 baud it'll be stty -F /dev/ttyAMA0 9600


You can send out characters out the serial port using the following;

echo -n <character(s)> > /dev/ttyAMA0

So to send "Hello" you it'll be echo -n Hello > /dev/AMA0


You can read in characters in from the serial port using the following;

cat /dev/ttyAMA0


These can be observed on your trusty TEK TBS1052-EDU.


If you operate your PSoC at the same voltage as the Raspberry Pi then all you need to do is connect up the TX, RX and ground pins.

The COMPACT HAT has a pin header specifically for this purpose. Just connect a common ground and cross-connect the TX and RX pins to the PSoC


The choice is up to you as what to do with this serial port connection. It can be used with an application or it can be used as a bootloader to upload firmware into the PSoC.


Raspberry Pis are Slave Drivers!

The Raspberry Pi is configured as an I2C master so if it is used the PSoC can be configured as an I2C Slave.

The assigned I2C address for the PSoC base just needs to be compatible with other present I2C peripherals.

The process to create an I2C Slave on a PSoC is easy.

1. Create a new project

2. Plop on an I2C SCB component on the Schematic

3. Configure its I2C address

4. Write some code to initialise the I2C component and enable global Interrupts

5. Write some code to respond to I2C events such as receiving some data.

6. Assign the I2C component pins.


Not so you Loupy!

SPI is an alternative low cost serial communication bus to I2C and requires the use of some additional signal lines but has the advantage of much faster clock rates.

PSoC SCBs can be used as either UART, I2C or SPI peripherals so the choice is yours on how to use them.

In addition, PSoC also has UDB (Universal Digital Blocks) component counterparts that could be used.


Raspbian supports all these interfaces so there is plenty of flexibility of choice and easy programmatic access.

  • Sign in to reply
  • DAB
    DAB over 10 years ago

    Nice update Monte.


    The PSOC board is impressive for its size an cost, plus the programmable hardware blocks open a new world of capability.


    DAB

    • Cancel
    • Vote Up 0 Vote Down
    • Sign in to reply
    • More
    • Cancel
element14 Community

element14 is the first online community specifically for engineers. Connect with your peers and get expert answers to your questions.

  • Members
  • Learn
  • Technologies
  • Challenges & Projects
  • Products
  • Store
  • About Us
  • Feedback & Support
  • FAQs
  • Terms of Use
  • Privacy Policy
  • Legal and Copyright Notices
  • Sitemap
  • Cookies

An Avnet Company © 2025 Premier Farnell Limited. All Rights Reserved.

Premier Farnell Ltd, registered in England and Wales (no 00876412), registered office: Farnell House, Forge Lane, Leeds LS12 2NE.

ICP 备案号 10220084.

Follow element14

  • X
  • Facebook
  • linkedin
  • YouTube