


Returning to school took out most of our free time, mine included since I’m in graduate school. Our evenings are now pretty full: the kids are now in swimming three times a week and and Karate two times a week, and I’m in class twice a week, and have been turning in a 20 page lab report each week.
I’ve tried multiple times to get them interested in working on their hats, but aside from a few failed experiments on the Treasure Map Hat (Treasure map hat progress 1) I wasn’t able to create any enthusiasm.
I finally gave up last week and decided to go ahead and sew the Dog Safety Hat myself.
My daughter’s first swim meet was this weekend. For those of you blessedly unfamiliar with swim meets, they’re generally 4-6 hours of watching other people’s kids swim, mixed in with about 10 minutes of your kids swimming, so there’s usually a lot of time for other pursuits, as long as they’re small and portable, and can be done sitting down. This was a perfect time/place to sew the hat.
I sewed the ground and power busses for the Dog Safety Hat during the swim meet, and definitely learned some things:
1) Plan the layout ahead of time. We planned the location of the Gemma and the LEDs to allow the bandanna to be tied normally without any interference from the electronics, but we really didn’t plan anything else. I just went ahead and started sewing, and learned these lessons along the way. Chalk is a nice medium for drawing temporary lines on fabric (especially light colored chalk on dark colored fabric). It even comes in different colors! We did use chalk to indicate the fold in the bandanna, and the approximate locations of the 12 LEDs, but did not think to draw out the 4 different wires that needed to go to each LED.
2) Much like in Ghostbusters, try to avoid crossing the lines! In my case, I was sewing the ground and power planes to attach 12 NeoPixel LEDs, and a little advance planning (and some chalk) would have allowed me to avoid the two crossing points I ended up needing. I now more fully understand Becky’s admonishment about battery safety. When sewing power and ground planes with uncoated stainless steel thread, it’s entirely possible that a short can be created simply by a fold in the fabric. This possibility is greatly increased every time the lines cross each other! 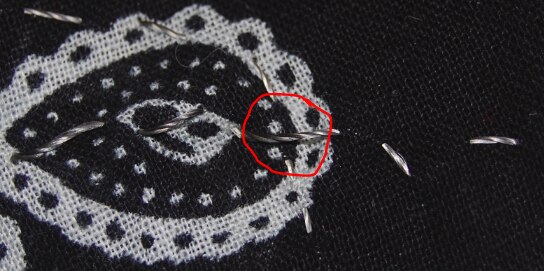
These are power and ground. I'd really rather not have had to cross them like this!
3) When sewing in rows of NeoPixels, alternate the orientation of the NeoPixels on each row (diagram?) This makes the layout and sewing both much easier. I didn’t do this for the first row, but did for the second.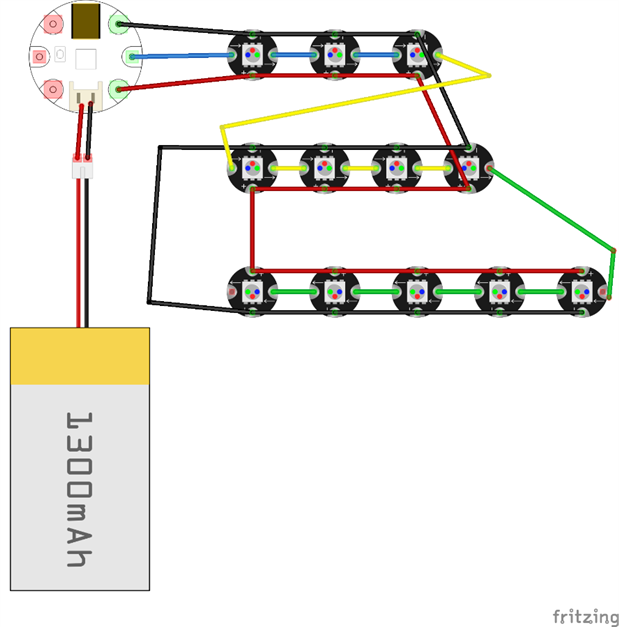
Note that the transition from the yellow row to the green row goes much better than the transition from the blue row to the yellow row. I did learn from my mistake! You can see the power/ground crossing right where the yellow wire transitions to the green wire. If I'd flipped the parts from the 2nd row upside down (putting power on top and ground on the bottom) this wouldn't have happened.
4) Stainless thread is not easy to sew with. I ordered the medium weight line, thinking that a little more material would give me stronger lines, reduce the resistance per foot, and provide better conductivity for attaching a lot of NeoPixels. That’s all still probably true, but it also made the thread a bit harder to sew with. It’s difficult to thread standard needles with thick wire (especially if it’s already been threaded a couple times and just fell off the needle because you were nearing the end of the thread and weren’t paying attention!). It’s also a bit difficult to sew with because it’s not nearly as flexible as cotton or polyester thread, and it tends to kink when you bend it (which happens every time you pull it through a hole in the material). That said, I think I did a reasonable job sewing except for where I ran out of thread and had to connect a new segment. In normal sewing this isn’t a big deal as long as you make sure to tie off the old line and start the new line close enough to keep the strength of the binding constant. When sewing with conductive thread, you need to make sure to keep enough of the threads touching each other that there’s a good connection between them. I generally left a loose end on the thread I was finished with, and crossed over it several times with the new thread.
I finished sewing the power and ground lines with time to spare, so I swiped a couple patches of black cloth from my wife, who was working on my daughter’s costume while I sewed the hat, and made a battery pocket near the Gemma.
When we got home, I tested conductance with a multimeter. I was (slightly surprised and) happy to see that I had infinite resistance between power and ground, and no more than 10 ohms of resistance between any connection pad on an LED and the correct pad (Vout or GND) on the Gemma. No rework required!
This was important because we were taking the kids to the Halloween event at the Henry Ford Sunday night (Hallowe’en in Greenfield Village) , and I was hoping to wear the Safety Hat if I got it finished in time.