


Previous posts for this project:
- [AirCare] InTheAir - Project Description
- [AirCare] InTheAir - Week 1: Getting a Launchpad to Blink
- [AirCare] InTheAir - Week 2: Preparing the Beaglebone Black
- [AirCare] InTheAir - Week 3: Fuel Tank Testing
- [AirCare] InTheAir - Week 4: Using the CC3200
Introduction
Other competitors in this challenge have already described how they installed openHAB. I did notice however that they used different methods to go the job done.
In this post, I describe the method that I've used to deploy the latest version of openHAB (v1.6.0) and how I created a basic configuration to receive MQTT messages.
By the end of the post, I have openHAB subscribing to a broker, receiving MQTT messages sent by the CC3200 containing some statistics on the FuelTank's battery.
Preparation
First, I updated my system and ensured the "unzip" tool was installed, as I'll be requiring it to install openHAB.
debian@beaglebone:~$ sudo apt-get update
debian@beaglebone:~$ sudo apt-get upgrade
debian@beaglebone:~$ sudo apt-get install unzip
I also configured the proper timezone.
debian@beaglebone:~$ sudo dpkg-reconfigure tzdata

Current default time zone: 'Europe/Brussels'
Local time is now:      Wed Nov 26 12:23:46 CET 2014.
Universal Time is now:  Wed Nov 26 11:23:46 UTC 2014.
Java
To install Java on the BBB, I followed the steps defined by nikil511 in the following post: [Air ex Machina] #04 Beaglebone for dummies - JAVA,OpenHab
I did add "sudo" here and there, as I was running the commands as user "debian" and not "root".
debian@beaglebone:~$ echo "deb http://ppa.launchpad.net/webupd8team/java/ubuntu precise main" | sudo tee /etc/apt/sources.list.d/webupd8team-java.list
debian@beaglebone:~$ echo "deb-src http://ppa.launchpad.net/webupd8team/java/ubuntu precise main" | sudo tee -a /etc/apt/sources.list.d/webupd8team-java.list
debian@beaglebone:~$ sudo apt-key adv --keyserver keyserver.ubuntu.com --recv-keys EEA14886
debian@beaglebone:~$ sudo apt-get update
debian@beaglebone:~$ sudo apt-get install oracle-java8-installer
Easy enough, and Java was installed!
openHAB
I installed openHAB a bit more manually than the other competitors here, but it works just as well.
First thing I did, was to download the openHAB runtime and addons for version 1.6.0 directly on the Beaglebone Black.
debian@beaglebone:~$ wget https://github.com/openhab/openhab/releases/download/v1.6.0/distribution-1.6.0-runtime.zip
debian@beaglebone:~$ wget https://github.com/openhab/openhab/releases/download/v1.6.0/distribution-1.6.0-addons.zip
Next, I prepared the location I would deploy the application to.
debian@beaglebone:~$ sudo mkdir /opt/openhab
debian@beaglebone:~$ cd /opt/openhab/
debian@beaglebone:/opt/openhab$ sudo unzip /home/debian/distribution-1.6.0-runtime.zip
Then, I deployed the addons (bindings, actions, persistence, ...), but I did it in a subfolder called "unused".
That way, openHAB will not load all the addons, but I can easily deploy/activate them by moving the files from the "unused" folder back to the "addons" folder.
debian@beaglebone:/opt/openhab$ cd addons/
debian@beaglebone:/opt/openhab/addons$ sudo mkdir unused
debian@beaglebone:/opt/openhab/addons$ cd unused/
debian@beaglebone:/opt/openhab/addons/unused$ sudo unzip /home/debian/distribution-1.6.0-addons.zip
openHAB requires a configuration file to be able to work properly, so I created one, based on the default.
debian@beaglebone:/opt/openhab/addons/unused$ cd ../../configurations/
debian@beaglebone:/opt/openhab/configurations$ sudo cp openhab_default.cfg openhab.cfg
I also created some placeholders for my items, sitemap and rules.
debian@beaglebone:/opt/openhab/configurations$ sudo touch items/intheair.items
debian@beaglebone:/opt/openhab/configurations$ sudo touch sitemaps/intheair.sitemap
debian@beaglebone:/opt/openhab/configurations$ sudo touch rules/intheair.rules
Finally, I made the startup script executable, edited the HTTP port in it to use port "9090" instead of the default "8080".
debian@beaglebone:/opt/openhab$ sudo nano start.sh


...
# set ports for HTTP(S) server
HTTP_PORT=9090
...
debian@beaglebone:/opt/openhab$ sudo chmod +x start.sh
debian@beaglebone:/opt/openhab$ sudo ./start.sh
openHAB was installed successfully!
MQTT
Last week, I already explained how I got the CC3200 to publish data to a broker. The next step, was to have openHAB subscribe to that same data and visualise it.
Using MQTT with openHAB is made easy by means of a ready-to-use MQTT binding.
The first step, is to prepare the MQTT binding addon and define the broker to be used.
To activate the addon, I moved it from the "unused" folder created earlier, to the "addons" folder so that openHAB would be able to use it.
debian@beaglebone:/opt/openhab/addons$ sudo mv unused/org.openhab.binding.mqtt-1.6.0.jar .
Because I also intend to use persistence, I deployed the required addon for that as well.
I've used MySQL persistence before and thought I'd use RRD4J this time around.
debian@beaglebone:/opt/openhab/addons$ sudo mv unused/org.openhab.persistence.rrd4j-1.6.0.jar .
Next, I specified the broker information in the general openHAB configuration file "openhab.cfg".
There is a MQTT binding section in the file, which I edited as follows:
################################# MQTT Transport ######################################
#
# Define your MQTT broker connections here for use in the MQTT Binding or MQTT
# Persistence bundles. Replace <broker> with a id you choose.
#

# URL to the MQTT broker, e.g. tcp://localhost:1883 or ssl://localhost:8883
mqtt:eclipseIot.url=tcp://iot.eclipse.org:1883

# Optional. Client id (max 23 chars) to use when connecting to the broker.
# If not provided a default one is generated.
mqtt:eclipseIot.clientId=bbb-openhab-fvan

# Optional. User id to authenticate with the broker.
# mqtt:<broker>.user=<user>

# Optional. Password to authenticate with the broker.
#mqtt:<broker>.pwd=<password>

# Optional. Set the quality of service level for sending messages to this broker.
# Possible values are 0 (Deliver at most once),1 (Deliver at least once) or 2
# (Deliver exactly once). Defaults to 0.
#mqtt:<broker>.qos=<qos>

# Optional. True or false. Defines if the broker should retain the messages sent to
# it. Defaults to false.
#mqtt:<broker>.retain=<retain>

# Optional. True or false. Defines if messages are published asynchronously or
# synchronously. Defaults to true.
#mqtt:<broker>.async=<async>

# Optional. Defines the last will and testament that is sent when this client goes offline
# Format: topic:message:qos:retained <br/>
#mqtt:<broker>.lwt=<last will definition>
For the parameters you intend to use, it is important to uncomment them and to replace "<broker>" by an alias you can refer to in the items configuration. In this case, I used "eclipseIot" as an alias for testing.<broker>
Then, I started defining my items in the "intheair.items" file.
Group All
Number FT_Voltage_Period "Chart Period"
Number FT_TimeToEmpty_Period "Chart Period"
Number FT_StateOfCharge_Period "Chart Period"
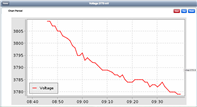
Number FT_Voltage "Voltage [%d mV]" (All) {mqtt="<[eclipseIot:cc3200-fvan/voltage:state:default]"}
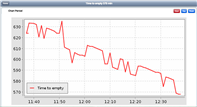
Number FT_TimeToEmpty "Time to empty [%d min]" (All) {mqtt="<[eclipseIot:cc3200-fvan/tte:state:default]"}
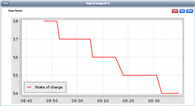
Number FT_StateOfCharge "State of charge [%d %%]" (All) {mqtt="<[eclipseIot:cc3200-fvan/soc:state:default]"}
After the items, I defined the sitemap in the "intheair.sitemap" file. Pretty simple so far: three clickable items, leading to a chart visualising the history of that specific item.
sitemap intheair label="In The Air" {
     Frame label="Fuel Tank" {
          Text item=FT_Voltage {
               Switch item=FT_Voltage_Period label="Chart Period" mappings=[0="Hour", 1="Day", 2="Week"]
               Chart item=FT_Voltage period=h refresh=6000 visibility=[FT_Voltage_Period==0, FT_Voltage_Period=="Uninitialized"]
               Chart item=FT_Voltage period=D refresh=30000 visibility=[FT_Voltage_Period==1]
               Chart item=FT_Voltage period=W refresh=30000 visibility=[FT_Voltage_Period==2]
          }
          Text item=FT_StateOfCharge {
               Switch item=FT_StateOfCharge_Period label="Chart Period" mappings=[0="Hour", 1="Day", 2="Week"]
               Chart item=FT_StateOfCharge period=h refresh=6000 visibility=[FT_StateOfCharge_Period==0, FT_StateOfCharge_Period=="Uninitialized"]
               Chart item=FT_StateOfCharge period=D refresh=30000 visibility=[FT_StateOfCharge_Period==1]
               Chart item=FT_StateOfCharge period=W refresh=30000 visibility=[FT_StateOfCharge_Period==2]
          }
          Text item=FT_TimeToEmpty {
               Switch item=FT_TimeToEmpty_Period label="Chart Period" mappings=[0="Hour", 1="Day", 2="Week"]
               Chart item=FT_TimeToEmpty period=h refresh=6000 visibility=[FT_TimeToEmpty_Period==0, FT_TimeToEmpty_Period=="Uninitialized"]
               Chart item=FT_TimeToEmpty period=D refresh=30000 visibility=[FT_TimeToEmpty_Period==1]
               Chart item=FT_TimeToEmpty period=W refresh=30000 visibility=[FT_TimeToEmpty_Period==2]
          }
     }
}
Finally, I set up the persistence by creating a configuration file for it.
The file should be located in "/opt/openhab/configurations/persistence" and have the name of the persistence service to be used with ".persist" extension. In my case "rrd4j.persist".
This is what I put inside the configuration file:
Strategies {
  everyMinute : "0 * * * * ?"
  everyHour : "0 0 * * * ?"
  everyDay : "0 0 0 * * ?"

  default = everyChange
}

Items {
  * : strategy = everyChange, everyMinute, restoreOnStartup
}
After all the modifications, I restarted openHAB for everything to take effect.
To close this week's post, I have some screenshots of openHAB with some Fuel Tank BoosterPack data received from the CC3200 via MQTT:

In my next post, I'll be describing in detail how I got the Fuel Tank to work with the CC3200 in order to retrieve battery information, along with longer duration measurements.


