element14 Community
element14 Community
    Register Log In
  • Site
  • Search
  • Log In Register
  • About Us
  • Community Hub
    Community Hub
    • What's New on element14
    • Feedback and Support
    • Benefits of Membership
    • Personal Blogs
    • Members Area
    • Achievement Levels
  • Learn
    Learn
    • Ask an Expert
    • eBooks
    • element14 presents
    • Learning Center
    • Tech Spotlight
    • STEM Academy
    • Webinars, Training and Events
    • Learning Groups
  • Technologies
    Technologies
    • 3D Printing
    • FPGA
    • Industrial Automation
    • Internet of Things
    • Power & Energy
    • Sensors
    • Technology Groups
  • Challenges & Projects
    Challenges & Projects
    • Design Challenges
    • element14 presents Projects
    • Project14
    • Arduino Projects
    • Raspberry Pi Projects
    • Project Groups
  • Products
    Products
    • Arduino
    • Avnet Boards Community
    • Dev Tools
    • Manufacturers
    • Multicomp Pro
    • Product Groups
    • Raspberry Pi
    • RoadTests & Reviews
  • Store
    Store
    • Visit Your Store
    • Choose another store...
      • Europe
      •  Austria (German)
      •  Belgium (Dutch, French)
      •  Bulgaria (Bulgarian)
      •  Czech Republic (Czech)
      •  Denmark (Danish)
      •  Estonia (Estonian)
      •  Finland (Finnish)
      •  France (French)
      •  Germany (German)
      •  Hungary (Hungarian)
      •  Ireland
      •  Israel
      •  Italy (Italian)
      •  Latvia (Latvian)
      •  
      •  Lithuania (Lithuanian)
      •  Netherlands (Dutch)
      •  Norway (Norwegian)
      •  Poland (Polish)
      •  Portugal (Portuguese)
      •  Romania (Romanian)
      •  Russia (Russian)
      •  Slovakia (Slovak)
      •  Slovenia (Slovenian)
      •  Spain (Spanish)
      •  Sweden (Swedish)
      •  Switzerland(German, French)
      •  Turkey (Turkish)
      •  United Kingdom
      • Asia Pacific
      •  Australia
      •  China
      •  Hong Kong
      •  India
      •  Korea (Korean)
      •  Malaysia
      •  New Zealand
      •  Philippines
      •  Singapore
      •  Taiwan
      •  Thailand (Thai)
      • Americas
      •  Brazil (Portuguese)
      •  Canada
      •  Mexico (Spanish)
      •  United States
      Can't find the country/region you're looking for? Visit our export site or find a local distributor.
  • Translate
  • Profile
  • Settings
In the Air Design Challenge
  • Challenges & Projects
  • Design Challenges
  • In the Air Design Challenge
  • More
  • Cancel
In the Air Design Challenge
Blog HAB monitoring Post#4 (Using UART in BBB)
  • Blog
  • Forum
  • Documents
  • Polls
  • Files
  • Events
  • Mentions
  • Sub-Groups
  • Tags
  • More
  • Cancel
  • New
  • Share
  • More
  • Cancel
Group Actions
  • Group RSS
  • More
  • Cancel
Engagement
  • Author Author: rmlab
  • Date Created: 16 Nov 2014 8:05 AM Date Created
  • Views 443 views
  • Likes 3 likes
  • Comments 0 comments
  • iot_algal
  • python
  • in_the_air
  • xbee
  • bbb
  • BeagleBone
  • uart
  • shield
  • beagleboard
  • beagle_bone_black
  • arduino
Related
Recommended

HAB monitoring Post#4 (Using UART in BBB)

rmlab
rmlab
16 Nov 2014

In this week's post, I will be using a transceiver connected to a UART of BBB to collect data.

  • Cool features of Beaglebone Black rev C
  • Hardware setup
  • Using UART of BBB


Cool features of Beaglebone Black:

     This is the first time I use BBB and below are some of the cool features I love during the first few days of use. This board is amazing and I'm sure there will be more features to enjoy.

  1. Processor. 1GHz chip with 512 of DDR3 RAM
  2. OnBoard Flash Memory. Referred to as eMMC with pre-installed Debian OS. With this, I was able to use BBB out of the box even without MicroSD card and the change from Angstrom to Debian makes my transition from RaspPi easier.
  3. Mini USB Port. This allows you to access BBB through your computer aside from the ethernet port. Since I frequently change IP address of eth0 of the board, the mini usb port gives me a fix way to access BBB (BTW through 192.168.7.2).
  4. Expansion headers. There are two headers labeled P9 and P8 for GPIO, I2C, SPI, UART, CAN, PWM, ADC


Hardware setup:

imageimage

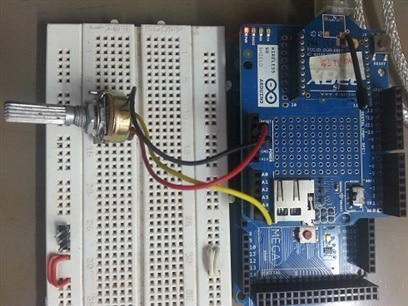
The materials used in this post including Arduino board, shields and XBee radios are just to test the UART of BBB and will not be used in the design challenge instead they will be replaced by MSP4305969 and CC110L. The left figure above is the source of data. I am using Arduino Mega with Wireless shield. The transceiver is XBee series 1. The potentiometer is to simulate analog sensor and connected to A5 of the Arduino board.

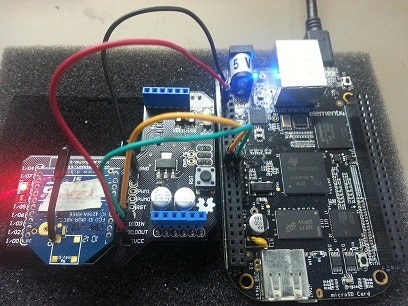
The right figure is a Beaglebone Black conncted to my computer. The XBee s1 is attached to an XBee shield for Arduino but this shield is just used as breakout board in this setup.

  • XBee pin 1 is Vcc connected to P9_3 of BBB (3.3V source) Caution: XBee operates at 3.3V and check the BBB pin mapping below
  • XBee pin 10 is GND connected to P9_1 of BBB (GND)
  • XBee pin 2 is Dout connected to P9_22 of BBB (UART2_RXD)
  • XBee pin 3 is Din connected to P9_21 of BBB (UART2_TXD)


Using UART of Beaglebone Black:

Pin mapping of BBB with UART pins highlight

http://beagleboard.org/Support/bone101image

TxRxdevice
UART0J1_4J1_5/dev/ttyO0
UART1P9_26P9_24/dev/ttyO1
UART2P9_22P9_21

/dev/ttyO2

UART3P9_42/dev/ttyO3
UART4P9_11P9_13/dev/ttyO4
UART5P8_38P8_37/dev/ttyO5


1. To use a particular UART, it has to be enabled first:

# echo BB-UART2 >> /sys/devices/bone_capemgr.9/slots


2. Before the code, you have to install xbee library for python:

#wget https://python-xbee.googlecode.com/files/XBee-2.1.0.tar.gz
#tar -xvf XBee-2.1.0.tar.gz
#cd XBee-2.1.0
#python ./setup.py install


3. Create a python file and give it a name:

# nano xbee_bbb.py


4. Code:

import serial
import time
from xbee import XBee

serial_port = serial.Serial('dev/ttyO2', 9600)

def print_data(data):
     if 'source_addr' in data:
          hex_data = data['rf_data']
          sensor_data = map(ord, hex_data)
          print 'D.O. = %d'%sensor_data[0]
          print sensor_data[1]
          print sensor_data[2]
          print sensro_data[3]

xbee = XBee(serial_port, callback = print_data)
while True:
     try:
          time.sleep(0.01)
     except KeyboardInterrupt:
          break
xbee.halt()
serial_port.close()


Note: Check the table above for device name if you want to use other UART


5. Run the code:

#python xbee_bbb.py


Here is the output:

image

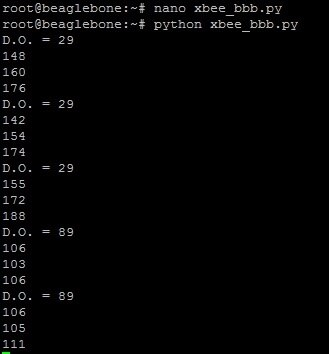
6. Turn the potentiometer connected to A5 of Arduino to see change of value for  D.O. The other 3 values below D.O. are analog readings from A4,A3 and A2 of Arduino and these will be just random values since nothing is connected to these ports.


I am supposed to publish the received data by the BBB to AirVantage cloud but I am having trouble with proxy configuration since my device is behind university proxy.

I will update this post or have it another post with data in the cloud as soon as I'm able to figure out my proxy configuration.

I am able to update and install in my BBB but sending data to cloud fails. Any help on this is much appreciated. Thanks.

  • Sign in to reply
element14 Community

element14 is the first online community specifically for engineers. Connect with your peers and get expert answers to your questions.

  • Members
  • Learn
  • Technologies
  • Challenges & Projects
  • Products
  • Store
  • About Us
  • Feedback & Support
  • FAQs
  • Terms of Use
  • Privacy Policy
  • Legal and Copyright Notices
  • Sitemap
  • Cookies

An Avnet Company © 2025 Premier Farnell Limited. All Rights Reserved.

Premier Farnell Ltd, registered in England and Wales (no 00876412), registered office: Farnell House, Forge Lane, Leeds LS12 2NE.

ICP 备案号 10220084.

Follow element14

  • X
  • Facebook
  • linkedin
  • YouTube