element14 Community
element14 Community
    Register Log In
  • Site
  • Search
  • Log In Register
  • About Us
    About the element14 Community
    About Us
    • Watt's Up?
  • Community Hub
    Community Hub
    • What's New on element14
    • Feedback and Support
    • Benefits of Membership
    • Personal Blogs
    • Members Area
    • Achievement Levels
  • Learn
    Learn
    • Ask an Expert
    • eBooks
    • element14 presents
    • Learning Center
    • Tech Spotlight
    • STEM Academy
    • Webinars, Training and Events
    • Learning Groups
  • Technologies
    Technologies
    • 3D Printing
    • FPGA
    • Industrial Automation
    • Internet of Things
    • Power & Energy
    • Sensors
    • Technology Groups
  • Challenges & Projects
    Challenges & Projects
    • Design Challenges
    • element14 presents Projects
    • Project14
    • Arduino Projects
    • Raspberry Pi Projects
    • Project Groups
  • Products
    Products
    • Arduino
    • Avnet & Tria Boards Community
    • Dev Tools
    • Manufacturers
    • Multicomp Pro
    • Product Groups
    • Raspberry Pi
    • RoadTests & Reviews
  • Store
    Store
    • Visit Your Store
    • Choose another store...
      • Europe
      •  Austria (German)
      •  Belgium (Dutch, French)
      •  Bulgaria (Bulgarian)
      •  Czech Republic (Czech)
      •  Denmark (Danish)
      •  Estonia (Estonian)
      •  Finland (Finnish)
      •  France (French)
      •  Germany (German)
      •  Hungary (Hungarian)
      •  Ireland
      •  Israel
      •  Italy (Italian)
      •  Latvia (Latvian)
      •  
      •  Lithuania (Lithuanian)
      •  Netherlands (Dutch)
      •  Norway (Norwegian)
      •  Poland (Polish)
      •  Portugal (Portuguese)
      •  Romania (Romanian)
      •  Russia (Russian)
      •  Slovakia (Slovak)
      •  Slovenia (Slovenian)
      •  Spain (Spanish)
      •  Sweden (Swedish)
      •  Switzerland(German, French)
      •  Turkey (Turkish)
      •  United Kingdom
      • Asia Pacific
      •  Australia
      •  China
      •  Hong Kong
      •  India
      •  Japan
      •  Korea (Korean)
      •  Malaysia
      •  New Zealand
      •  Philippines
      •  Singapore
      •  Taiwan
      •  Thailand (Thai)
      •  Vietnam
      • Americas
      •  Brazil (Portuguese)
      •  Canada
      •  Mexico (Spanish)
      •  United States
      Can't find the country/region you're looking for? Visit our export site or find a local distributor.
  • Translate
  • Profile
  • Settings
IoT on Wheels Design Challenge
  • Challenges & Projects
  • Design Challenges
  • IoT on Wheels Design Challenge
  • More
  • Cancel
IoT on Wheels Design Challenge
Blog VeTAS - Blog #5: Mobile App - Setup New Device
  • Blog
  • Forum
  • Documents
  • Polls
  • Files
  • Events
  • Mentions
  • Sub-Groups
  • Tags
  • More
  • Cancel
  • New
  • Share
  • More
  • Cancel
Group Actions
  • Group RSS
  • More
  • Cancel
Engagement
  • Author Author: shantimohan
  • Date Created: 12 Nov 2017 6:32 PM Date Created
  • Views 508 views
  • Likes 1 like
  • Comments 0 comments
  • iot on wheels design challenge
  • temperature alert system
  • vetas
  • iot on wheels
Related
Recommended

VeTAS - Blog #5: Mobile App - Setup New Device

shantimohan
shantimohan
12 Nov 2017

In previous blogs, I have shown the Main Menu of the Mobile App. In this blog I will explain the "Setup New Device" option in that menu. Below is the screenshot of this page on Android Emulator running Marshmallow image.

image


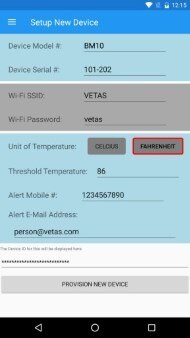
The various components are described here:

  1. Device Model #: The format of this value is two letters followed by two numbers. This will be used in forming the Device Id for cloud access purpose. These indicate as follows,
    1. The 1st letter indicates the Connectivity as follows.
      1. C - Cellular only - When only this connectivity is possible, the WiFi details pane (shown in grey in the above picture) will be disabled as those details need not be input.
      2. W - WiFi only - When this connectivity is possible, the WiFi panel will be enabled.
      3. B - Both Cellular and WiFi connectivity
    2. The 2nd letter indicates the Cloud Service available as follows,
      1. M - Microsoft Azure (Currently this is the only option coded)
      2. A - Amazon Web Services (This service is under examination)
      3. G - Google Web Services (This is not yet considered and meant for future expansion)
    3. The last two digits indicate the version of the hardware board, where the 1st digit is the Major version and the 2nd digit is the Minor version.
  2. Device Serail #: This can take any number of digits. This also will be used in setting the Device Id for cloud access purposes.
  3. WiFi Details pane: This pane will be enabled only if the Model # doesn't start with C.
    1. WiFi SSID: This is the WiFi Network Name.
    2. WiFi Password: Though this is shown in clear text in the screenshot, it will actually be masked with a button to show it momentarily (which is the general practice now for mobile apps).
  4. Unit of Temperature: The button with red border indicates the current selection.
  5. Threshold Temperature: This value is the temperature, in the units selected above, when crossed an alert will be sent to the contact details that will entered next.
  6. Alert Mobile #: This is the mobile phone number to which SMS text message will be sent if cellular connectivity is enabled on the board. However push notifications will anyway be sent for all configurations. The mobile number will be verified by sending a notification to it. Until it is confirmed no alerts will be sent to it.
  7. Alert E-mail Address: When an alert situation occurs an email will be sent to this address if given. This email will be validated by sending a confirmation email. Until it is confirmed no alerts will be sent.
  8. "PROVISION NEW DEVICE" Button: This button will be enabled only after the Model # and Serial # are entered as these two values are needed to formulate the Device Id under which the device is provisioned in the cloud service. When this button is tapped, the designated cloud service will be contacted and the Device Id will be registered with it so that the device can send sensor data to be stored in the cloud. After registering the device with the cloud service, all the details will be sent to the device via Bluetooth so that the device initializes with the parameters and start sending data to the cloud.


The two fields above the button are for development purposes and will not appear in the Release version of the app.

  • Sign in to reply
element14 Community

element14 is the first online community specifically for engineers. Connect with your peers and get expert answers to your questions.

  • Members
  • Learn
  • Technologies
  • Challenges & Projects
  • Products
  • Store
  • About Us
  • Feedback & Support
  • FAQs
  • Terms of Use
  • Privacy Policy
  • Legal and Copyright Notices
  • Sitemap
  • Cookies

An Avnet Company © 2026 Premier Farnell Limited. All Rights Reserved.

Premier Farnell Ltd, registered in England and Wales (no 00876412), registered office: Farnell House, Forge Lane, Leeds LS12 2NE.

ICP 备案号 10220084.

Follow element14

  • X
  • Facebook
  • linkedin
  • YouTube