![]() Addendum BLOG D - Connecting to the Arduino IoT Cloud directly over LoRaWAN
Addendum BLOG D - Connecting to the Arduino IoT Cloud directly over LoRaWAN
This blog is an addendum Blog to "Blog#2 Design (Case Enclosure Reliability Monitor)", for my Design Challenge Just Encase Blog Series. The design in BLOG#2, was my 1st attempt to using the MKR WAN 1300 to connect to the IoT cloud. Since I was not in range of a TTN gateway, I decided to abandon my efforts and came up with another design for the Challenge.
After I finished the blog series for the challenge, I decided to try my initial design Idea and connect the MKR WAN 1300 directly to the Arduino IoT cloud. In this blog, I will detail a solution I came up with to connect an Arduino MKR WAN 1300 to the The Things Network (TTN).and pass the packets from a simple counter Arduino sketch to the Arduino IoT Cloud. I followed all the steps in the in the tutorial on the Arduino site to configure my MKRWAN 1300 to connect it to the Arduino Cloud via The Things Network. This tutorial is is described later on in this blog and from here on described as the "Arduino LoRa Tutorial" .
I Designed and Implemented a LoRa gateway finder that will allow the presence of LoRa WAN Gateway to be detected. It will test for a successful connection to a gateway located on a heatmap of possible gateways in my area. For now I simply get the Lat/Lon coordinates from the heatmap at the TTN Mapper project at ttnmapper.org. I then drive to the location, since Gateways are sparse here in the USA! Once I'm connected, the counter is incremented and the value is sent in a packet via TTN and on to the Arduino IoT cloud Thing. A sim[le dashboard will display the value of the counter using this thing variable.
Table of Contents
Design Specification
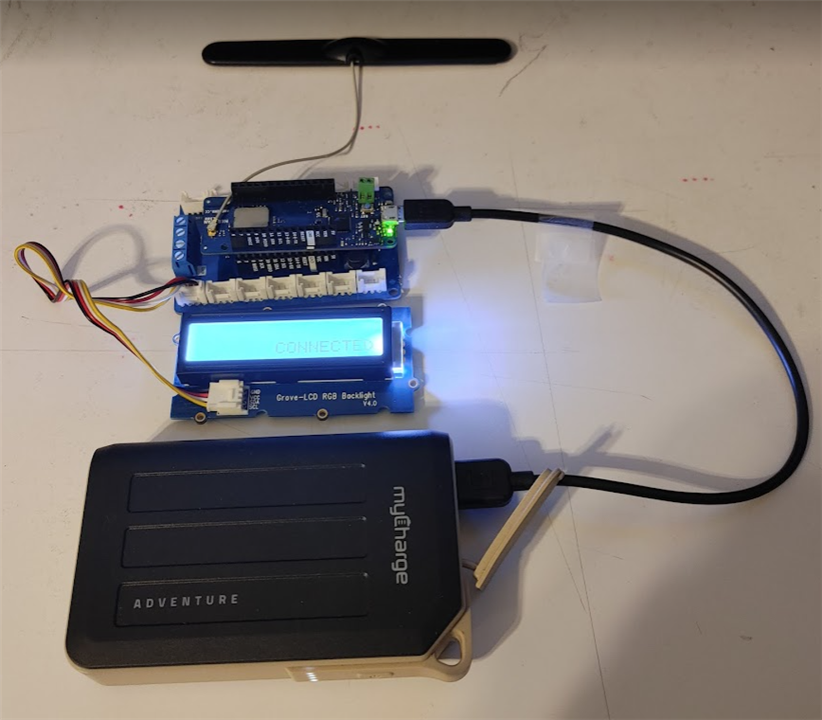
- One MKR will be placed in an Enclosure
- The antenna is tape to the side of the enclosure and the MKR is powered by a USB charger.
- A Dashboard will be implemented on The Arduino IoT Cloud.
- The Dashboard will display COUNTER data from the MKR WAN 1300 in the Enclosure.
- LoRaWAN Connection to the Arduino IoT Cloud
- MKR WAN 1300 -> Antenna -> TTN -> Arduino IoT Cloud -> Dashboard
- The sketch is initially created on the Arduino IoT Cloud, after you create a new THING. I then Modified this sketch to implement my logic. I then upload the Skecth to the MKR WAN 1300. NOTE: you can modify the code all you need to the changes are saved.
- MKR WAN 1300 -> Antenna -> TTN -> Arduino IoT Cloud -> Dashboard
Design Diagrams
1st Attempt
- The following diagram is from my initial attempt to use the TTN to send packets to an Arduino IoT Cloud Dashboard. My idea was to collect sensor data with the MKR WAN 1300 and send the Telemetry Data to the Arduino IoT cloud. This was abandoned by me and even though I followed all the steps in the Arduino LoRa Tutorial , I was never able to test with a TTN gateway.

LoRa Gateway Finder
Here you will find a design that will show the components and flow of the data of my Design for the Lora Gateway Finder. It shows the path taken by the counter value generated on the MKRWan 1300


FINDING A GATEWAY NEAR YOU
- Check out the TTN Mapper tool to see if you are in range of a gateway. Remember that even if you are in range, you may still have issues transmitting data.
- You can check the coverage of your area through TTN Map , but I found TTN Mapper to be more accurate.
- I used the TTN Mapper to locate the nearest gateway to my home. In my case I will need to drive by the the indicated gateway on the TTN Mapper site. .What I really like about the TTN Mapper Heatmap, is that it gives more information then the TTN Map. I shows the date and time of the last LoRaWAN chirp, so I can tell if it's currently active.. Also It gives me the Lat,Lon of the gateway, which I'll be able to use to pinpoint the gateway using Google Maps. Here is one that is 20 minutes away from my home by car.
.
IMPLEMENTATION
-
Follow the Tutorial in appendix A
- After you follow the tutorial in the appendix you will have accomplished the following:
- Configure a LoRaWAN® device in the Arduino Cloud.
- Register an account on The Things Console.
- The generated sketch created for the end device.
- How to View data from the device in the Arduino Cloud.
- now you are ready to add you own code to the generated sketch and run the Finder Sketch.
- After you follow the tutorial in the appendix you will have accomplished the following:
-
Add Code to the Sketch created in the tutorial.
- As mentioned the IoT cloud will construct the basic sketch when creating a dashboard.
- The sketch that is generated follows:
- #include "thingsProperties.h"
- in setup function
- from thingsProperties.h , initProperties();
- from the ArduinoCloud object , Begin(connection);
- for debugmessages, from the ArduinoCloud object
- Set message level
- PrintDebugInfo()
- In the loop function
- from the ArduinoCloud object , update()
- That's the basic flow of all the IoT cloud based code.
- I added some of my own code.to it
- A Display function
- Called to send info to the LCD display
- An IF statement to execute code in the loop if the connection is made.
- NOTE: It is very important to keep pressing the RESET button so that an connection is attempted. Once connected if you go out of range the Display will report that the device is "Not Connected"
- A Display function
- The full sketch follows
 /*
  Sketch generated by the Arduino IoT Cloud Thing "Untitled"
  https://create.arduino.cc/cloud/things/5d51dea6-2054-4153-8357-59a70718489c

  Arduino IoT Cloud Variables description

  The following variables are automatically generated and updated when changes are made to the Thing

  int counter;

  Variables which are marked as READ/WRITE in the Cloud Thing will also have functions
  which are called when their values are changed from the Dashboard.
  These functions are generated with the Thing and added at the end of this sketch.
*/

#include "thingProperties.h"
#include <Wire.h>
#include "rgb_lcd.h"

LoRaModem modem;

rgb_lcd lcd;

//DISPLAY STRING
void Display(String title,String message){
// display title and message on the LCD display
// Put title on the 1st line
// put message on the 2nd line

  //DISPLAY TITLE
  // set the cursor to (0,0):
  lcd.setCursor(0, 0);
  lcd.print(title);
  //lcd.print(" . . . . . . .  ");
  delay(2000);

  //DISPLAY MESSAGE - on a scrolling message on the 2nd line
  // set the cursor to (16,1):
  lcd.setCursor(16,1);
  // set the display to automatically scroll:
  lcd.autoscroll();
  lcd.print(message);
  delay(2000);

  //CLEAN UP
  // turn off automatic scrolling
  lcd.noAutoscroll();
  // clear screen for the next Message
  lcd.clear();
}

void setup() {
  // Initialize serial and wait for port to open:
  //Serial.begin(9600);

  // set up the LCD's number of columns and rows:
  lcd.begin(16, 2);

  // This delay gives the chance to wait for a Serial Monitor without blocking if none is found
  //delay(1500);

  // Defined in thingProperties.h
  initProperties();

  // Connect to Arduino IoT Cloud
  ArduinoCloud.begin(ArduinoIoTPreferredConnection);

    /*
      Invoking `addCallback` on the ArduinoCloud object allows you to subscribe
      to any of the available events and decide which functions to call when they are fired.
      The functions `doThisOnConnect`, `doThisOnSync`, `doThisOnDisconnect`
      are custom functions and can be named to your likings and for this example
      they are defined/implemented at the bottom of the Sketch
  */
  ArduinoCloud.addCallback(ArduinoIoTCloudEvent::CONNECT, doThisOnConnect);
  ArduinoCloud.addCallback(ArduinoIoTCloudEvent::SYNC, doThisOnSync);
  ArduinoCloud.addCallback(ArduinoIoTCloudEvent::DISCONNECT, doThisOnDisconnect);

  /*
     The following function allows you to obtain more information
     related to the state of network and IoT Cloud connection and errors
     the higher number the more granular information you’ll get.
     The default is 0 (only errors).
     Maximum is 4
 */
  setDebugMessageLevel(4);
  ArduinoCloud.printDebugInfo();

  //Serial.print("Your module version is: ");
  //Serial.println(modem.version());
  //Serial.print("Your device EUI is: ");
  //Serial.println(modem.deviceEUI());
}

void loop() {
  ArduinoCloud.update();
  // Your code here
  if (!ArduinoCloud.connected())
  {
    Display("NOT","CONNECTED");
    delay(500);
  }
  else
  {
    Display("CONNECTED","to Gateway");
    delay(500);
    //Increment counter
    counter = counter +1;
    //Serial.print("counter:" );
    //Serial.println(counter);
    Display(" SENT counter:",String(counter));

    delay(1000);
  }

}

/*
  Since Counter is READ_WRITE variable, onCounterChange() is
  executed every time a new value is received from IoT Cloud.
*/
void onCounterChange()  {
  // Add your code here to act upon Counter change
}

void doThisOnConnect(){
  /* add your custom code here */
  //Serial.println("Board successfully connected to Arduino IoT Cloud");
  Display("Board successfully connected", "to Arduino IoT Cloud";
}
void doThisOnSync(){
  /* add your custom code here */
  //Serial.println("Thing Properties synchronised");
  Display("Thing Properties", "synchronised";
}
void doThisOnDisconnect(){
  /* add your custom code here */
  //Serial.println("Board disconnected from Arduino IoT Cloud");
  Display("Board disconnected from", "Arduino IoT Cloud");
}
-
Test the Finder
- Was this connection successful?
- YES, The connection was successful (photos below),The LED did display connected , but the following steps, did not indicate the counter data that should have been sent?
- section 4... Things overview, under the "Last Value / Last Update" column.
- THIS WAS NOT SET
- section 5a ... TSS console on Applications > NameOfApp > End Devices. Here we can see if data is received.
- Basically, if it is not receiving any data, it means that data is not correctly passing through the gateway and the Internet to TTS.
- NO DATA RECEIVED
- Section 5b ... If successful, in the "live data" section, the "first sign of life" should be a message that says "Accept join-request".
- NO MESSAGES?
Here are the photo's during the drive by of the supposed gateway describe. It clearly shows that the connection is made. I wonder what I'm doing wrong? I'm at a lost here and cannot keep driving past this house to make the connection.
| {tabbedtable} description | photo |
|---|---|
| Finder on my car 's dashboard | 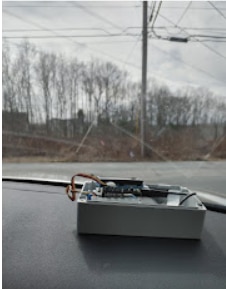 |
| Connected | 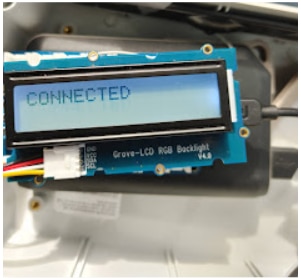 |
| Proof that counter 14 was sent to Gateway |  |
| Counter 14 | 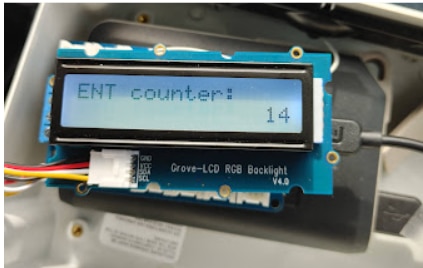 |
| to gateway | 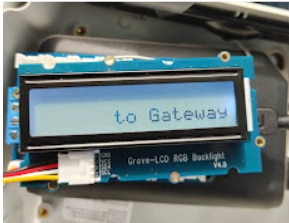 |
APPENDIX A Tutorial - Connect your LoRaWAN® devices to the Arduino Cloud platform via The Things Network.
- This Appendix will. Describe my notes on following tutorial in the Arduino DOCS.
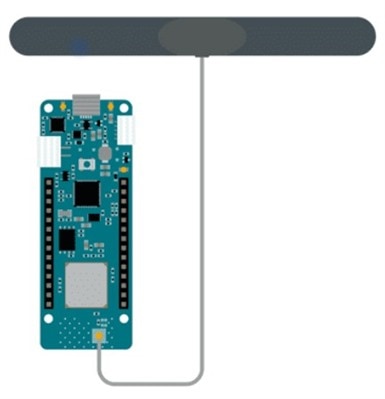
- Connect the antenna to the MKR WAN 1300 connector as follows:
- Configure the MKR WAN 1300
- Follow step1 in the tutorial
- Registering the Things Stack Network
- Follow Step 2 in the tutorial
- Completing Arduino Cloud Setup
- Follow Step 3 in the tutorial