element14 Community
element14 Community
    Register Log In
  • Site
  • Search
  • Log In Register
  • Community Hub
    Community Hub
    • What's New on element14
    • Feedback and Support
    • Benefits of Membership
    • Personal Blogs
    • Members Area
    • Achievement Levels
  • Learn
    Learn
    • Ask an Expert
    • eBooks
    • element14 presents
    • Learning Center
    • Tech Spotlight
    • STEM Academy
    • Webinars, Training and Events
    • Learning Groups
  • Technologies
    Technologies
    • 3D Printing
    • FPGA
    • Industrial Automation
    • Internet of Things
    • Power & Energy
    • Sensors
    • Technology Groups
  • Challenges & Projects
    Challenges & Projects
    • Design Challenges
    • element14 presents Projects
    • Project14
    • Arduino Projects
    • Raspberry Pi Projects
    • Project Groups
  • Products
    Products
    • Arduino
    • Avnet & Tria Boards Community
    • Dev Tools
    • Manufacturers
    • Multicomp Pro
    • Product Groups
    • Raspberry Pi
    • RoadTests & Reviews
  • About Us
  • Store
    Store
    • Visit Your Store
    • Choose another store...
      • Europe
      •  Austria (German)
      •  Belgium (Dutch, French)
      •  Bulgaria (Bulgarian)
      •  Czech Republic (Czech)
      •  Denmark (Danish)
      •  Estonia (Estonian)
      •  Finland (Finnish)
      •  France (French)
      •  Germany (German)
      •  Hungary (Hungarian)
      •  Ireland
      •  Israel
      •  Italy (Italian)
      •  Latvia (Latvian)
      •  
      •  Lithuania (Lithuanian)
      •  Netherlands (Dutch)
      •  Norway (Norwegian)
      •  Poland (Polish)
      •  Portugal (Portuguese)
      •  Romania (Romanian)
      •  Russia (Russian)
      •  Slovakia (Slovak)
      •  Slovenia (Slovenian)
      •  Spain (Spanish)
      •  Sweden (Swedish)
      •  Switzerland(German, French)
      •  Turkey (Turkish)
      •  United Kingdom
      • Asia Pacific
      •  Australia
      •  China
      •  Hong Kong
      •  India
      • Japan
      •  Korea (Korean)
      •  Malaysia
      •  New Zealand
      •  Philippines
      •  Singapore
      •  Taiwan
      •  Thailand (Thai)
      • Vietnam
      • Americas
      •  Brazil (Portuguese)
      •  Canada
      •  Mexico (Spanish)
      •  United States
      Can't find the country/region you're looking for? Visit our export site or find a local distributor.
  • Translate
  • Profile
  • Settings
Just Encase
  • Challenges & Projects
  • Design Challenges
  • Just Encase
  • More
  • Cancel
Just Encase
Blog Biofloc Monitoring System #5: Communication Between Two Arduino MKR WAN 1300
  • Blog
  • Forum
  • Documents
  • Events
  • Polls
  • Files
  • Members
  • Mentions
  • Sub-Groups
  • Tags
  • More
  • Cancel
  • New
Join Just Encase to participate - click to join for free!
  • Share
  • More
  • Cancel
Group Actions
  • Group RSS
  • More
  • Cancel
Engagement
  • Author Author: taifur
  • Date Created: 23 Feb 2022 12:59 PM Date Created
  • Views 1296 views
  • Likes 6 likes
  • Comments 0 comments
Related
Recommended

Biofloc Monitoring System #5: Communication Between Two Arduino MKR WAN 1300

taifur
taifur
23 Feb 2022

Communication Using LoRa

LoRaWAN is an exciting IoT technology that is expanding our communication capabilities. LoRaWAN allows devices to communicate over tens or even hundreds of kilometers (in extreme cases), all without a cell network or a high-powered antenna array. The big tradeoff with this technology is that data rates become severely restricted—in the low kb/s range depending on conditions. While you might not be able to stream a 4k movie or even a low-fi audio clip, LoRaWAN is still an excellent option for intermittent sensor data spread over a wide geographic area.

One way to get started with LoRaWAN is with an internet gateway that already exists, like The Things Network (TTN), or by installing one yourself. An internet gateway lets you get your data to the cloud for usage anywhere, but we can also set up point-to-point communication between two MKR WAN boards as the first step towards LoRaWAN exploration and point-to-point communication is pretty simple, though figuring out the steps can be tricky. Let’s walk through how to get one-way communication going between two of these boards.

Arduino IDE Setup

As for any modern Arduino Board you need to download the right Board and Library. So, once you have started your Arduino application you need to add these elements:

  • Go to Tools >> Boards >> Board Manager menu
  • Search for MKR
  • Select the last revision and click on the Install button.

image

  • Install the MKRWAN library. 

Hardware Needed

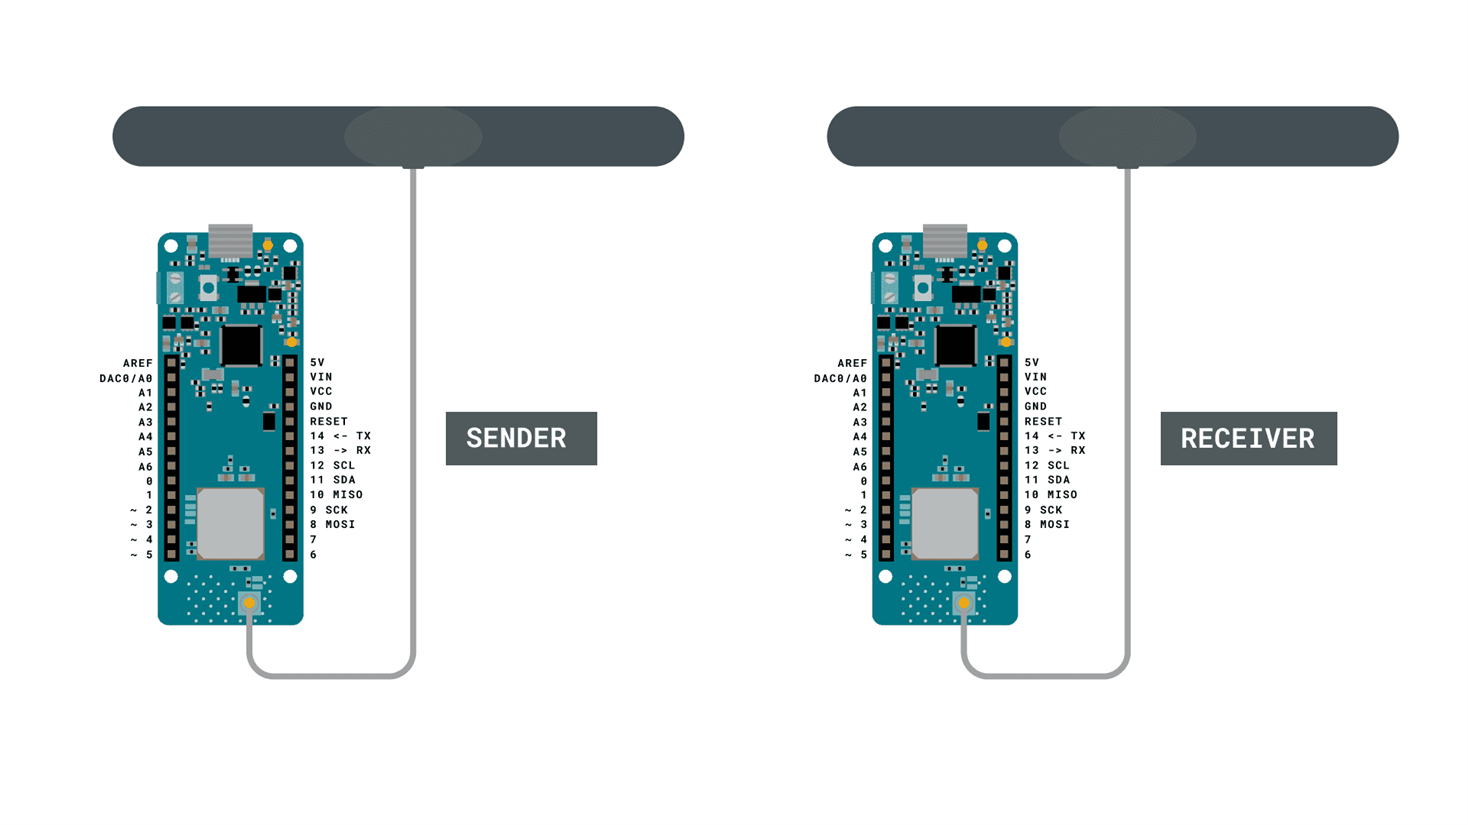
  • 2x Arduino MKR WAN 1300.
  • 2x Antenna.
  • 2x Micro USB cable.

image

Once you have your hardware ready to go, follow these steps to install and run your Arduino LoRaWAN:

1. Physically attach an antenna to both MKR WAN boards.

2. Open two instances of the Arduino IDE via a desktop or Start menu shortcut. Opening both separately (not through the file-new dialog) allows you to manipulate two serial ports at the same time. Doing so will make the process much easier.

3. Navigate back to File-Examples, then LoRa. Under this section, load “LoRaSender” onto one board, then “LoRaReceiver” onto the other.

image

4. Start a serial monitor on both ports, and you’ll see the transmitter board sending a packet every five seconds. The receiver serial port—if everything works properly—will show it receiving these packets with a Received Signal Strength Indication (RSSI) number to show how well the pair is communicating.

Sender Code

#include <SPI.h>
#include <LoRa.h>

int counter = 0;

void setup() {
  Serial.begin(9600);
  while (!Serial);

  Serial.println("LoRa Sender");

  if (!LoRa.begin(868E6)) {
    Serial.println("Starting LoRa failed!");
    while (1);
  }
}

void loop() {
  Serial.print("Sending packet: ");
  Serial.println(counter);

  // send packet
  LoRa.beginPacket();
  LoRa.print("hello ");
  LoRa.print(counter);
  LoRa.endPacket();

  counter++;

  delay(5000);
}


Receiver Code

#include <SPI.h>
#include <LoRa.h>

void setup() {
  Serial.begin(9600);
  while (!Serial);

  Serial.println("LoRa Receiver");

  if (!LoRa.begin(868E6)) {
    Serial.println("Starting LoRa failed!");
    while (1);
  }
}

void loop() {
  // try to parse packet
  int packetSize = LoRa.parsePacket();
  if (packetSize) {
    // received a packet
    Serial.print("Received packet '");

    // read packet
    while (LoRa.available()) {
      Serial.print((char)LoRa.read());
    }

    // print RSSI of packet
    Serial.print("' with RSSI ");
    Serial.println(LoRa.packetRssi());
  }
}

Troubleshoot

If the code is not working, there are some common issues we might need to troubleshoot:

  • Antenna is not connected properly.
  • The radio frequency is wrong. Remember, 868E6 for Europe and 915E6 for Australia & North America.
  • We have not opened the Serial Monitor.
  • We are using the same computer for both boards without a serial interfacing program.

More Detail is here. 

  • Sign in to reply
element14 Community

element14 is the first online community specifically for engineers. Connect with your peers and get expert answers to your questions.

  • Members
  • Learn
  • Technologies
  • Challenges & Projects
  • Products
  • Store
  • About Us
  • Feedback & Support
  • FAQs
  • Terms of Use
  • Privacy Policy
  • Legal and Copyright Notices
  • Sitemap
  • Cookies

An Avnet Company © 2025 Premier Farnell Limited. All Rights Reserved.

Premier Farnell Ltd, registered in England and Wales (no 00876412), registered office: Farnell House, Forge Lane, Leeds LS12 2NE.

ICP 备案号 10220084.

Follow element14

  • X
  • Facebook
  • linkedin
  • YouTube