element14 Community
element14 Community
    Register Log In
  • Site
  • Search
  • Log In Register
  • About Us
  • Community Hub
    Community Hub
    • What's New on element14
    • Feedback and Support
    • Benefits of Membership
    • Personal Blogs
    • Members Area
    • Achievement Levels
  • Learn
    Learn
    • Ask an Expert
    • eBooks
    • element14 presents
    • Learning Center
    • Tech Spotlight
    • STEM Academy
    • Webinars, Training and Events
    • Learning Groups
  • Technologies
    Technologies
    • 3D Printing
    • FPGA
    • Industrial Automation
    • Internet of Things
    • Power & Energy
    • Sensors
    • Technology Groups
  • Challenges & Projects
    Challenges & Projects
    • Design Challenges
    • element14 presents Projects
    • Project14
    • Arduino Projects
    • Raspberry Pi Projects
    • Project Groups
  • Products
    Products
    • Arduino
    • Avnet Boards Community
    • Dev Tools
    • Manufacturers
    • Multicomp Pro
    • Product Groups
    • Raspberry Pi
    • RoadTests & Reviews
  • Store
    Store
    • Visit Your Store
    • Choose another store...
      • Europe
      •  Austria (German)
      •  Belgium (Dutch, French)
      •  Bulgaria (Bulgarian)
      •  Czech Republic (Czech)
      •  Denmark (Danish)
      •  Estonia (Estonian)
      •  Finland (Finnish)
      •  France (French)
      •  Germany (German)
      •  Hungary (Hungarian)
      •  Ireland
      •  Israel
      •  Italy (Italian)
      •  Latvia (Latvian)
      •  
      •  Lithuania (Lithuanian)
      •  Netherlands (Dutch)
      •  Norway (Norwegian)
      •  Poland (Polish)
      •  Portugal (Portuguese)
      •  Romania (Romanian)
      •  Russia (Russian)
      •  Slovakia (Slovak)
      •  Slovenia (Slovenian)
      •  Spain (Spanish)
      •  Sweden (Swedish)
      •  Switzerland(German, French)
      •  Turkey (Turkish)
      •  United Kingdom
      • Asia Pacific
      •  Australia
      •  China
      •  Hong Kong
      •  India
      •  Korea (Korean)
      •  Malaysia
      •  New Zealand
      •  Philippines
      •  Singapore
      •  Taiwan
      •  Thailand (Thai)
      • Americas
      •  Brazil (Portuguese)
      •  Canada
      •  Mexico (Spanish)
      •  United States
      Can't find the country/region you're looking for? Visit our export site or find a local distributor.
  • Translate
  • Profile
  • Settings
N-gaged Design Challenge
  • Challenges & Projects
  • Design Challenges
  • N-gaged Design Challenge
  • More
  • Cancel
N-gaged Design Challenge
N-Gaged Blog MTT - Layer N Wireless Smart Sensor
  • Blog
  • Forum
  • Documents
  • Polls
  • Files
  • Leaderboard
  • Mentions
  • Sub-Groups
  • Tags
  • More
  • Cancel
  • New
  • Share
  • More
  • Cancel
Group Actions
  • Group RSS
  • More
  • Cancel
Engagement
  • Author Author: scottiebabe
  • Date Created: 12 Apr 2022 1:28 PM Date Created
  • Views 1235 views
  • Likes 5 likes
  • Comments 2 comments
Related
Recommended

MTT - Layer N Wireless Smart Sensor

scottiebabe
scottiebabe
12 Apr 2022

I welcome you to my second blog as part of my Maple Tree Telemetry project. In this blog, I will setup and explore some of the features of the SS-002-3 smart wireless sensor.

image

Setup

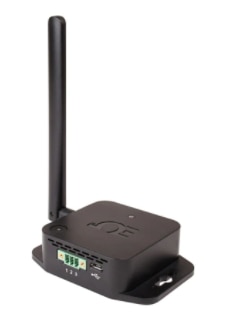
Getting the wireless sensor up and running was quick and easy. With the layer-n gateway already setup and registered to my layer-n cloud account, I was ready to get the sensor setup. I first attached the included antenna onto the SMA connector. Then, installed the included AA batteries into the sensor node. Then pressed the pair button on the gateway, and a few seconds later pressed the pair button on the sensor node. Eventually the gateway transitioned from a blinking orange LED to a solid green LED. Likewise, the sensor node's status LED turned off, from a blinking orange LED indicator. Presumably, the sensor node paired. It took sometime for the senor to show up on the layer-n cloud interface, on the order of 30 minutes or more. But eventually, it got there.

Configuration

By default, the sensor node was configured to measure a dry contact switch.

In the Omega Sync measurement and configuration tool, I configured the SS-002 to measure a thermocouple on its terminal block input and report temperature, humidity, and light from the units internal environmental sensors. It's worth pointing out that you can only report 4 measurement fields.

image

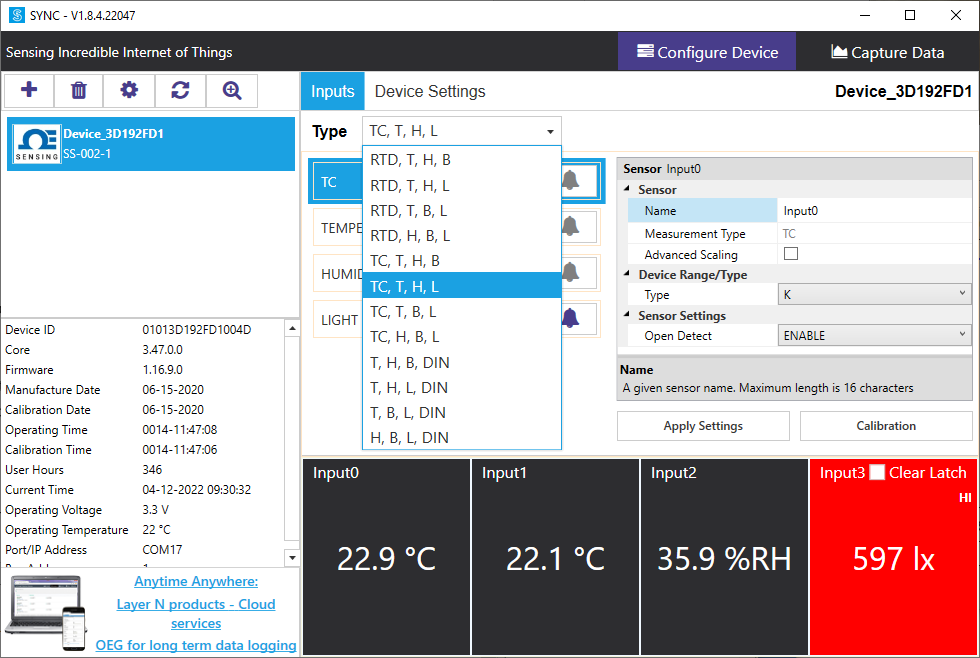
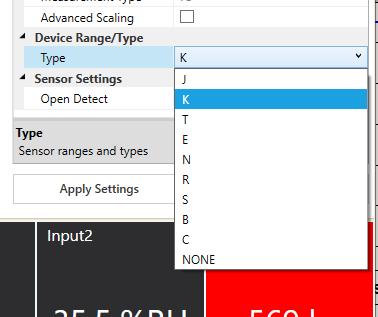
I selected the thermocouple type as k-type:

image

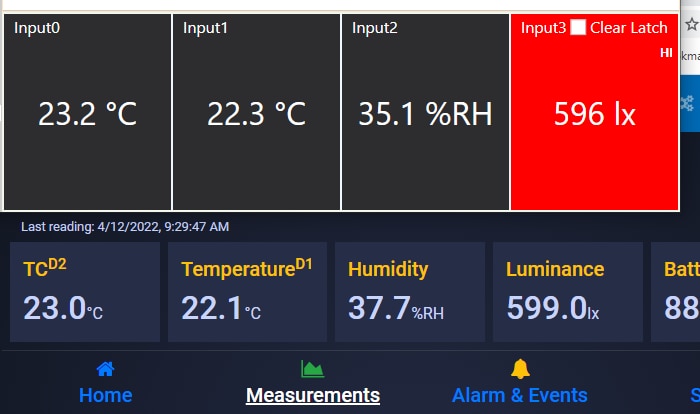
I also configured an alarm for high lux readings:

image

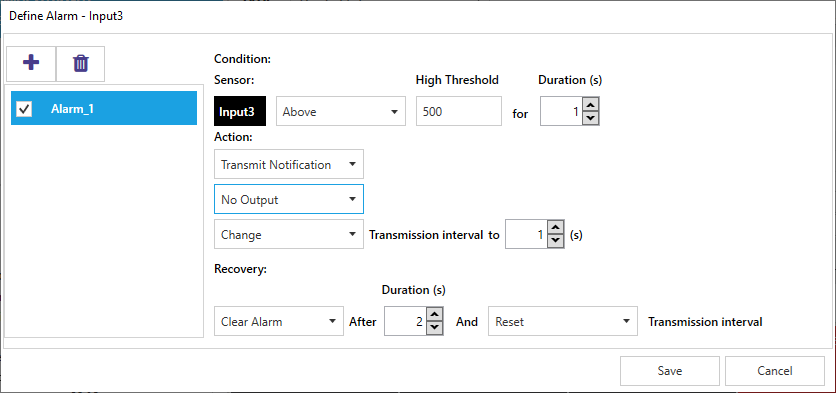
In the alarm configuration panel, I could have also requested a state change on one of the gateway's digital outputs, too cool!

I now had sensor data streaming to the layer-n cloud!

image

Installation

I have opted to use a birdhouse as an outdoor enclosure as I feel its more aesthetically pleasing mounted in a tree than an industrial IP67 enclosure. I used the included screws in the kit to mount the wireless sensor in a little birdhouse.

image 

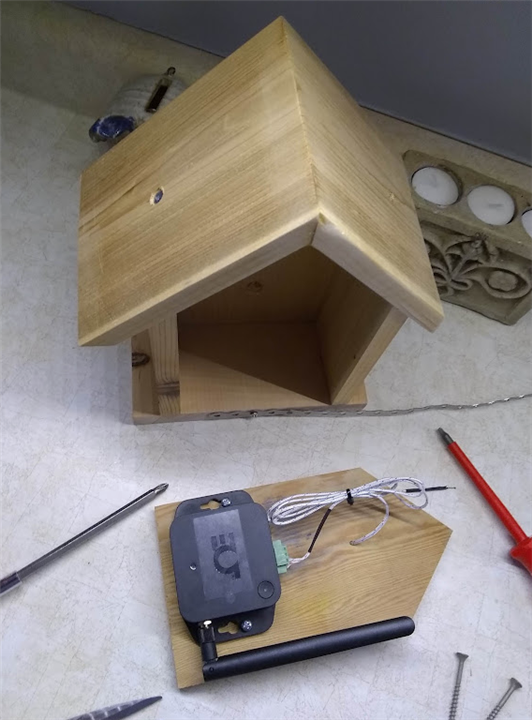
The thermocouple is drawn threw a small hole in the rear panel of the birdhouse.

 image

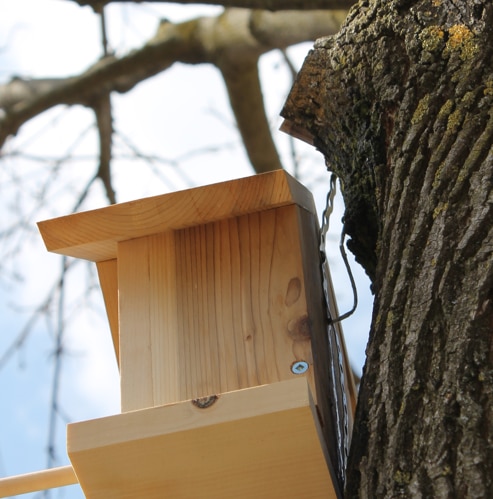
I drilled a 1/8” hole just below the tree bark to and inserted the thermocouple. And, finally I mounted the birdhouse with some all-round pipe strapping in the maple tree:

 image image

Really Nice Components Inside

I haven’t yet taken my own unit apart, so I am just going of what part numbers I could see in the FCC report for this unit. I couldn’t make out the environmental sensors (light, pressure, temperature, humidity) used in the product but the following are the notable integrated circuits used:

  • TI MSP430FR5964
  • TI CC1312 (sub GHz radio)
  • TI CC1190 (RF LNA + PA)
  • TI ADS124S06

The ADS124S06 is the analog measurement frontend that enables the SS-002-03 to accept a diverse range of temperature probes or a dry contact switch on its 3 terminal connector blocks. What a chip!

image

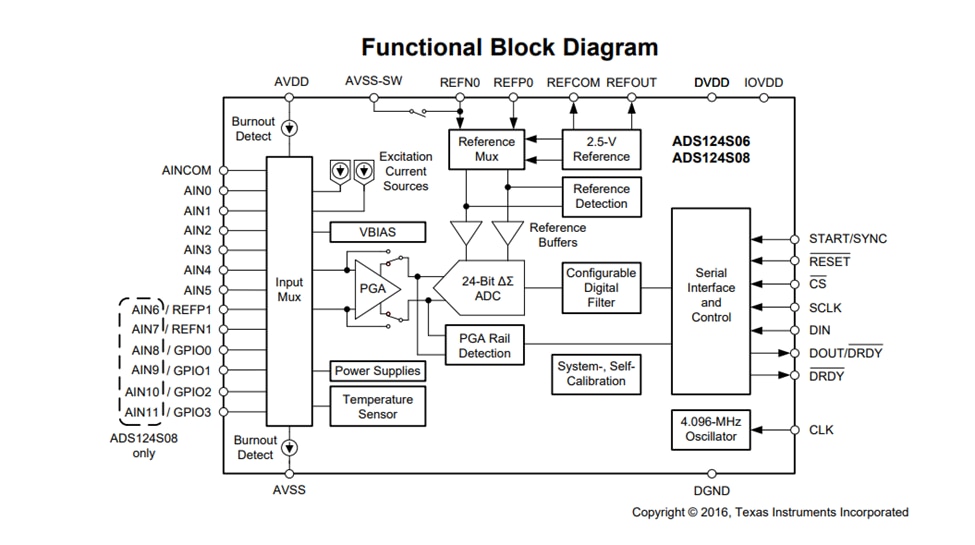
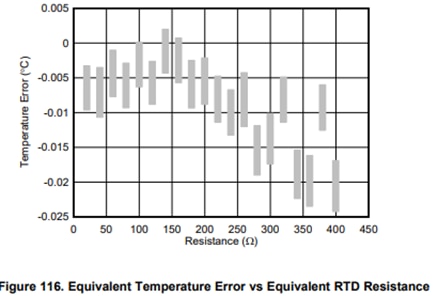
This integrated measurement frontend includes everything needed to make precision low-level resistance and voltage measurements. If you skim through the datasheet, you will find detailed examples of both 3-wire and 4-wire RTD resistance measurements and the expected solution precision and accuracy using the ads124S06:

image

And, to top it off, when the ADS124S0X is running at its highest oversampling ratio, the input-referred noise is a mere 20 nVrms.

Presumably the unit is also factory tested and calibrated by Omega adding even more measurement confidence to the product.

Battery Powered

The wireless senor can be powered either over USB via the unit’s micro-USB connector or a pair of AA batteries. In the layer-n dashboard the sensor reports battery status. I wanted to see what the value means as a function of battery voltage. So, I powered the sensor off my bench power supply and adjusted the supplied voltage from 1.8V to 3.2V and noted the battery status reported:

image

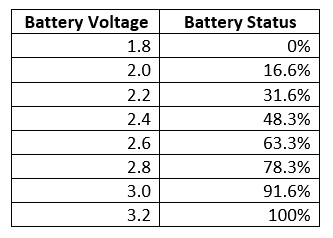
I am happy to see that the unit will operate down to 900 mV per cell, allowing virtual all of the energy capacity of a cell to be utilized. Additionally, I see no reason why this unit wouldn’t happily operate on rechargeable Ni-MH cells.

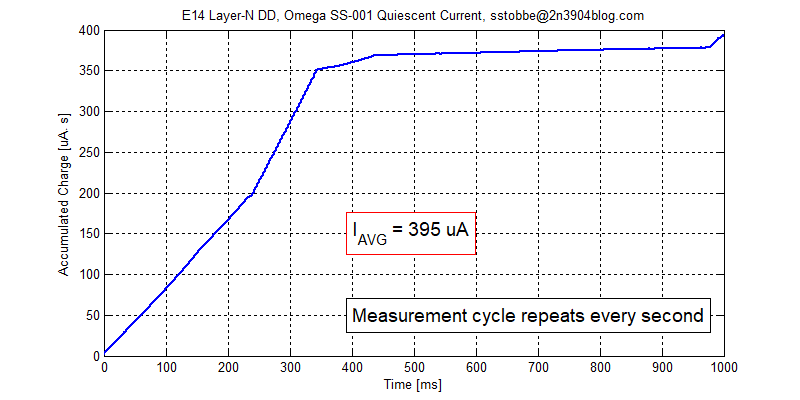
In my limited trial period prior to writing this blog, I found the battery life to be reasonable but by no means extraordinary. Having an alarm trigger a measurement and transmission every 30 s resulted in the reported battery capacity decline from 100% to 88% over the course of 4 days. I measured the baseline quiescent current of the sensor node with no radio activity to be 400 uA. Even if the sensor isn’t transmitting data to the cloud, the unit still wakes up once a second to sample its onboard sensors for 300 ms. Perhaps there is a way to change this, but it wasn’t obvious to me. Here is the integrated current consumption over 1 second:

image

Getting a battery life of 1.5 years appears to be a bit of a stretch. Depending on sensor reporting interval this unit would appear to easy achieve a 6 month battery life. I could also easily trickle charge the Ni-MH/Ni-Cd AA cells off a small solar panel and never change the batteries! Slight smile

What a neat little sensor! Thanks for stopping by the birdhouse :) 

  • Sign in to reply
Parents
  • skruglewicz
    skruglewicz over 3 years ago

    Hi fellow challenger...

    Nice post. I'm having a blast using this device and would like to know more.

    I'd be interested in knowing how to use the sensor block on the device. Could you share the model of the thermocouple you used and describe the connection to the  terminal block input?

    Regards

    Steve K 

    • Cancel
    • Vote Up 0 Vote Down
    • Sign in to reply
    • More
    • Cancel
Comment
  • skruglewicz
    skruglewicz over 3 years ago

    Hi fellow challenger...

    Nice post. I'm having a blast using this device and would like to know more.

    I'd be interested in knowing how to use the sensor block on the device. Could you share the model of the thermocouple you used and describe the connection to the  terminal block input?

    Regards

    Steve K 

    • Cancel
    • Vote Up 0 Vote Down
    • Sign in to reply
    • More
    • Cancel
Children
  • scottiebabe
    scottiebabe over 3 years ago in reply to skruglewicz

    Thanks! I think your inquiry is a good one and I will add a section about connecting the thermocouple. The k-type thermocouple was just a generic cheapie. I cut the connector off and striped the two wires. Then followed the wiring guide in the manual:

    imageimage

    I don't think you need an expensive sensor just to get started:

    image

    You can also find k-type thermocouple pretty much everywhere, of course Omega has some really nice ones! https://www.omega.com/en-us/temperature-measurement/c/temperature-wire-sensors 

    • Cancel
    • Vote Up 0 Vote Down
    • Sign in to reply
    • More
    • Cancel
element14 Community

element14 is the first online community specifically for engineers. Connect with your peers and get expert answers to your questions.

  • Members
  • Learn
  • Technologies
  • Challenges & Projects
  • Products
  • Store
  • About Us
  • Feedback & Support
  • FAQs
  • Terms of Use
  • Privacy Policy
  • Legal and Copyright Notices
  • Sitemap
  • Cookies

An Avnet Company © 2025 Premier Farnell Limited. All Rights Reserved.

Premier Farnell Ltd, registered in England and Wales (no 00876412), registered office: Farnell House, Forge Lane, Leeds LS12 2NE.

ICP 备案号 10220084.

Follow element14

  • X
  • Facebook
  • linkedin
  • YouTube