


Intro
This is the first time I publish something on element14 – so I am bit nervous but very excited about the journey, as we follow the three courses on developing for Zynq MPSoC. It took a while to ship the ULTRA96-V2 kit from Chicago to the UK, so I only spent around 5 days with the board by now.
The training program consists of three core modules – Software, Hardware and Petalinux. I decided to focus on the software course to begin with and have now completed 3 out of 11 labs, which we will go in more detail a bit later in this post.
Setting Up
The first step was of course to set up the development environment and install the required Xilinx tools. The Avnet guide on setting up an Ubuntu VM for these purposes is probably the most extensive guide of this kind you will ever find – almost 60 pages of detailed step-by-step instructions with relevant references to external resources. All the tweaks you have to do in Ubuntu are explained properly, so you never get a feeling of blindly following a set of “black box” actions. I also decided not to deviate from the guide and proceeded with installing Ubuntu 16.04 LTS and Xilinx tools v2018.3 instead of the latest ones available (18.04 LTS and v2019.1 respectively). I wanted to make sure that my setup matches exactly the one used in the course materials to avoid any unnecessary compatibility issues.
The screenshot below shows my VM with a shared folder setup and Oracle VirtualBox Guest Additions mounted correctly.

Software Labs 1-3
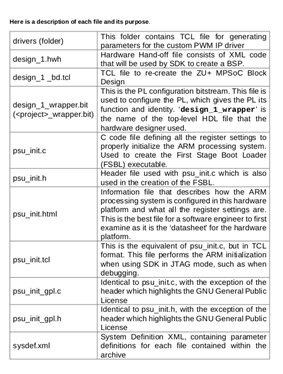
The first 3 Software module labs give a good overview of the Xilinx SDK and how it links to the Hardware platform. I have through the process of exporting hardware platform generated in Vivado to the SDK before in my university courses. However, I have never really paid attention to what the internals of the exported archive file are (this is the file with .hdf extension). Therefore, I found it very useful that the purpose of each component is explained clearly (see screenshot below).
It feels quite unusual that up until lab 4 u don’t get to run any actual code on the hardware but, to be fair, this is what I really liked in this course: by the time you run the “Hello World” application you know exactly what is happening behind the scenes.
Tutorials give you a lot of pointers to the information on the drivers and IP blocks that are included in the hardware platform. It also forces you to use the documentation efficiently and allows you to explore multiple options to do so. For example, I found the hardware report generated from psu_init.html file handy.
To sum up, the first week with Ultra96-V2 for me was rather theoretical. Nevertheless, I believe I am now on track to some exciting hands-on experiments which I will share with you in the next several days.
P.S. My anti-static mat arrived while I was writing this post, so I am now ready to go!
Top Comments