


I'm finally up and running with the development environment and Xilinx tools. The training material was serious when it mentioned the Ubuntu virtual machine (VM) installation would take a significant amount of time!
The VM instructions were thorough and detailed for the most part; however, there were a few items which weren't explicitly stated. In the network bridging section it said to select "Bridged Adapter" in order to connect the VM to the Internet via my computer's network hardware. If a new IP address was not assigned, it said to restart the Ethernet service. There are a few ways to check the IP address. One is to use the Ubuntu GUI and navigate to network settings. Another method is to open a terminal and use the ifconfig command. As seen in Fig 1, this showed a non-standard IP address before applying the "Bridged Adapter" setting.
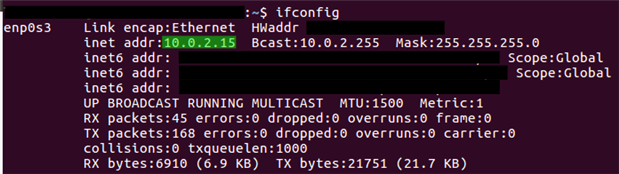
Fig 1
After applying the "Bridged Adapter" setting, a more standard default IP address was assigned, as seen in Fig 2.

Fig 2
When installing the GTK terminal and selecting the USB-UART device to use, the instructions showed a device called "Digilent USB Device". The JTAG programming card included in this training program showed up as "Xilinx JTAG+ Serial" for me, as seen in Fig 3.
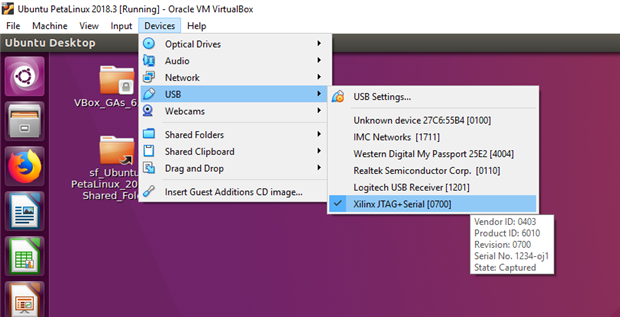
Fig 3
One other issue I came across was a persistent error window in the VM saying: "Could not apply stored configuration for monitors". Searching around a bit, I found a related question asked on the AskUbuntu Stack Exchange which solved the issue for me:
https://askubuntu.com/questions/67337/how-do-i-get-rid-of-this-monitor-error
I got the VM set up without too many issues, however I had some issues with installing Xilinx Vivado / SDK / SDx. I was not expecting the system resource requirement to be so great. The instructions recommended allocating 300GB (150GB minimum) storage for the Ubuntu VM. My laptop did not have enough space to accommodate this, so I installed the VM on an external hard drive. I ended up allocating 200GB to the VM.
The issues came when trying to extract the Xilinx SDx installer on the VM desktop. It would get about halfway and then throw an Input/output error. Trying the md5sum command on the .tar.gz file resulted in a similar error. Stumped, I put down the Xilinx installation until the next day. The next time I plugged in my external hard drive, WIndows said there was an issue with my external drive and it needed to be repaired. This consumed another evening as the disk repair took several hours and was not even finished before the night was up. The next morning I checked, and the disk repair had completed. I tried once again to save the SDx installer to the VM. I ran the md5sum command again just in case and got the correct checksum response; it matched the one listed by Xilinx. After this I tried extracting the installer. Finally it worked! It seems the disk repair healed an unknown issue with my external drive and allowed the SDx installer to be copied correctly to the VM desktop.
It was mostly smooth sailing from there. One final "gotcha" was forgetting to change the name "training" to my VM username when setting up the Desktop links to launch all the Xilinx tools, as seen in FIg 4. It was a simple fix to get the links working and everything seems to be installed correctly now.
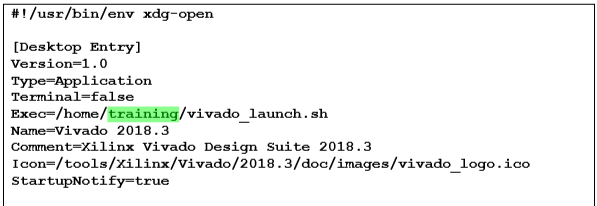
Fig 4
In addition to completing the installation of everything, I followed the Ultra96-V2 Quick Start Guide and Getting Started Guide. I flashed the Ultra96-V2 image on the provided microSD card using Etcher. I inserted the microSD card, connected the USB-JTAG card, opened the serial terminal in the VM and powered on the Ultra96-V2. I could see various booting messages over the serial terminal and was able to login as root to the Ultra96-V2 board. I accessed the Ultra96-V2 web server and was able to play with the demo projects after connecting my laptop to the Ultra96-V2 access point. This was a great demo for getting started, and I'm looking forward to diving deeper into the training now that I'm all set up!
-Phil
Top Comments