


Week 3 marks my start of the PetaLinux course. Before I did that I needed to move the Xilinx development environment to another more powerful computer. I now consider it somewhat of a miracle that I was able to get through the HW and SW courses using an i3 computer with 8GB of memory. I moved the setup (VM and XIlinx tools) to a new i7 with 16GB of memory. Setting up the VM for a second time went quickly and this time I installed Ubuntu 16.04.4 to insure that I was compatible with the Xilinx 2018_3 tools. Getting a new Xilinx license also went smoothly. Xilinx allows you to re-host an entitlement up to 5 times on a self-service basis. If for some reason you needed to do it more than 5 times then you would need to ask for help (and I imagine give some justification). The only requirement is that you agree to destroy the old license. After going through the first few PetaLinux labs I realize that I probably could not have done this particular course with the old computer. Doing a build on the new computer takes over 30 minutes. It probably would have taken the better part of a day on the old computer if it worked at all.
Integrating Sensors on Ultra96 with PetaLinux 2018.3
Course Objectives
- Learn fundamentals of the PetaLinux and the Yocto build system
- Create PetaLinux user level applications to read sensors (uses Click Mezzanine & LCD Mini & LSM6DSL Click boards)
- Use PetaLinux tools:
- Build PetaLinux for Ultra96
- Customize and configure PetaLinux
- Import existing Vivado hardware designs into PetaLinux
- Add custom applications into PetaLinux
- Create your own PetaLinux BSPs
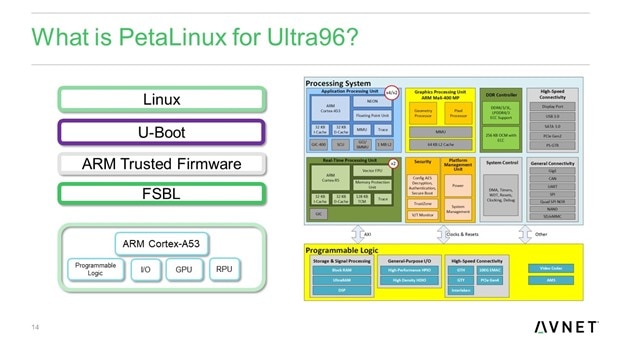
PetaLinux is an embedded Linux OS plus applications. In this case it has been customized for the Ultra96-V2. It consists of a first stage bootloader (FSBL) that initializes the boot process, a security layer if required (ARM trusted Firmware), a second stage bootloader (U-Boot) to load the OS and applications, and finally the Linux OS.
PetaLinux uses a Yocto framework customize and build the embedded Linux distribution. Yocto is an open source framework that uses a build tool called bitbake that uses structures called
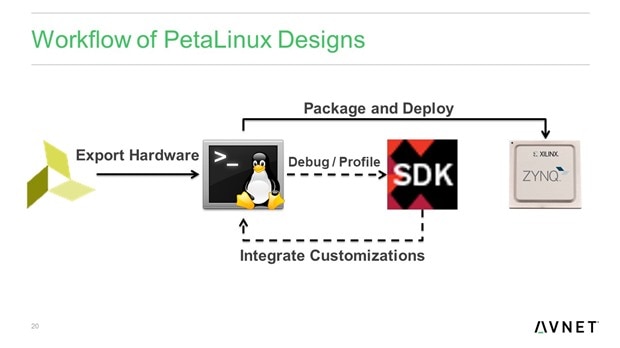
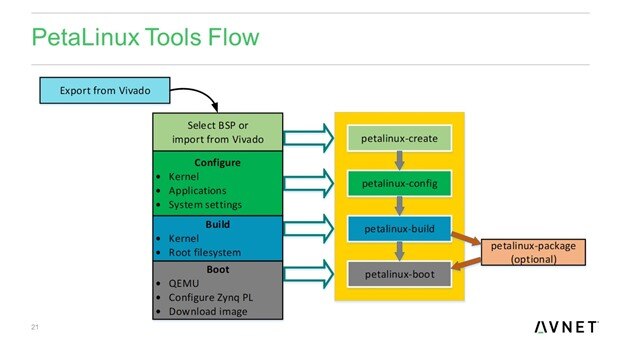
The PetaLinux customized Yocto framework has just 6 commands: petalinux-create, petalinux-config, petalinux-build, petalinux-boot, petalinux-package, petalinux-util
Lab 1 Minimal Ultra96 PetaLinux
Experiment 1: Create, Configure and Build Minimal PetaLinux
This experiment used the 3 commands petalinux-create, petalinux-config, and petalinux-build to develop a minimal Ultra96 PetaLinux image (missing devices like WiFI and Bluetooth).
The petalinux-config gets the hardware description (in this case the HDF archive) and opens a configuration editor to allow modifying kernal settings such as device settings and boot media.
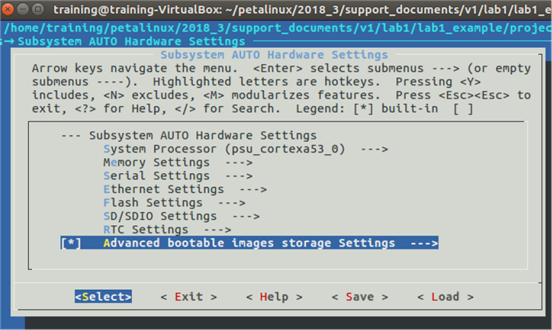
We configure it to boot from the SD card and select the correct UART to interface through the JTAG/UART pod and the we exit and build the configuration from the command line.
Experiment 2: Preparing our SD Card
The SD card needs to be set up in in a very specific configuration. It needs 2 partitions, a BOOT partition for the boot files and a ROOT partition for the root file system. This is accomplished using the fdisk command.
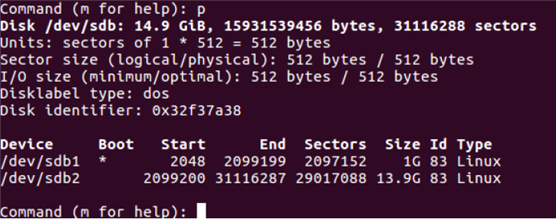
One thing that I did not realize is that Xilinx requires that the boot partition be formatted as FAT32. The root file system partition is required by Linux to formatted as EXT4.
Once the partitions are formatted, we copy the files generated by the build process into the appropriate partitions. And then run sync to flush the VM cache to write the files to the SD card.
Experiment 3: Boot Minimal PetaLinux on Ultra96
Configure the Ultra96 boot switches to boot from SD and then power up while watching the boot messages via a terminal connected to the JTAG/UART pod.
Everything booted fine and I logged in as root. My first successful build!
Lab 2 Updating Fully Featured PetaLinux
Experiment 1: Updating Petalinux
This just involved opening a pre-configured full featured HDF in Vivado and verifying that both of SPI 0's source selects were enabled because they are both need to interface the Click mezzanine card.
Then a new petalinux project was created and confifured using this HDF.
Experiment 2: Customizing the PetaLinux Kernel using the Menu
Enable the User mode SPI device driver support and update the system-user.dtsi file.
Then build the new configuration.
Experiment 3: Customizing the PetaLinux root File System using the Menu
Copy the new boot and rootfs files to the SD card.
Boot the Ultra96 with the new image.
Lab 3 Connect with Ultra96 Using Wi-Fi
Experiment 1: Connect Ultra96 to a LAN with Wi-Fi
When the Ultra96 boots with the new image it operates as a WiFi access point. This lab connects to the access point and then uses a WiFi configuration program to configure the Ultra96 to connect to the local LAN.
As I detailed in an earlier blog, I could not connect to the access point because the image had the incorrect wifi driver specified. After I corrected that everything worked as expected.
Experiment 2: Secure Remote Login and File Transfer
Once the LAN WiFi connection was established I then verified that I could establish an ssh connection and also do file transfers using filezilla.
Experiment 3: Interacting with the Internet
Verified that I was able to ping URLs on the external WAN and the local LAN.
Experiment 4: Internet HTTP File Transfer
Verified that I could pull files from URLs on the external WAN and the local LAN using wget.
Summary:
Very satisfying start to using PetaLinux. Everything is starting to feel real, like I can finally start to do something useful. The next lab, Lab 4, uses the mezzanine card and the LSM6DSL Click. I received a shipment notification that the mezzanine card should be delivered in 2 days. I'll use the down time to start trying to figure out my project.