


Table of Contents
- Introduction
- Training a CNN-based neural network on MNIST?
- Converting PyTorch model to ONNX
- Tensil AI accelerator hardware for Ultra96v2
- Generating Vivado bitstream for Ultra96v2
- LED hardware design
- Creating PYNQ image for Tensil AI
- Capturing image through webcam and generating Morse code
- Conclusion
1. Introduction
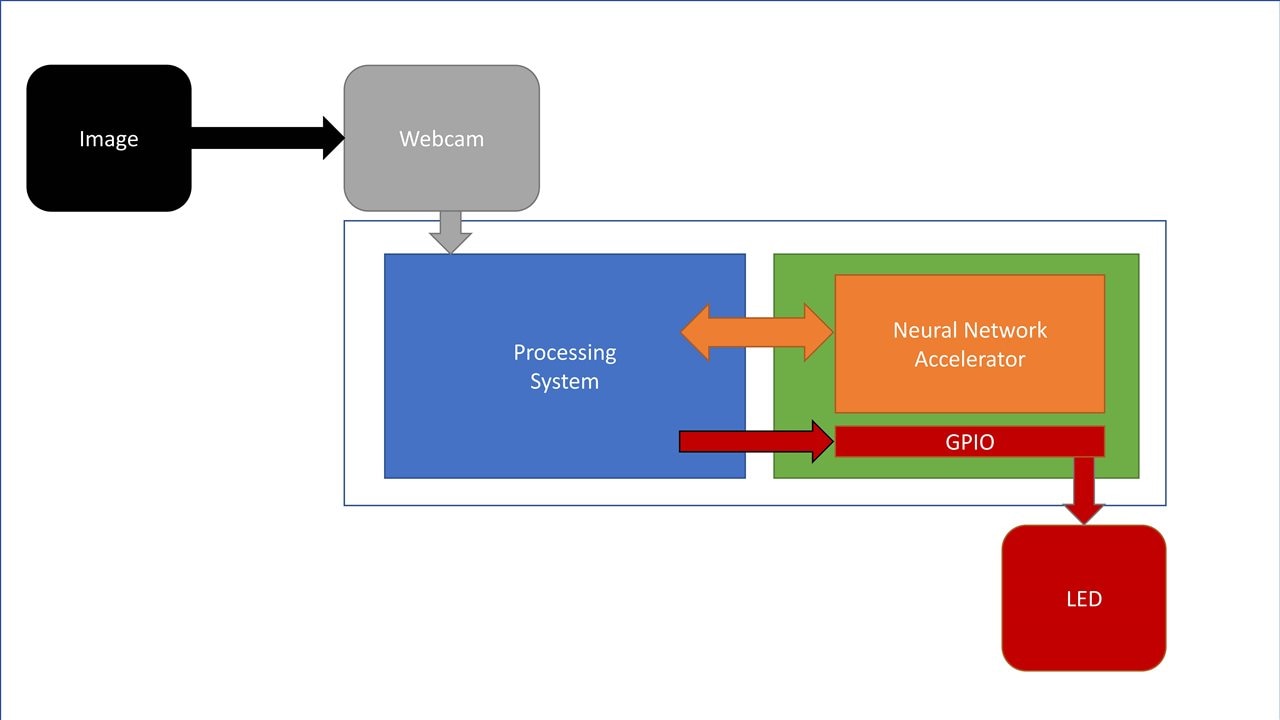
This final project deals with the pipeline from classifying a number fed to a neural network through webcam and then generating Morse code using LEDs connected to the Ultra96v2 board. Figure 1 shows the block diagram of how the system is connected.
The neural network accelerator is implemented using Tensil AI, which is an IP generator just like AMD DPU but open source and supports all the state-of-the-art (SOTA) convolutional neural networks from ResNets to YOLOs.
This uses an extremely simple network and the thought process behind this is to show how to create a real-world pipeline for a neural network in an Ultra96v2 board rather than show the execution of a SOTA model, which can be done by following the same steps as outlined in this project.
All the codes and resources belonging to this project are available here: rajivbishwokarma/tensil_mnist_morse: Files for the Element 14 final blog. (github.com)
2. Training CNN-based neural network in PyTorch
I have used a really simple, — one of the simplest there can be — version of a CNN, i.e., the LeNet but have added a block of fully connected layer and dropout layers to enhance the original network just a tiny bit as can be seen in the following network definition. This network is trained on the famous MNIST dataset for certain number of epochs to get the final model file.
class LeNet(Module):
	def __init__(self, numChannels, classes):
		super(LeNet, self).__init__()

		self.conv1 = Conv2d(in_channels=numChannels, out_channels=20, kernel_size=(5, 5))
		self.relu1 = ReLU()
		self.maxpool1 = MaxPool2d(kernel_size=(2, 2), stride=(2, 2))

		self.conv2 = Conv2d(in_channels=20, out_channels=50,
			kernel_size=(5, 5))
		self.relu2 = ReLU()
		self.maxpool2 = MaxPool2d(kernel_size=(2, 2), stride=(2, 2))

		self.fc1 = Linear(in_features=800, out_features=500)
		self.relu3 = ReLU()
		self.dropout1 = Dropout(p=0.1)

		self.fc2 = Linear(in_features=500, out_features=500)
		self.relu4 = ReLU()
		self.dropout2 = Dropout(p=0.1)

		# initialize our softmax classifier
		self.fc3 = Linear(in_features=500, out_features=classes)
		self.Softmax = Softmax(dim=1)

	def forward(self, x):
		x = self.maxpool1(self.relu1(self.conv1(x)))
		x = self.maxpool2(self.relu2(self.conv2(x)))
		x = self.dropout1(self.relu3(self.fc1(flatten(x, 1))))
		x = self.dropout2(self.relu4(self.fc2(x)))
		output = self.Softmax(self.fc3(x))
		return output
A simple summary of the model yields the following configuration result.
----------------------------------------------------------------
        Layer (type)               Output Shape         Param #
================================================================
            Conv2d-1           [-1, 20, 24, 24]             520
              ReLU-2           [-1, 20, 24, 24]               0
         MaxPool2d-3           [-1, 20, 12, 12]               0
            Conv2d-4             [-1, 50, 8, 8]          25,050
              ReLU-5             [-1, 50, 8, 8]               0
         MaxPool2d-6             [-1, 50, 4, 4]               0
            Linear-7                  [-1, 500]         400,500
              ReLU-8                  [-1, 500]               0
           Dropout-9                  [-1, 500]               0
           Linear-10                  [-1, 500]         250,500
             ReLU-11                  [-1, 500]               0
          Dropout-12                  [-1, 500]               0
           Linear-13                   [-1, 10]           5,010
          Softmax-14                   [-1, 10]               0
================================================================
Total params: 681,580
Trainable params: 681,580
Non-trainable params: 0
----------------------------------------------------------------
Input size (MB): 0.00
Forward/backward pass size (MB): 0.28
Params size (MB): 2.60
Estimated Total Size (MB): 2.88
----------------------------------------------------------------
This network is trained for 50 epochs, which results in a training accuracy of 96% and validation accuracy of 97%. But keep in mind that his is not a good accuracy as proper configuration of the network hyperparameters can easily result in the training and validation accuracy of more than 99% for such a simple dataset. However, we get the following training-validation history graph and scores.

Testing the model using the test-dataset results in the following scores.

We now need to convert the obtained model.pth model to ONNX, which is an neural network model exchange format that is supported by all popular neural network frameworks (PyTorch, TensorFlow, etc.).
3. Converting to ONNX
PyTorch has a separate class torch.onnx to convert PyTorch model to ONNX format. Therefore, we first set the model to evaluation mode and then provide a dummy input to the model and export the model using the torch.onnx.export() function. Following is the complete code, which can also be seen at the end of the notebook provided in the repo.
model.eval()
dummy_input = torch.randn(1, 1, 28, 28, requires_grad=True).to(device)

output_model = "e14_mnist_" + str(EPOCHS)+ "_tacc_" +str(int(train_correct*100))+".onnx"

torch.onnx.export(model,
                  dummy_input,
                  output_model,
                  export_params=True,
                  opset_version=10,
                  do_constant_folding=True,
                  input_names = ['x:0'],
                  output_names = ['Identity:0'])
Note the inputs_names and output_names parameters. We have to be careful when giving the name. Tensil TCU supports the accessing the input and output names in certain format: <input_layer>:0 and <output_layer>:0.
With that, the model found in the github is obtained.
4. Tensil AI accelerator hardware for Ultra96v2
Tensil AI is a neural network accelerator generator. More information can be found here: [https://www.tensil.ai/docs/tutorials/resnet20-ultra96v2/]
4.1 Docker and Ultra96v2 architecture
We have to first set up docker. Then, running the following command pulls the docker container for Tensil AI from the Docker Hub.
docker pull tensilai/tensil
We can then run the Tensil docker using the following command.
docker run -u $(id -u ${USER}):$(id -g ${USER}) -v $(pwd):/work -w /work -it tensilai/tensil bash
We will see something like the following.

You don’t have to worry about the “I have no name!@b0b..” part — and waste an hour like I did figuring out if there is something wrong with your Tensil docker — as it is normal and is just an issue with the user not being part of the docker group.
Inside the Tensil docker is the architecture file for Ultra96v2 board (along with other boards) as shown below, which contains the following information.
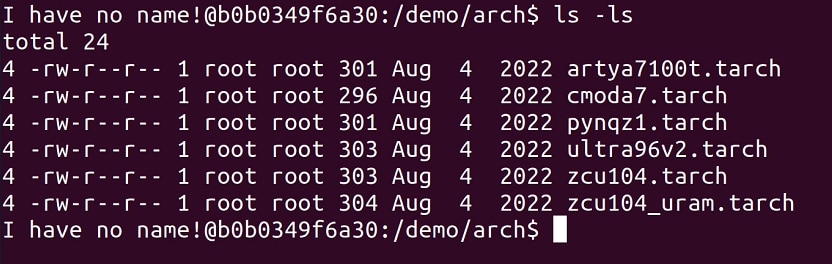
The architecture file for Ultra96v2 board contains the following information.
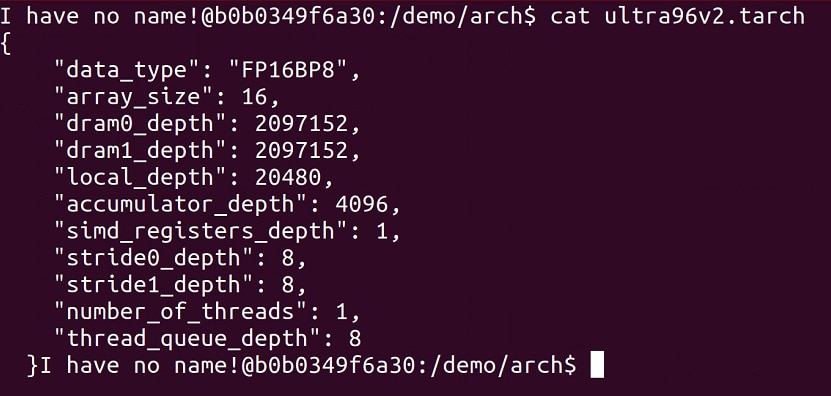
To read about these parameters in depth, please refer to Tensil documentation. In brief, here is what each parameter is:
| Parameter | Description |
|---|---|
| data_type | Data type used in Tensor Compute Unit, FP16BP8: 16-bit Fixed Point 8-bit Base Point |
| array_size | Systolic array of size 16x16 |
| dram0_depth, dram1_depth | Host-side (PS) DRAM0 and DRAM1 memory buffers |
| local_depth | FPGA fabric memory size for local buffers |
| accumulator_depth | FPGA fabric memory size for accumulators |
| simd_registers_depth | Number of registers in each SIMD ALU |
| stride0_depth, stride1_depth | Number of bits for strided memory read/write |
4.2 Compiling ONNX model to Tensil model
Tensil Compute Unit cannot execute the ONNX model that was exported from PyTorch, so we will have to convert the ONNX file to TCU compatible format. We do that with the following command. In the following command, ‘-m’ flag is used to pass the ONNX model file with a relative path. And, remember that I talked about naming the output in when exporting ONNX from PyTorch, well, here is the name that should be identical to the name in the model.
# tensil_compile.sh
# github: shell/tensil_compile.sh
tensil compile -a /demo/arch/ultra96v2.tarch -m e14_mnist_20_lr_0.001.onnx -o "Identity:0" -s true
Running the command, we will get an output as shown below.

The artifacts obtained as the result of the process are the files that we need to run the model in the Ultra96v2 TCU, so keep note of the files.
- <model>.tmodel - Plain text JSON description of the compiled model
- <model>.tprog - Tensil Compute Unit executable program
- <model>.tdata - Weights for the compiled model
4.3 Generating Tensil AI TCU RTL for Ultra96v2
We can then generate the Tensil TCU RTL using the following command.
tensil rtl -a /demo/arch/ultra96v2.tarch -s true -d 128
We then get the following output as a result.

Out of the four, three Verilog files generated are of importance. They implement the TCU and memory interface. These files are provided in the repo.
5. Generating Vivado bitstream for Ultra96v2
Now that we have the RTL files, we can go ahead and create a Vivado project and add in the files to create a block design as shown in the following diagram. Block design is provided in the GitHub repo. I have used Vivado 2021.1 version.

Each IP used along with any the required parameter change is listed in the table below.
IPs used:
- Zynq UltraScale+ MPSoC
- Set PL Fabric Clocks to PL0 at 100 MHz
- Enable Master PS-PL Interfaces: HPM0 FPD, HPM1 FPD
- Enable Slave PS-PL Interfaces: AXI HP1 FPD, AXI HP2 FPD, AXI HP3 FPD
- AXI DMA — Used to transfer images from Zynq PS to TCU and results from TCU to PS
- Disable Scatter Gather Engine
- Disable Write Channel
- Change “Width of Buffer Length Register” to 26 bits
- Select “Memory Map Data Width” to 128 bits
- Select “Stream Data Width” to 128 bits
- Set “Max Burst Size” to 256
- AXI SmartConnect — AXI SmartConnect is used to expose the DMA control registers to the PS, so that the PS can control the DMA transactions.
- Set Number of Slave Interfaces to 1
- AXI GPIO — AXI GPIO is used to connect the LEDs to the PL fabric.
- Check “All Outputs” under GPIO
- Set GPIO Width to 8
- Make the gpio_io_o[7:0] port external
- Change the name of the GPIO port to “gpio_led”
- top_ultra96v2 — Tensil generated Verilog files added to the block design
Now that we have done that, we can connect the interfaces a shown in the table below.
| From [IP : Interface] | To [IP : Interface] |
| zynq_ultra_ps_e_0 : M_AXI_HPM_0_FPD | smartconnect_0 : S00_AXI |
| zynq_ultra_ps_e_0 : M_AXI_HPM_1_FPD | ps8_0_axi_periph : S00_AXI |
| top_ultra_96v2_0 : m_axi_dram0 | zynq_ultra_ps_e_0 : S_AXI_HP1_FPD |
| top_ultra_96v2_0 : m_axi_dram1 | zynq_ultra_ps_e_0 : S_AXI_HP2_FPD |
| axi_dma_0 : M_AXI_MM2S | zynq_ultra_ps_e_0 : S_AXI_HP3_FPD |
| axi_dma_0 : M_AXIS_MM2S | top_ultra_96v2_0 : instruction |
With all these connections made, we can run the Run Connection Automation and select all the connection. The final output will be the block diagram shown above and provided in the repo.
With that done, we can validate the block design and when it’s error free, we can move ahead to creating the constraint for the LED pins.
In the schematic, we can see that the 40 PIN low-speed expansion header (LS EXP HDR) has the HD_GPIO_0 through HD_GPIO_15. So we can utilize all of them through PL.
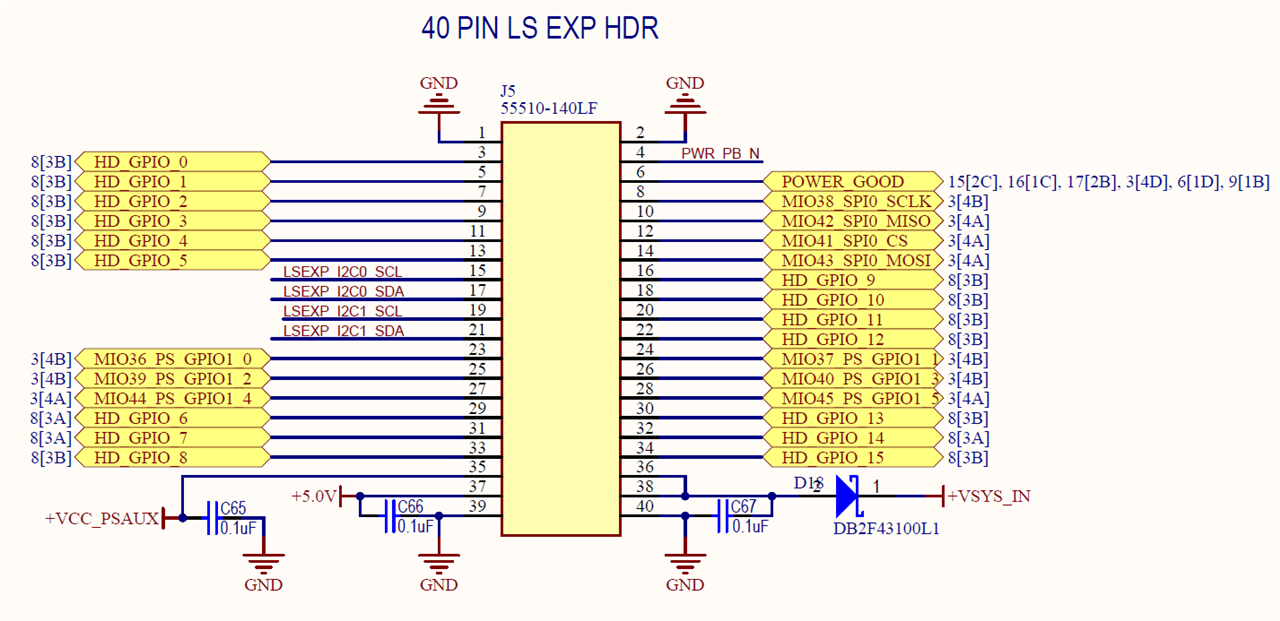
Then, these pins are mapped to the FPGA with the following physical pins.

I have used the following pins — spacing in between pins because my jumper pins were larger than the spacing of the two pins in the LS EXP HDR and did not fit in slots sequentially.
| GPIO Pin Name | MPSoC Pin | Expansion Pin Number |
| HD_GPIO_0 | D7 | 3 |
| HD_GPIO_2 | F7 | 7 |
| HD_GPIO_4 | F6 | 11 |
| HD_GPIO_6 | A6 | 29 |
| HD_GPIO_8 | G6 | 33 |
| HD_GPIO_9 | E6 | 16 |
| HD_GPIO_11 | D6 | 20 |
| HD_GPIO_13 | C7 |
30 |
With that reference, I have created the following tensil_mnist_led.xdc constraint file.
# tensil_mnist_led.xdc
# online: [GitHub/vivado/xdc]
set_property IOSTANDARD LVCMOS18 [get_ports {gpio_led[7]}]
set_property IOSTANDARD LVCMOS18 [get_ports {gpio_led[6]}]
set_property IOSTANDARD LVCMOS18 [get_ports {gpio_led[5]}]
set_property IOSTANDARD LVCMOS18 [get_ports {gpio_led[4]}]
set_property IOSTANDARD LVCMOS18 [get_ports {gpio_led[3]}]
set_property IOSTANDARD LVCMOS18 [get_ports {gpio_led[2]}]
set_property IOSTANDARD LVCMOS18 [get_ports {gpio_led[1]}]
set_property IOSTANDARD LVCMOS18 [get_ports {gpio_led[0]}]

set_property PACKAGE_PIN D7 [get_ports {gpio_led[0]}]
set_property PACKAGE_PIN F7 [get_ports {gpio_led[1]}]
set_property PACKAGE_PIN F6 [get_ports {gpio_led[2]}]
set_property PACKAGE_PIN A6 [get_ports {gpio_led[3]}]
set_property PACKAGE_PIN G6 [get_ports {gpio_led[4]}]
set_property PACKAGE_PIN E6 [get_ports {gpio_led[5]}]
set_property PACKAGE_PIN D6 [get_ports {gpio_led[6]}]
set_property PACKAGE_PIN C7 [get_ports {gpio_led[7]}]
Pin map in the Vivado I/O Ports window.

Generating the bitstream for the design yields the following result along with the bitstream.

With that done, we have completed the Vivado side of the project and we then need the following files from the project for later usage. Both of the files are available in the repo.
- Bitstream file — for example: tensil_mnist_led.bit
- Hardware handoff — for example: tensil_mnist_led.hwh
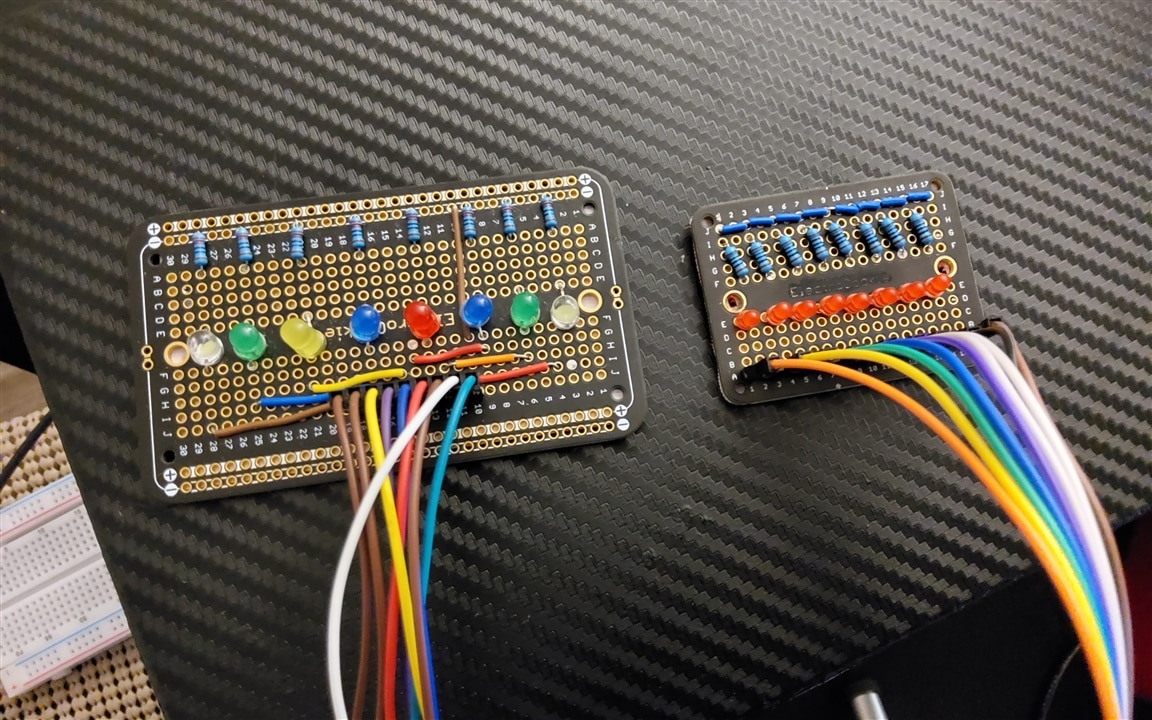
6. LED hardware design
I have used 8 LED board for the purpose. 4-bits are used to represent DOT in the Morse code and all 8-bits are used to represent the DASH. The issue with connecting a LED with the 1.8v output from the Ultra96v2 LS_EXP_HDR pins is that not all of them will light up. However, I found that the RED LEDs will work with voltage level, so here’s a progression from LED board v1 to LED board v2.
7. Creating PYNQ image for Tensil AI
The current PYNQ version is 3.0, however, Tensil is not compatible with the current version of the PYNQ. We have to go back to PYNQ 2.7 to be able to use Tensil. And we also have to patch the PYNQ 2.7 image in order for TCU to actually work. The patch is provided here in the repo.
The basic step to patch the PYNQ image is to write PYNQ 2.7 to an SD card and then boot Ultra96v2 with that image. Then, copy the patch image.ub to /boot of the PYNQ2.7, replacing the existing one. After that is done, restart the the board and your PYNQ is ready. I have provided the complete patched PYNQ 2.7 image that can be written to a microSD card here: [Google Drive Link]
Once that is done, we need to then prepare the final steps for executing the complete pipeline. That is, we will have to copy the Tensil drivers to our PYNQ booted Ultra96v2. The drivers can be found in TensilAI github page or in the repo.
8. Capturing image through webcam and generating Morse code
The final step is to bring it all together and write a python script to execute the step one by one and that is what I have exactly done in the morse_mnist.py code available in the repo.
import sys
import subprocess

# Needed to run inference on TCU
import time
import numpy as np
import pynq
import cv2
import glob
import random

from pynq import Overlay
from tcu_pynq.driver import Driver
from tcu_pynq.architecture import ultra96
from pynq.lib import AxiGPIO
from morse_lib import morse_code

# global parameters
overlay = 'tensil_mnist_led.bit'
model = './e14_mnist_20_lr_0_001_onnx_ultra96v2.tmodel'

# DO NOT MODIFY
img_path = "webcam_img.jpg"

def capture_image():
    # call fswebcam as a shell command
    subprocess.run(["/usr/bin/fswebcam --no-banner --save webcam_img.jpg -d /dev/video0 2> /dev/null"], shell=True)
    return img_path

def tensil_classify(img_path):
    img = cv2.imread(img_path, 0)
    img = cv2.resize(img, (28, 28), interpolation = cv2.INTER_AREA)
    inputs = {}
    inputs.update({"x:0" : img})

    time_start = time.time()
    outputs = tcu.run(inputs)
    time_end = time.time()

    classes = outputs['Identity:0'][:10]
    result_idx = np.argmax(classes)
    print(f"[INFO] Result = {result_idx}")
    print(f"[INFO] Inference time: {(time_end - time_start):.4f}s")
    # print(f"[INFO] Class weights: {classes}")
    return result_idx

def display_morse(led, num_list):
    print("[INFO] Morse Code: ", end='')
    for i in range(len(num_list)):
        led[0:8].write(num_list[i])
        if num_list[i] == 240:
            print(".", end='')
        elif num_list[i] == 255:
            print("-", end='')
        time.sleep(1)
        led[0:8].write(0x00)
        time.sleep(1)

    # reset at the end
    led[0:8].write(0x00)

if __name__ == '__main__':
    print(f"[INFO] Starting Execution")

    # Initial setup: import overlay and assign gpio class
    overlay = Overlay(overlay)
    led = AxiGPIO(overlay.ip_dict['axi_gpio_0']).channel1
    led[0:8].write(0x00)

    print(f"[INFO] Loading the MNIST model")
    tcu = Driver(ultra96, overlay.axi_dma_0)
    tcu.load_model(model)

    print(f"[INFO] Capturing image")
    # Pipeline: Capture -> Classify -> Output
    img = capture_image()

    print(f"[INFO] Classyfing the number")
    num = tensil_classify(img).tolist()

    print(f"[INFO] Displaying MOORSE Code")
    morse_dict = morse_code()
    display_morse(led,  morse_dict[num])
    print(f"\n[INFO] Execution Comleted!")
The following pipeline is used in the code above:
- Initialization
- The overlay and GPIO are initialized.
- The driver for the TCU is loaded
- Neural network model is loaded.
- Capturing image
- capture_image() function is used to execute the fswebcam tool to capture an image through USB connected webcam and save it to the disk
- Classifying the number
- tensil_classify(img) function takes in the path to the image then reads the image, preprocesses it to make it compatible for the loaded model
- The processed image is then passed to the model for classification, which then outputs the result of the classification
- Generating morse code
- morse_lib.py file contains the dictionary for the Morse code that I created using Wikipedia [https://en.wikipedia.org/wiki/Morse_code]
- display_morse(led, morse_dict[num]) then takes in the dictionary and based on the output generated from the model, displays the Morse code
Then, with everything in one directory as shown below, we can execute the python code.

python morse_mnist.py
9. Result and Conclusion
Then, the following output will be seen on the console:
Terminal output for Morse code display
And the following result will be on the board:
Final Demo for Morse code display
This concludes the final project for the Element 14’s Path to Programmable III program. In this project, we created a pipeline for a real-world neural network acceleration and used an MNIST trained LeNet to classify an image taken through a USB connected webcam in Ultra96v2 PYNQ.
