


The project was developed in the Health part of the Market path though the application is related also to Vision path.
The project is intended to allow the process of medical images in order to improve diagnostics or provide radiologists with a tool that will help them to reach the diagnostic faster and increase its accuracy.
For the moment the focus was put on *** imaging (mammography) but once the application is implemented, it can be a good start for developing workflows for processing images obtained with other types of imaging techniques (ultrasound, CT, MRI).
One part of the project is to use Ultra96 board to support the radiologist by providing an enhanced version of initial images.
During the development of this project, I was looking to implement two types of support:
- image processing techniques to improve the quality of images or to emphasize characteristics useful for elaborating a good diagnostic. These techniques would consist of applying different algorithms for image transformation (ex. inverse), image enhancement (ex. sharpening), intensity windowing, or filtering (ex. edge detection) etc;
- a model that will be trained on a set of mammographies and associated diagnostics given by radiologists. The model will then be deployed to be run on the FPGA board helping radiologists to rich faster the diagnostic. The board should be interfaced with the PC on which the mammographies are saved (either by digitizing the exposed cassettes or directly acquired from the digital sensor of the mammography unit) so they can be sent for processing to the FPGA board. Then the radiologist will receive an initial diagnostic output by the deployed model.
The radiologist workflow would be then the following:
- Open digital image or set of images acquired with the mammography unit and scanned by the cassette scanner.
- Decide if support is needed to reach or verify the diagnostic.
- Select the type of support (image processing or diagnostic prediction). If image processing was selected, decide also the type of processing (ex. edge detection)
- Send image/s names and support type request to the app running on Ultra96. The Ultra96 board will run the app and provide the result. It will also send the job completion notification and that the result is available
- Inspect processed image/s or the predicted diagnostic
- Select another type of support or reach the final diagnostic
For the implementation of these kinds of support, the Ultra96 is integrated into a system with the block diagram in Fig. 1. It consists of:
- an Image acquisition system, in fact, a PC connected with a digital scanner for digitizing images from digital detectors used with an analog mammography unit.
- an image repository where original and processed images are stored.
- the Ultra96-based system to support the diagnostic of radiologists.

Fig. 1
Image acquisition system
The image acquisition system runs the software of the scanner that scans the photo-stimulable plates exposed to the X-rays resulting in the digital images of the brests. The digital images are saved in jpg format with the following characteristics:
|
Dimensions 4648 x 5744 pixels |
|
Width: 4648 pixels |
|
Height: 5744 pixels |
|
Horizontal/Vertical resolution: 96 dpi |
|
Bit depth: 8 |
Images are then used by radiologists to elaborate a diagnostic.
Typically, for each patient are taken 4 images, two for each ***, each *** imaged with one mediolateral oblique (MLO) view - the view is taken from the center of the chest outward - and one with a cranial caudal (CC) view - the view is taken from above the ***. They are encoded R-CC/L-CC and R-MLO/L-MLO (R-right, L-left).
In Fig. 2 we have an example of a set of 4 images.

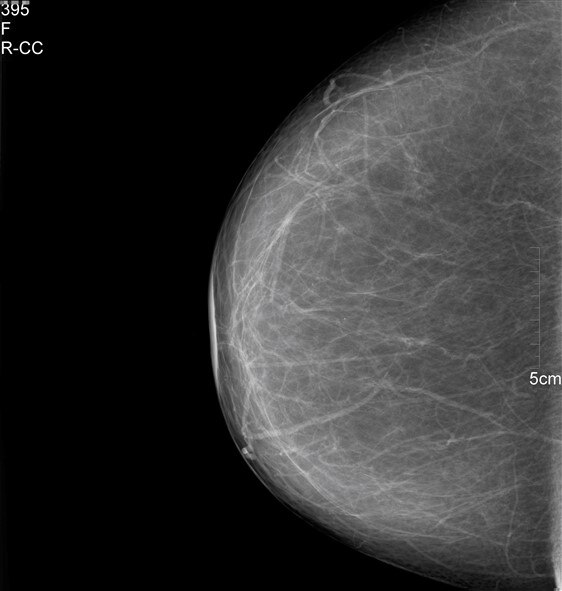
L-CC R-CC

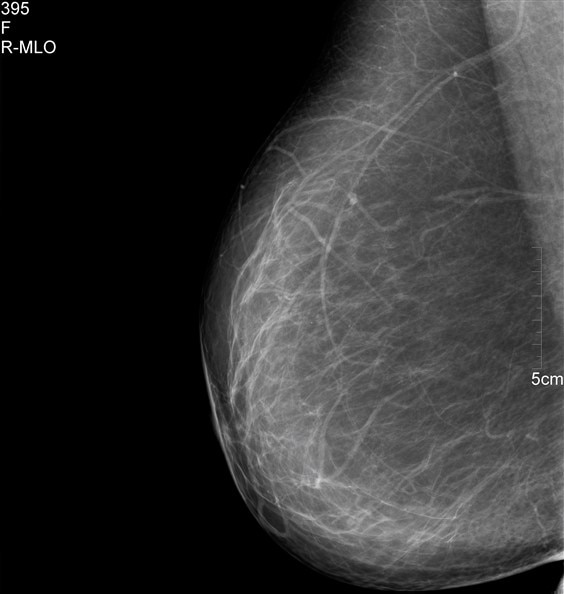
L-MLO R-MLO
Image repository
For developing the concept and test purposes, I have used for the image repository a Raspberry Pi (RPi) as a server and a USB stick for the storage of images.
I had already an RPi and a Raspian image used for other projects, therefore I only had to install the software to make it a file server. I also studied the possibility of turning the RPi into a NAS (there are several tutorials on “How to build a Raspberry Pi NAS Server” using OpenMedia Vault) but, I considered that it would take too much time to make it work so, I only installed and configured the samba service on the RPi.
I configured the repository folder on the USB stick which can be accessed both from Windows and Linux. We can see in Fig. 3 the image repository mounted as drive W and the home folder of Ultra96 system mounted as drive Z.

Fig.3
Ultra96 system
For the rapid implementation of the system concept, it was selected the Pynq platform.
For this, I followed the guide “Getting started with Pynq on Ultra96 v2” available at
https://ultra96-pynq.readthedocs.io/en/latest/getting_started.html.
I made the SD card using the image available on the Pynq page. The image was written on the SD card using Win32DiskImager.
I inserted the SD card, I connected the Ultra96board with the PC using the USB cable, I powered the board and I pressed the power button.
After the platform started, I could connect to the Jupyter Notebook using the default address 192.168.3.1:9090/notebook
Several examples and documentation are provided through Jupyter Notebook environment.
In the common folder is an example for connecting the board to Internet using the Wifi connection. I have used this example to connect the board to my wireless router (Fig. 4).
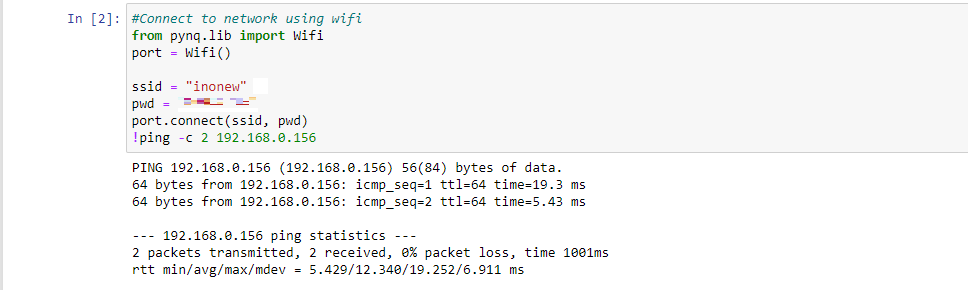
Fig. 4
First test
The first test consists of the following steps:
- Connect to the internet using wifi
- Access the repository
- Download one image at a time from the folder containing the original images ( folder “test_files”), and see if it is a left or a right view
- Crop correspondingly the image to remove the text not needed in the image processing or the text that can include confidential data.
- Upload the resulting image to the repository in the folder for the cropped images (“test_cropped_files”)
The implementation of these steps implies using a library for accessing the repository using the samba server running on the RPi. For this purpose, I found the python SMBHandler Class which provides support for “smb://” URLs in the urllib2 python package.
For the cropping function, I have used OpenCV which is already installed in the Pynq environment.
One issue that must be solved is that the SMB Handler can be used to transfer files from the host to the Samba server while OpenCV functions work with images loaded from files. Therefore, some additional steps are added.
- a connection to the repository is opened using "connect" function.
- a list of files is retrieved from the repository folder using "listPath"
- file names are extracted from the list one by one in a loop
- file name is searched for "_L" or "_R" substring indicating the left/right view
- a temporary file is created locally to receive the image file with the selected name downloaded from the server.
- the image is read from the temporary file using "imread" read function.
- downloaded image is displayed using "imshow" function.
- image is cropped
- the image is saved in a file locally using "imwrite" function
- file is uploaded into the repository using storeFile function
- the temporary files are closed and deleted to free space.
In Fig.5 below we can see the two images displayed side by side.

Fig. 5
Second test
The second test was intended to get familiar with OpenCV libraries in Jupyter notebooks and also explore OpenCV acceleration on FPGAs through the use of overlays. The test started from the example “OpenCV Overlay: Filter2D and Dilate” in the PYNQ Computer Vision library.
For installing the Pynq Computer Vision library I have followed the instructions on Pynq Computer Vision page (https://github.com/Xilinx/PYNQ-ComputerVision/tree/master).
After installing Pynq Computer Vision library I started to modify the example mentioned above for running the following steps:
- Connect to the internet using wifi
- Access the repository
- Download one image at a time from the folder containing the original images ( folder “test_files”), and see if it is a left or a right view
- Apply a filter implemented in software (such as Sobel x - other also tested such as Sobel y, Soble xy or Canny edge detection) and display the resulting image.
- Upload the resulting image to the repository in the folder for the filtered images (“test_sobelx_files”)
In Fig. 6 we can see the results of applying a Sobel xy and a Canny Edge detection filter.


Sobel xy Canny
Fig. 6
The next steps were intended to replace the software filters with the hardware ones implemented with the overlays of the Pynq Computer Vision library.
Unfortunately, I get the “ImportError: libopencv_shape.so.3.2: cannot open shared object file: No such file or directory” (see Fig. 7). As the opencv version available in the installed image was 4.5, I tried first to cheat the system by creating symbolic links to the 4.5 version of the files renamed as 3.2 version. As it didn't work, I tried to downgrade opencv to 3.2 version, which resulted in a system in which the module cv2 is not found anymore.
It seems that I will have to recreate the initial image of the Pynq system (though, for using the Computing Vision library I might have to use an older image), but before I have to copy the notebooks that I have used for the tests.

Fig. 7
As the deadline is around the corner, I have to end the blog, though I will continue to work on the project.
Discussion
During these tests, I measured the time needed to process the images. If the cropping of the image takes around 0.003 s, the overall time (downloading from the repository, opening the image, cropping, and uploading back to the repository) takes around 26 s. I will have to measure each step in order to see what takes so long. In a normal operation, there is no need for the images to be displayed either before or after the processing. The resulting image will be accessed by the doctor from the repository.
Preliminary tests with the edge detection filters resulted many times in the kernel dying and not succeeding in reconnecting. Usually, I had to reboot the Ultra96 system. Did not find what causes this behavior and also how to restart the kernel without rebooting the system.
What remains to do is learn how to use Computer Vision library implemented in hardware in order to accelerate CV algorithms and how to create my own overlays for this purpose.
The last part of the project, creating a model to help doctors reach an accurate diagnosis, is still to be developed in the following weeks.
Conclusions
Though the idea of the project was pretty clear, the implementation proved to take longer than I expected.
Many problems in the training part came from the fact that teaching materials were adapted from other courses and not all the information or resources were updated.
Most of the time, in these teaching materials, the learner is well conducted through the theoretical and practical aspects of using both the hardware and software tools. Sometimes though, just a simple missing information can block the learner for hours or even days.
In the end, I want to thank the entire team from element14 and AMD (Xilinx) that have prepared all these teaching materials, who provided the hardware and software tools to support this contest, and who allowed in this way to many passionate participants to be initiated with the skills to deal with these powerful devices and create interesting projects.
Top Comments