


Hello everyone,
My interest in this contest is to learn about the current state of FPGAs and how I can apply it to the field of Artificial Intelligence. I'm also curious about the possibility of running a RISC-V core on the board. Last year I had the chance to design some parts of an educational processor and found it very interesting.
My first post is one that I didn't expect to have to write, but I decided to do it anyway since it was really challenging for me to get it up and running: how to install the environment in a MACOS laptop.
In my opinion MACOS isn't the best platform to work in hardware development, I prefer Linux to work in native (without virtualization) or Windows because most companies develop the drivers for those platforms and you have better documentation and support available. In my case, I had no other choice for personal reasons and decided to give it a try.
It was a painful trial and error waste of time, but in the end it worked fine. I'll start with the conclusions: the problems I found and how I solved them, and then, if you're not bored enough, I'll give you the full process in case you face the same thing I did.
Problems I found
- One of the requirements of the suite of tools is tons of disk space, at least 300GB (but I ended up needing 500GB for trials and errors)... this is impossible in an OSX laptop since you don't have the option to upgrade your hard drive, or terribly expensive if you decide to buy it.
Try 1: I relied on a WD Elements hard drive, but the installation never finished and after 2 days of leaving the laptop to install the suite, I decided to give up. The hard drive's bandwidth was peaking at 70Mbps and it was a big bottleneck.
Try 2: Taking advantage of the Thunderbolt 3 port, I found the external drives where expensive compared to doing it myself and I decided to build one myself with an external shell... was not cheap either but was reasonable and portable since I can move it between virtual machines and in the future I can reuse it in a desktop (Linux native this time for God's sake). I bought this components:
- The enclosure: Acasis M.2 NVMe SSD
- The NVMe disk: Samsung 980n PRO2 .
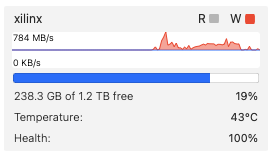
. 
This screen shoot is the speed test from the virtual machine doing a dd directly to the filesystem inside the loop device using direct-io (as I explain later).
- The second issue I found was the virtualization layer:
Try 3: I started with virtualbox, but it didn't work, after 8h of downloading and installing the screen went blank and I lost control of the machine. When I fine-tuned the virtual machine (later in this post you'll see the optimizations I did that are similar to Vmware)
Try 4: I checked the latest version of vmware fusion 13 and I got a surprise, from the latest version they have a free version for non-commercial use, which is more or less the same as with virtualbox... and it worked!
- The third problem I found was that the unified installer took almost 1d to download... and sometimes it failed in the last step with some package the installation required. And you are forced to restart. There is a cache of the download, but if you need to rebuild the virtual machine... you're lost. I solved this problem by redirecting to the full download file.
- The fourth problem was the memory requirements that cause my processes to be killed during compilation or during installation and you only notice it if you look at the logs or dmesg. I found that with 8GB and zram compressing device for swapping I got a stable environment.
Yes... it was as painful as I'm describing, but it works now, and I'll explain how I did it to save you time.
Creation of the virtual machine
Step 1 - Download the full version of vmware fusion 13 (or superior) and install it as usual. Then the confusing part is to get a free personal-use code to be able to run it for longer, since vmware have different loging portals:
You need to go to this page: https://customerconnect.vmware.com/evalcenter?p=fusion-player-personal-13 , and click this button.
After you fullfill the form of registry, in the same place will appear a button “register” and after that you’ll get your license code.
Step 2 - Download the ubuntu desktop dvd to install
I wanted to stay as close as possible to the requirements of the tutorials to be able to reproduce them, but get the maximum version as possible to have a kernel as new as possible. Checking the requirements I found that the most restrictive one is Pynq with 20.04 LTS (without patch version) and I’ve installed that:
- Vivado 2021.1: Ubuntu (...) 20.04 LTS, 20.04.1 LTS, 20.04.2 LTS (64-bit),
- Vivado 2023.1: Ubuntu (...) 20.04 LTS, 20.04.1 LTS, 20.04.2 LTS, 20.04.3 LTS, 20.04.4 LTS; 20.04.5 LTS; 22.04 LTS and 22.04.1 LTS (64-bit),
- Vitis 2021.1: Ubuntu (...) 20.04 LTS, 20.04.1 LTS, 20.04.2 LTS
- Vitis 2023.1: Ubuntu (...) 20.04, 20.04.1-20.04.5, 22.04 and 22.04.1 LTS: 64-bit.
- Petalinux 2021.1 Ubuntu (...) 20.04, 20.04.1 (64-bit)
- Petalinux 2023.1 Ubuntu (...) 20.04 LTS, 20.04.1 LTS, 20.04.2 LTS, 20.04.3 LTS, 20.04.4 LTS, 20.04.5 LTS(64-bit), 22.04 LTS and 22.04.1 LTS
- Pynq SD: Ubuntu (...) 20.04 LTS 64-bit host PC
- Pynq SD: Xilinx Petalinux and Vitis or Vivado v2022.1 tools
Ubuntu keeps an old repository with the old versions here: https://old-releases.ubuntu.com/releases/focal/ where I downloaded: ubuntu-20.04-desktop-amd64.iso
Ubunto 20.04 comes with kernel 5.15, that enables me to use direct-io in loop devices, to gain performance and memory.
Step 3 - create the virtual machine:
- Create the virtual machine by default and into the last step click the button “customize settings” and add:
- From processors and memory section: put 4 processors and 8192MB of RAM
- From the Hard disk section: I leave it by default with 20GB since the installation path will be into my external USB device
- From the advanced section: activate “Disable Channel Mitigations” (this is after spectre vulnerability was discovered counter measures applied provoque a 30% of reduction of performance of the machines… but we’re in a virtual machine that we’re using for ourselves in a safe environment right?)
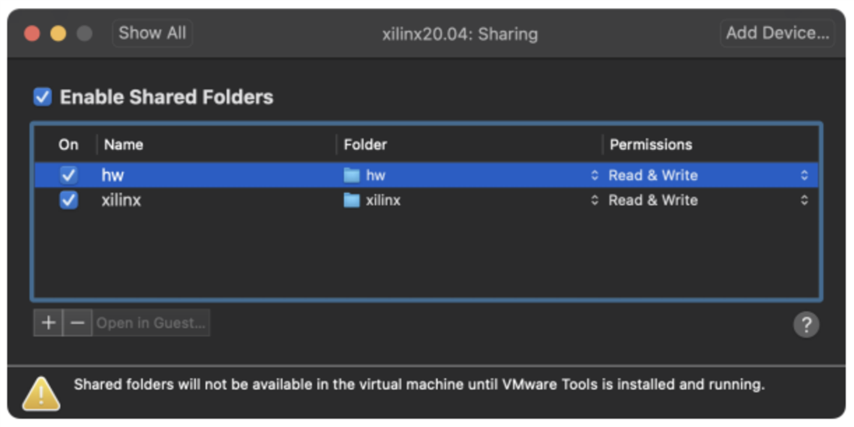
- Sharing add a folder from your external disk where you’ll put everything, I put two hw (for my files) and xilinx for a virtual disk (we’ll explain it later after the installation):
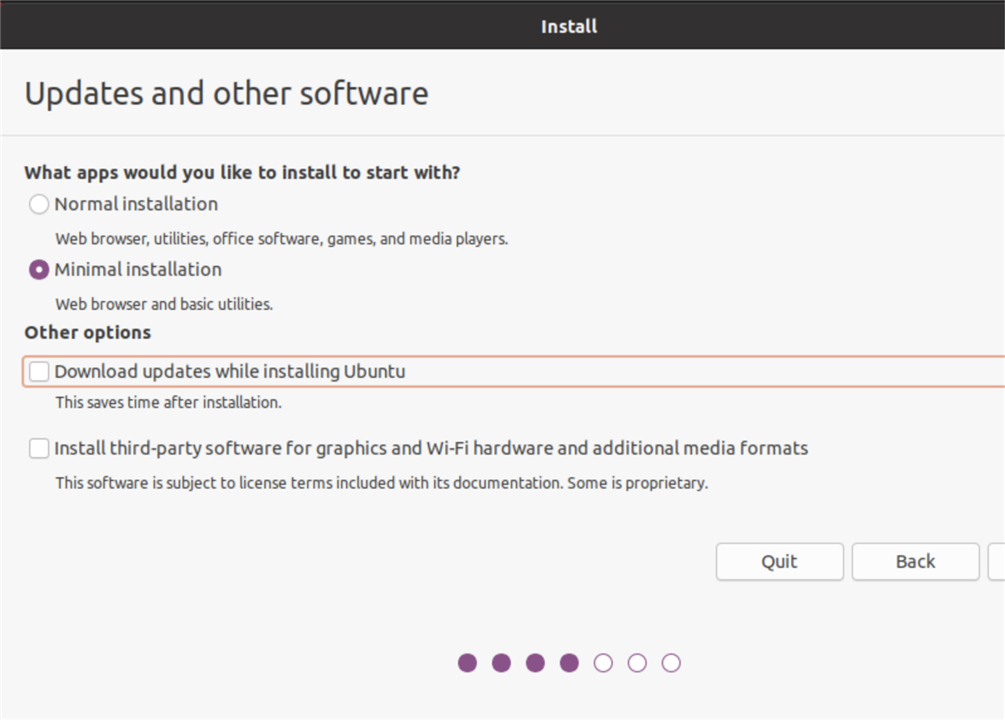
- Run the virtual machine and follow the ubuntu assistant with all the defaults (or your preferred configurations if you want). WARNING: is important you change the defaults in one step: in the section “updates and other software”:
- you must select the minimal installation, since it requires less hard drive and let you install later what you really need.
- Disable “Download updates while installing ubuntu”... since we want the version of ubuntu to stay in 20.04 LTS and don’t update.
- Finish the installation and restart.
Step 4 - customize the virtual machine.
1. Open a terminal and install the following packages:
$ sudo apt install zram-config \
                    vim htop ncdu \
                    openssh-server terminator gtkterm \
                    build-essential dkms \
                    open-vm-tools-desktop
$ sudo usermod -a -G dialout $USER
2. Disable kernel spectre mitigations from the operating system, as we did from the hypervisor
$ nano /etc/default/grub
        ( edit the following line adding “mitigations=off”)
        GRUB_CMDLINE_LINUX_DEFAULT="quiet splash mitigations=off"``

$ sudo update-grub
3. Configure the swap from the standard threshold to reduce to the minimum swapping avoiding unneeded performance loss due swapping, and add zram compression for swap:
$ cat > /etc/sysctl.d/09-swap.conf <<-EOF
vm.swappiness = 1
EOF

$ sudo /usr/bin/init-zram-swapping
4. Disable crash report, window not respond timeout, disable update notifier and media automounter.
$ vi /etc/default/apport
    (edit the following line to disable it)

    enabled=0

$ gsettings set org.gnome.mutter check-alive-timeout 60000

$ vi /etc/apt/apt.conf.d/99update-notifier
    ( comment all the lines adding # as first character)

$ systemctl stop udisks2.service
$ systemctl mask udisks2.service
5. Disable screensaver and blank screen lock (this provoke my virtualbox to freeze)
Gnome settings > power > blank screen → set never
Gnopme settings > privacy > screenlock → disable screenlock
6. Mount drives from the external drive:
This has been other tricky point to solve, since I discovered you can’t pass through a thunderbolt interface and mount it into the virtual machine to format it as a regular disk. To overcome this problem I had to rely on the standard filesystem of OSX APFS, and share it through the virtual machine.
This generates an extra problem since linux permissions, case sensitiveness, links and other characteristics of the filesystem aren’t expected when you try to install vivaldo. But this is an easy problem to solve creating a file formatted with ext4 and mounted back through loopback as native disk… this doesn’t affect much the performance on newer kernels (from 4.4) and I get almost the whole bandwith of the disk 700Mbps over the 1000Mbps that gives natively.
1. you need to ensure you already configured into the virtual machine (after you configured it into the virtual machine in point 3.1.d) in my case hw (for my working files) and xilinx (for the image of the hard drive)
2. Create the mount points (vol2 will be the mount point of the loopback device):
$ sudo mkdir /mnt/hw /mnt/xilinx /mnt/vol2
$ sudo chown your-user:your-user /mnt/{hw,xilinx,vol2}
3. Configure the fstab to mount the vmware directories through automounter (to facilitate shutdown of the machine unmounting correctly the filesystems)
$ sudo vi /etc/fstab
    (add the following lines)

.host:hw /mnt/hw/ fuse.vmhgfs-fuse nofail,defaults,allow_other,uid=1000,gid=1000,umask=0033,noatime 0 0
.host:xilinx /mnt/xilinx/ fuse.vmhgfs-fuse nofail,defaults,allow_other,uid=1000,gid=1000,umask=0033,noatime 0 0
#/mnt/xilinx/hd.img /mnt/vol2/ ext4 nofail,x-systemd.requires=/mnt/xilinx,x-systemd.automount,loop,defaults 0 0
(*) you'll see the comment into the mount option of /mnt/vol2 loop device since I didn't found the way to pass the parameter of directio to the loopback device and I have to do it manually. Probably in the future I'll add a systemd service. But into the meanwhile you can:
$ export HDLOOPDEV=$( losetup --direct-io=on --show -f /mnt/xilinx/hd.img )
$ mount $HDLOOPDEV /mnt/vol2/
4. Mount the filesystems and check that is really mounted
$ sudo mount -a
$ sudo mount -fav
5. Prepare the ext4 filesystem with 500GB
$ dd if=/dev/zero of=/mnt/xilinx/hd.img bs=1G count=500 status=progress
$ mkfs.ext4 /mnt/xilinx/hd.img
6. Verify that everything is working and ready to install vivado!
$ sudo mount -a
$ sudo mount -fav
Installing vivado
Step 1 - Install linux requirements: since we installed the minimum version we need to add packages that the installation requires to work. I also encorage you to download at this point this script from xilinx to download all the dependencies for petalinux to have everything ready to install xilinx software: https://support.xilinx.com/s/article/73296?language=en_US
$ sudo apt install libncurses5-dev libncursesw5-dev libncurses5 libtinfo5 libtinfo-dev
$ sudo /mnt/hw/repo/xilinx/plnx-env-setup.sh
Step 2 - Download xilinx software: Since the internet downloader was slow for me, I opted out to download the self extract download Xilinx Unified Installer 2021.2 SFD you need to uncompress it and run the setupx file, and follow all the steps. WARNING: this step is long and it required 8h in my machine.
Step 3 - Install vivado drivers :
$ cd ${INSTALL_BASE}/Vivado/2021.2/data/xicom/cable_drivers/lin64/install_script/install_drivers/
$ sudo ./install_drivers
Step 4 - (Optional) Customize the vivaldo launch icons: this is recommended into the tutorials but I found it works either. I put you here the script to do it automatically
export INSTALL_BASE=/mnt/vol2/xilinx2021.2
export SCRIPT_BASE=$HOME

cat > ${SCRIPT_BASE}/vivado_launch.sh <<-EOF
#!/bin/bash
source ${INSTALL_BASE}/Vivado/2021.2/settings64.sh
vivado &
EOF
chmod u+x ${SCRIPT_BASE}/vivado_launch.sh

cat > ${SCRIPT_BASE}/vitis_launch.sh <<-EOF
#!/bin/bash
export SWT_GTK3=0
source ${INSTALL_BASE}/Vitis/2021.2/settings64.sh
vitis &
EOF
chmod u+x ${SCRIPT_BASE}/vitis_launch.sh

cat > ${SCRIPT_BASE}/Desktop/Vivado.desktop <<-EOF
#!/usr/bin/env xdg-open
[Desktop Entry]
Version=1.0
Type=Application
Name=Vivado 2021.2
Comment=Vivado 2021.2
Icon=${INSTALL_BASE}/Vivado/2021.2/doc/images/vivado_logo.png
Exec=${SCRIPT_BASE}/vivado_launch.sh
Terminal=false
StartupNotify=true
EOF
chmod u+x $HOME/Desktop/Vivado.desktop

cat > ${SCRIPT_BASE}/Desktop/Vitis.desktop <<-EOF
#!/usr/bin/env xdg-open
[Desktop Entry]
Version=1.0
Type=Application
Name=Vitis 2021.2
Comment=Vitis 2021.2
Icon=${INSTALL_BASE}/Vitis/2021.2/doc/images/ide_icon.png
Exec=${SCRIPT_BASE}/vitis_launch.sh
Terminal=false
StartupNotify=true
EOF
chmod u+x $HOME/Desktop/Vitis.desktop

cd ${INSTALL_BASE}/Vivado/2021.2/data/xicom/cable_drivers/lin64/install_script/install_drivers/
sudo ./install_drivers
Top Comments