element14 Community
element14 Community
    Register Log In
  • Site
  • Search
  • Log In Register
  • About Us
  • Community Hub
    Community Hub
    • What's New on element14
    • Feedback and Support
    • Benefits of Membership
    • Personal Blogs
    • Members Area
    • Achievement Levels
  • Learn
    Learn
    • Ask an Expert
    • eBooks
    • element14 presents
    • Learning Center
    • Tech Spotlight
    • STEM Academy
    • Webinars, Training and Events
    • Learning Groups
  • Technologies
    Technologies
    • 3D Printing
    • FPGA
    • Industrial Automation
    • Internet of Things
    • Power & Energy
    • Sensors
    • Technology Groups
  • Challenges & Projects
    Challenges & Projects
    • Design Challenges
    • element14 presents Projects
    • Project14
    • Arduino Projects
    • Raspberry Pi Projects
    • Project Groups
  • Products
    Products
    • Arduino
    • Avnet Boards Community
    • Dev Tools
    • Manufacturers
    • Multicomp Pro
    • Product Groups
    • Raspberry Pi
    • RoadTests & Reviews
  • Store
    Store
    • Visit Your Store
    • Choose another store...
      • Europe
      •  Austria (German)
      •  Belgium (Dutch, French)
      •  Bulgaria (Bulgarian)
      •  Czech Republic (Czech)
      •  Denmark (Danish)
      •  Estonia (Estonian)
      •  Finland (Finnish)
      •  France (French)
      •  Germany (German)
      •  Hungary (Hungarian)
      •  Ireland
      •  Israel
      •  Italy (Italian)
      •  Latvia (Latvian)
      •  
      •  Lithuania (Lithuanian)
      •  Netherlands (Dutch)
      •  Norway (Norwegian)
      •  Poland (Polish)
      •  Portugal (Portuguese)
      •  Romania (Romanian)
      •  Russia (Russian)
      •  Slovakia (Slovak)
      •  Slovenia (Slovenian)
      •  Spain (Spanish)
      •  Sweden (Swedish)
      •  Switzerland(German, French)
      •  Turkey (Turkish)
      •  United Kingdom
      • Asia Pacific
      •  Australia
      •  China
      •  Hong Kong
      •  India
      •  Korea (Korean)
      •  Malaysia
      •  New Zealand
      •  Philippines
      •  Singapore
      •  Taiwan
      •  Thailand (Thai)
      • Americas
      •  Brazil (Portuguese)
      •  Canada
      •  Mexico (Spanish)
      •  United States
      Can't find the country/region you're looking for? Visit our export site or find a local distributor.
  • Translate
  • Profile
  • Settings
Pi-Fest
  • Challenges & Projects
  • Design Challenges
  • Pi-Fest
  • More
  • Cancel
Pi-Fest
Blog Pi-Fest - Breadboard to Prototype, Final Setup (Blog4)
  • Blog
  • Forum
  • Documents
  • Polls
  • Files
  • Leaderboard
  • Mentions
  • Sub-Groups
  • Tags
  • More
  • Cancel
  • New
  • Share
  • More
  • Cancel
Group Actions
  • Group RSS
  • More
  • Cancel
Engagement
  • Author Author: asokfair
  • Date Created: 7 Aug 2022 5:03 PM Date Created
  • Views 539 views
  • Likes 7 likes
  • Comments 0 comments
  • raspberrypipico
  • asokfair
  • Pi-Fest Design Challenge
  • raspberry pi pico
  • pico
  • embeddedclub
  • pi-fest
Related
Recommended

Pi-Fest - Breadboard to Prototype, Final Setup (Blog4)

asokfair
asokfair
7 Aug 2022

In the previous blog (blog3), i have interfaced Neo Pixel LED's to pico. In this blog , Iam going to eliminate the breadboard and pack it all together into

the wall mounting switch board.

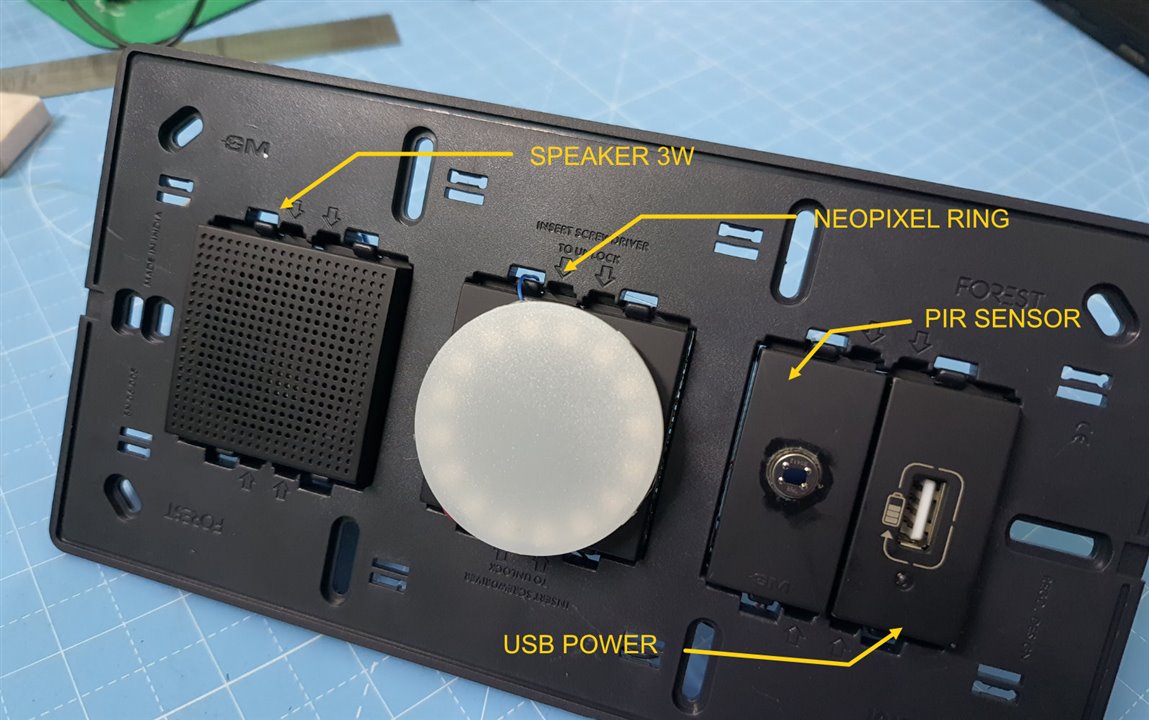
The size occupied by the components in this design,

Speaker - 2 Module
Sensor - 1 Module
Neo Pixel Ring - 2 Module
USB power - 1 Module
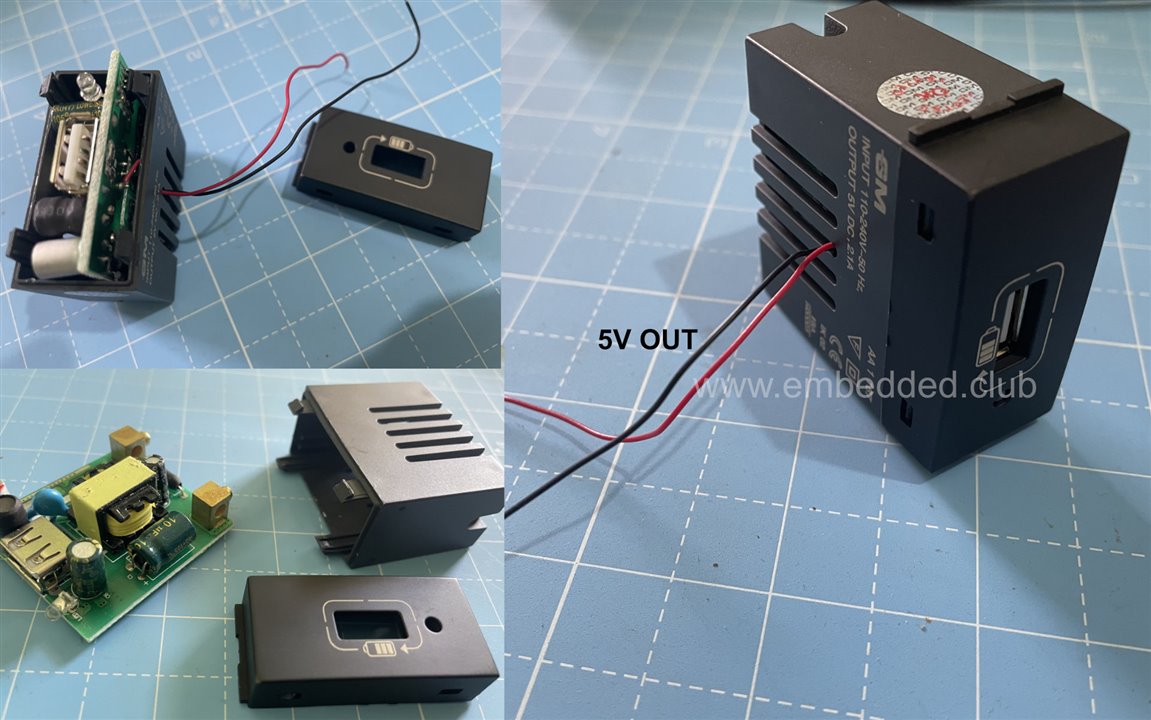
Setting Up 5V Power

The sensor , LED's & speaker to operate its required 3.3v and its sourced from the Pico. Pico board required 5V Supply.

So far I have been running the Pico board with USB Power , Now the circuit should operate on 230v Power.

It requires the USB charger module (from GM) , it gives 5V, 2A output which is more than enough to run the Raspberry Pi Pico and LED's.

The 5V power is taken out from the internal circuit of the USB charger like below. These 5V is connected to the Pico VBUS.

image

Fitting the Sensor & NeoPixel Ring

The PIR sensor is mounted on a Dummy switch module with a simple 10mm drill hole.

The NeoPixel LED ring was not fitting inside the Module so I just kept it outside for a prototype.

In actual design it should be outside the switch board box with external LED drivers.

image

image


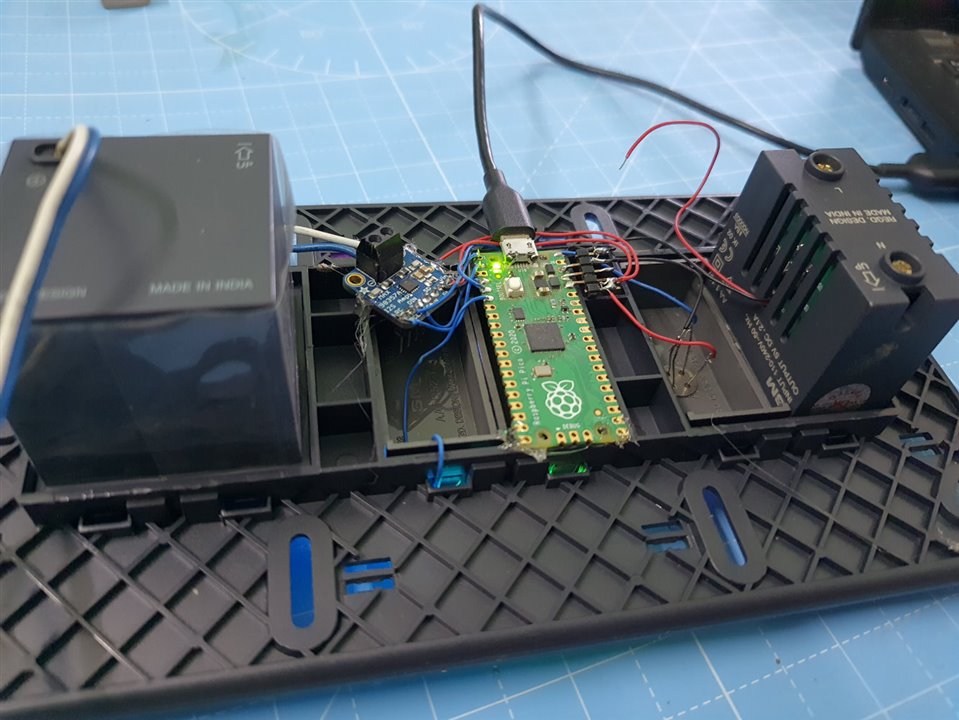
Raspberry Pi Pico & I2S Audio Board

Raspberry Pi pico and I2S board is mounted on the backside of the switch plate.

And used glue gum to stick all them into the panel. All the required pins are soldered with wire.

image

Power ON the Setup

Finally I power on the setup from main power (AC 230V) and everything works as expected.

Also still the board can be powered from USB power too. Because I have to make changes in firmware further.


image

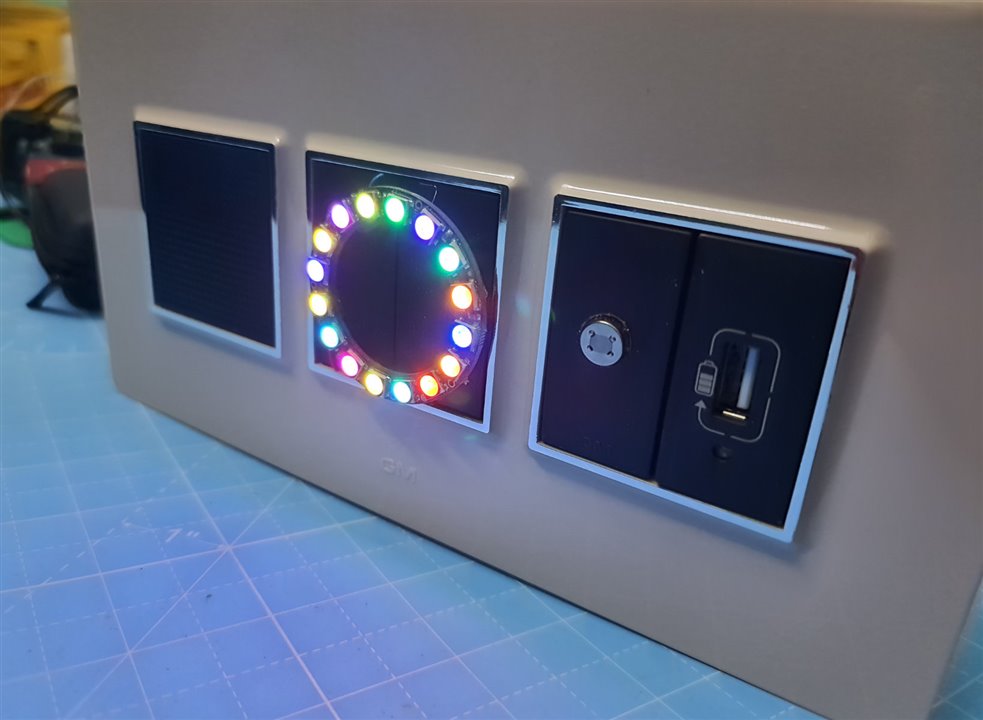
In the next final blog (blog5) I will meet with an overall summary of the project with the final working video.


  • Sign in to reply
element14 Community

element14 is the first online community specifically for engineers. Connect with your peers and get expert answers to your questions.

  • Members
  • Learn
  • Technologies
  • Challenges & Projects
  • Products
  • Store
  • About Us
  • Feedback & Support
  • FAQs
  • Terms of Use
  • Privacy Policy
  • Legal and Copyright Notices
  • Sitemap
  • Cookies

An Avnet Company © 2025 Premier Farnell Limited. All Rights Reserved.

Premier Farnell Ltd, registered in England and Wales (no 00876412), registered office: Farnell House, Forge Lane, Leeds LS12 2NE.

ICP 备案号 10220084.

Follow element14

  • X
  • Facebook
  • linkedin
  • YouTube