


Playing with Raspberry Pi Pico #1
Let's start
Hi, I'm a teacher and, for a couple of years, I've been using simple Arduino boards to make simple projects.
My aim is to stimulate the curiosity of my students and to let them know how simple it can be to build simple systems with Arduino. Designing a simple traffic light or a thermometer or a distance meter is a real adventure for a student.
I have never used Raspberry Pico before and this contest was an opportunity for me to get to know a board that could be an excellent solution for simple projects to be proposed at school.
I will start this adventure from scratch, looking at the main features of the board and then moving on to its use.
Raspberry Pi Pico
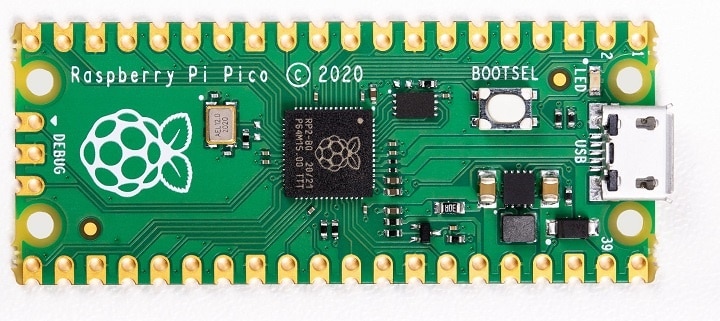
The Raspberry Pi Pico board is a low-cost, high-performance microcontroller with flexible digital interfaces. Key features include:
- RP2040 microcontroller chip designed by Raspberry Pi;
- Dual-core Arm Cortex M0 + processor, clock running up to 133 MHz;
- 264kB of SRAM, and 2MB of on-board flash memory;
- USB 1.1 with device and host support;
- Low-power sleep and dormant modes;
- Drag-and-drop programming using mass storage over USB;
- 26 × multi-function 3.3V GPIO pins;
- 2 × SPI, 2 × I2C, 2 × UART, 3 × 12-bit ADC, 16 × controllable PWM channels;
- Temperature sensor;
- Accelerated floating-point libraries on-chip;
- Various options for easily powering the unit from micro-USB, external supplies or batteries;
- 8 × Programmable I / O (PIO) state machines for custom peripheral support.

The Raspberry Pi Pico board is programmable in many ways, we can use C / C ++, Python or use the Arduino IDE. I will use the second solution as Python is increasingly popular at school and there are many resources on the net.
The MicroPython Environment and installation
MicroPython is a Python 3 full implementation for microcontrollers and small embedded systems and it that runs directly on embedded hardware like Raspberry Pi Pico.
Because MicroPython is highly efficient, and RP2040 is designed with a large amount of system memory and with a high computing power relative to its price, MicroPython is an excellent tool for embedded systems development. You get an interactive prompt (the REPL) to execute commands immediately via USB Serial, and a built-in filesystem.
You can program your Pico by connecting it to a computer via USB, in a simple way.
- Download the correct MicroPython UF2 file for Raspberry Pi Pico from the link: https://micropython.org/download/rp2-pico/rp2-pico-latest.uf2
- Push and hold the BOOTSEL button and plug your Pico into the USB port of your PC
- Release the BOOTSEL button after your Pico is connected
- It will mount a Mass Storage Device called RPI-RP2 on your PC;
- Drag and drop the MicroPython UF2 file onto the RPI-RP2 volume;
- The Raspberry Pi Pico will reboot running MicroPython;
- You can access the REPL using the USB serial.
When MicroPython boots for the first time, it will sit and wait for you to connect and tell it what to do.
You can load a .py file from your computer onto the board, but a more immediate way to interact with it is through what is called the Read-Evaluate-Print-Loop, or REPL (often pronounced similarly to "ripple").
- Read MicroPython waits for you to type in some text, followed by the enter key.
- Evaluate Whatever you typed is interpreted as Python code, and runs immediately.
- Print Any results of the last line you typed are printed out for you to read.
- Loop Go back to the start - prompt you for another line of code.
You can communicate with the MicroPython firmware on your board using USB.
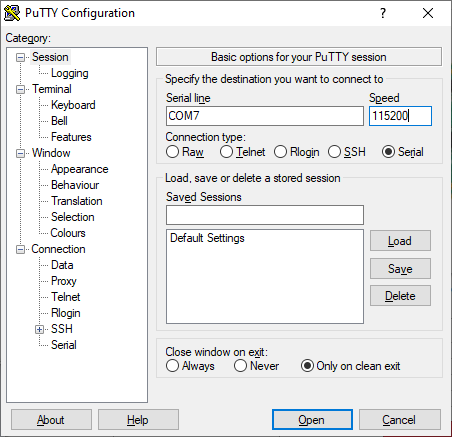
To check that everything has gone well, just use a remote terminal such as, for example, Putty. I usually use Putty because it is very simple to use and there is a portable and very light version that does not burden the operating system and does not require administrative privileges: this is very important if we want to work with this board in a school, where students often have privileges to user and cannot install applications.
As settings just use:
- Windows, device manager
- Ports
- See which COM port the board is connected to
- Open Putty, choose serial connection, COM port xx (the one obtained in point 3), speed 115200
- The board shell open
- we are ready to enter Python commands.
Now our MicroPython is ready to go.

I'm ready to start using my new nice board, see you next blog!
