element14 Community
element14 Community
    Register Log In
  • Site
  • Search
  • Log In Register
  • Community Hub
    Community Hub
    • What's New on element14
    • Feedback and Support
    • Benefits of Membership
    • Personal Blogs
    • Members Area
    • Achievement Levels
  • Learn
    Learn
    • Ask an Expert
    • eBooks
    • element14 presents
    • Learning Center
    • Tech Spotlight
    • STEM Academy
    • Webinars, Training and Events
    • Learning Groups
  • Technologies
    Technologies
    • 3D Printing
    • FPGA
    • Industrial Automation
    • Internet of Things
    • Power & Energy
    • Sensors
    • Technology Groups
  • Challenges & Projects
    Challenges & Projects
    • Design Challenges
    • element14 presents Projects
    • Project14
    • Arduino Projects
    • Raspberry Pi Projects
    • Project Groups
  • Products
    Products
    • Arduino
    • Avnet & Tria Boards Community
    • Dev Tools
    • Manufacturers
    • Multicomp Pro
    • Product Groups
    • Raspberry Pi
    • RoadTests & Reviews
  • About Us
    About the element14 Community
  • Store
    Store
    • Visit Your Store
    • Choose another store...
      • Europe
      •  Austria (German)
      •  Belgium (Dutch, French)
      •  Bulgaria (Bulgarian)
      •  Czech Republic (Czech)
      •  Denmark (Danish)
      •  Estonia (Estonian)
      •  Finland (Finnish)
      •  France (French)
      •  Germany (German)
      •  Hungary (Hungarian)
      •  Ireland
      •  Israel
      •  Italy (Italian)
      •  Latvia (Latvian)
      •  
      •  Lithuania (Lithuanian)
      •  Netherlands (Dutch)
      •  Norway (Norwegian)
      •  Poland (Polish)
      •  Portugal (Portuguese)
      •  Romania (Romanian)
      •  Russia (Russian)
      •  Slovakia (Slovak)
      •  Slovenia (Slovenian)
      •  Spain (Spanish)
      •  Sweden (Swedish)
      •  Switzerland(German, French)
      •  Turkey (Turkish)
      •  United Kingdom
      • Asia Pacific
      •  Australia
      •  China
      •  Hong Kong
      •  India
      •  Japan
      •  Korea (Korean)
      •  Malaysia
      •  New Zealand
      •  Philippines
      •  Singapore
      •  Taiwan
      •  Thailand (Thai)
      •  Vietnam
      • Americas
      •  Brazil (Portuguese)
      •  Canada
      •  Mexico (Spanish)
      •  United States
      Can't find the country/region you're looking for? Visit our export site or find a local distributor.
  • Translate
  • Profile
  • Settings
Pi IoT
  • Challenges & Projects
  • Design Challenges
  • Pi IoT
  • More
  • Cancel
Pi IoT
Blog Pi IoT - Pilot - #3 Monitoring the environment - part 2
  • Blog
  • Forum
  • Documents
  • Polls
  • Files
  • Events
  • Mentions
  • Sub-Groups
  • Tags
  • More
  • Cancel
  • New
  • Share
  • More
  • Cancel
Group Actions
  • Group RSS
  • More
  • Cancel
Engagement
  • Author Author: sebathorus
  • Date Created: 17 Jun 2016 2:22 PM Date Created
  • Views 423 views
  • Likes 1 like
  • Comments 2 comments
  • piiot
  • piiot challenge
  • pi iot design challenge
Related
Recommended

Pi IoT - Pilot - #3 Monitoring the environment - part 2

sebathorus
sebathorus
17 Jun 2016

Hello


In this post I'll show you some more details on wireless nodes schematics and operation and also the code I write so far for nodes and Raspberry web server.


Wireless ESP8266 nodes


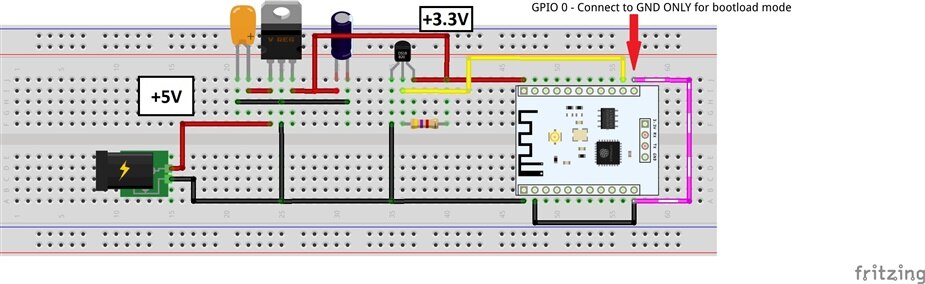
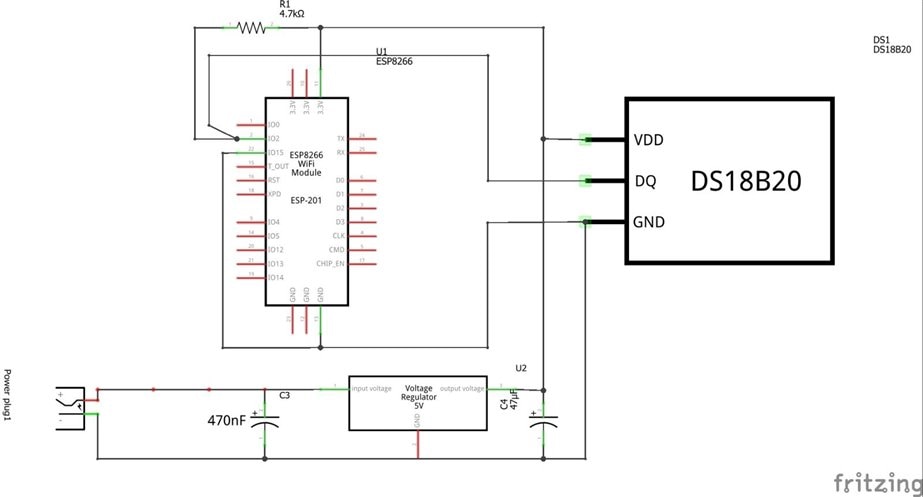
At this moment I have two wireless nodes based on ESP8266-201 and built on perf board, which read ambient temperature and send the readings to a server running on RaspberryPi3.

From previous hardware build, I changed the Pololu adjustable power regulator with a LM3940 3.3V power regulator. This regulator accept 5V as input and provide stabilised  3.3V/1A output. This setup will allow me to power the nodes with 5V required for some sensors and servos with LM3940 provide power for ESP board.


image

image


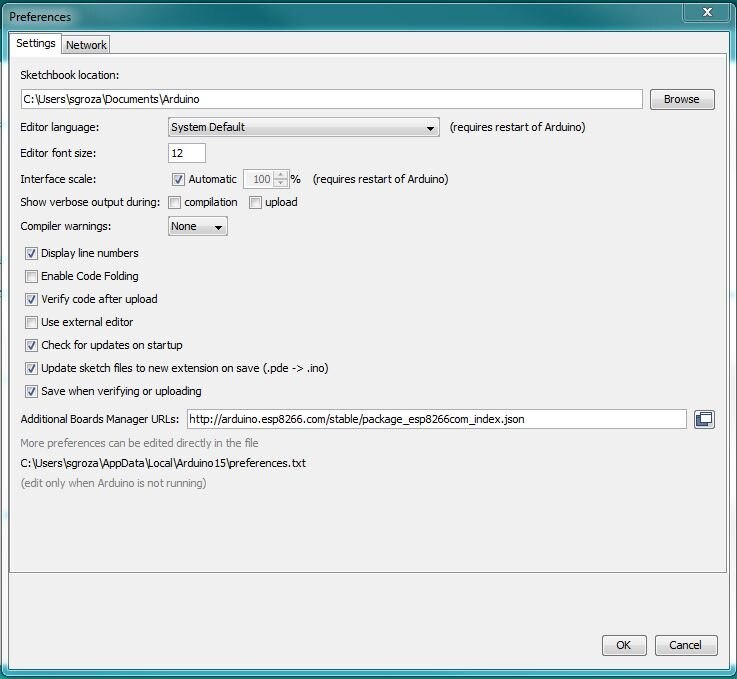
For ESP8266 module programming I choose Arduino IDE. Arduino environment needs a little setup before it can be use for this.


Into Additional Board Manager URLs field in the Arduino v1.6.4+ preferences, enter http://arduino.esp8266.com/stable/package_esp8266com_index.json.


image


Next, use the Board manager to install and update(if needed) the ESP8266 package.


image


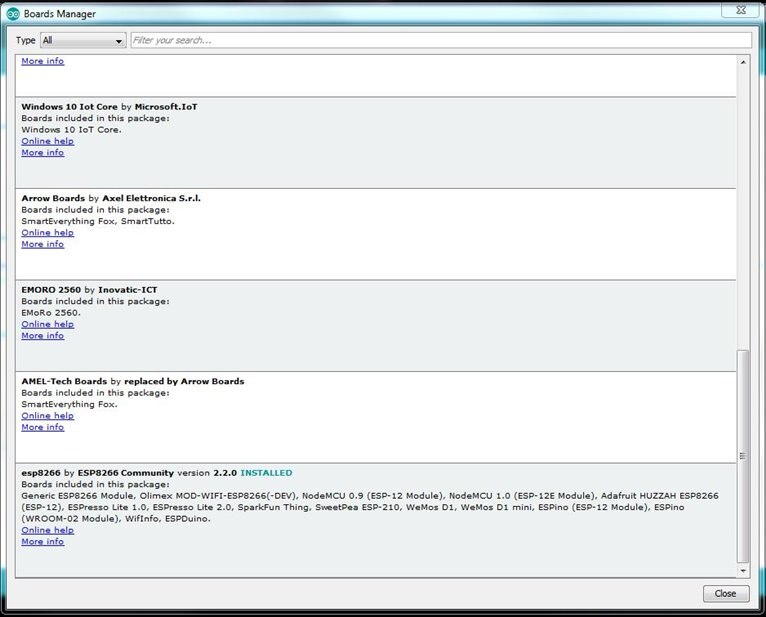
From "Tools" select "Generic ESP8266 Module" (at least this one works for me). I let all board settings default except "Port" which have to match your serial adapter COM port and "Upload Speed" which have to be set at "115200".


image


Before you going to flash the esp_pilot.ino to ESP8266-201 Board you need to change the SSID and the password to match your WiFI router settings and the IP Address for Apache web server.

Put ESP board into bootload mode by connecting GPIO 0 pin to GND and reset the board.


After these steps are done the code upload should be possible (esp_pilot.ino on Github repository). After upload is done, ESP node should start sending data to RaspberryPi web server.


RaspberryPi environment setup


For Raspberry I used the latest available Raspbian Jessie. Good thing, everything I tested was fine, given the operation mode of this project and because I usually run my RPis headless,

my top concern was wireless adapter to work properly.


In order to have access from wireless nodes to web server on Raspberry, I need to have a static IP address for RaspberryPi wireless adapter so the following config files have to be edited:


- sudo nano /etc/wpa_supplicant/wpa_supplicant.conf - configure SSID and Password for WiFi router


- sudo nano /etc/dhcpcd.conf - add the following at the end of the file, of course put your own IPs.

  interface wlan0

  static ip_address=192.168.1.150/24

  static routers=192.168.1.1

  static domain_name_servers=192.168.1.1


The above IP address will be used by the nodes to send data to web server.


After remote access was completed, I proceed to install Apache2 and Php5:


- sudo apt-get update

- sudo apt-get upgrade

- sudo apt-get install apache2 apache2-utils

- sudo apt-get install libapache2-mod-php5 php5 php-pear php5-xcache php5-mysql php5-curl php5-gd


That's it. Reboot the RPi and you should have a functional web server with Php support. The default folder for web server is /var/www/html so I placed here the php script (add.php from Github repository) for receiving and processing data sent by wireless nodes. Add.php needs to have two folders in web server root folder, "/var/www/html/datahist" - for storing a log of temperature values and "/var/www/html/datainst" - for storing only instantaneous values.


These instantaneous values are feed by a python script (mqtt_pilot.py from Github repository) to AdafruitIO service to be displayed on a dashboard format. This script use MQTT protocol to send/receive data and is implemented with the help of Adafruit mqtt python client library, a full tutorial and repository is available on their website/Github repo. A nice thing is bidirectional communication between dashboard and mqtt pyton script, dashboard can not only receive feeds from RaspberryPi3 but also send commands through switches and buttons. Switches don't have anything behind yet, i use them so far only to see if messages are sent/received.

Mqtt_pilot.py script is placed in /home/pi/pilot folder along with node_config.txt file, used to pair nodes MAC addresses with AdafruitIO feeds names.


Code for Raspberry and ESPs is available and updated as often as possible to Pilot Github page.


When my RPi is online you can see things happen HERE.

  • Sign in to reply
  • shabaz
    shabaz over 9 years ago in reply to pettitda

    Hi David,


    I suspect he may not be bridging, but only a single access, i.e. WiFi on the Pi (and not using Ethernet). That stuff about setting the static IP address was just to make it slightly more convenient for his endpoints to know where to send data, since the Pi (server) will have a known IP address. There are other ways that wouldn't have required this of course, but his method is one option. So basically he's using the WiFi for all access, to the local endpoints, and to his router out to the Internet.

    • Cancel
    • Vote Up 0 Vote Down
    • Sign in to reply
    • More
    • Cancel
  • pettitda
    pettitda over 9 years ago

    I may have missed it or misunderstood.  Since you set up the Raspberry Pi 3 as a router, how do you bridge to the internet? 

    • Cancel
    • Vote Up 0 Vote Down
    • Sign in to reply
    • More
    • Cancel
element14 Community

element14 is the first online community specifically for engineers. Connect with your peers and get expert answers to your questions.

  • Members
  • Learn
  • Technologies
  • Challenges & Projects
  • Products
  • Store
  • About Us
  • Feedback & Support
  • FAQs
  • Terms of Use
  • Privacy Policy
  • Legal and Copyright Notices
  • Sitemap
  • Cookies

An Avnet Company © 2026 Premier Farnell Limited. All Rights Reserved.

Premier Farnell Ltd, registered in England and Wales (no 00876412), registered office: Farnell House, Forge Lane, Leeds LS12 2NE.

ICP 备案号 10220084.

Follow element14

  • X
  • Facebook
  • linkedin
  • YouTube