element14 Community
element14 Community
    Register Log In
  • Site
  • Search
  • Log In Register
  • Community Hub
    Community Hub
    • What's New on element14
    • Feedback and Support
    • Benefits of Membership
    • Personal Blogs
    • Members Area
    • Achievement Levels
  • Learn
    Learn
    • Ask an Expert
    • eBooks
    • element14 presents
    • Learning Center
    • Tech Spotlight
    • STEM Academy
    • Webinars, Training and Events
    • Learning Groups
  • Technologies
    Technologies
    • 3D Printing
    • FPGA
    • Industrial Automation
    • Internet of Things
    • Power & Energy
    • Sensors
    • Technology Groups
  • Challenges & Projects
    Challenges & Projects
    • Design Challenges
    • element14 presents Projects
    • Project14
    • Arduino Projects
    • Raspberry Pi Projects
    • Project Groups
  • Products
    Products
    • Arduino
    • Avnet & Tria Boards Community
    • Dev Tools
    • Manufacturers
    • Multicomp Pro
    • Product Groups
    • Raspberry Pi
    • RoadTests & Reviews
  • About Us
  • Store
    Store
    • Visit Your Store
    • Choose another store...
      • Europe
      •  Austria (German)
      •  Belgium (Dutch, French)
      •  Bulgaria (Bulgarian)
      •  Czech Republic (Czech)
      •  Denmark (Danish)
      •  Estonia (Estonian)
      •  Finland (Finnish)
      •  France (French)
      •  Germany (German)
      •  Hungary (Hungarian)
      •  Ireland
      •  Israel
      •  Italy (Italian)
      •  Latvia (Latvian)
      •  
      •  Lithuania (Lithuanian)
      •  Netherlands (Dutch)
      •  Norway (Norwegian)
      •  Poland (Polish)
      •  Portugal (Portuguese)
      •  Romania (Romanian)
      •  Russia (Russian)
      •  Slovakia (Slovak)
      •  Slovenia (Slovenian)
      •  Spain (Spanish)
      •  Sweden (Swedish)
      •  Switzerland(German, French)
      •  Turkey (Turkish)
      •  United Kingdom
      • Asia Pacific
      •  Australia
      •  China
      •  Hong Kong
      •  India
      •  Korea (Korean)
      •  Malaysia
      •  New Zealand
      •  Philippines
      •  Singapore
      •  Taiwan
      •  Thailand (Thai)
      • Americas
      •  Brazil (Portuguese)
      •  Canada
      •  Mexico (Spanish)
      •  United States
      Can't find the country/region you're looking for? Visit our export site or find a local distributor.
  • Translate
  • Profile
  • Settings
Pi IoT
  • Challenges & Projects
  • Design Challenges
  • Pi IoT
  • More
  • Cancel
Pi IoT
Blog [Pi IoT] Hangar Central #3 -- Unboxing the Challenge Kit
  • Blog
  • Forum
  • Documents
  • Polls
  • Files
  • Events
  • Mentions
  • Sub-Groups
  • Tags
  • More
  • Cancel
  • New
  • Share
  • More
  • Cancel
Group Actions
  • Group RSS
  • More
  • Cancel
Engagement
  • Author Author: rhavourd
  • Date Created: 30 Jun 2016 4:29 PM Date Created
  • Views 922 views
  • Likes 4 likes
  • Comments 7 comments
  • piiot hangarcentral smarterspaces piiot
Related
Recommended

[Pi IoT] Hangar Central #3 -- Unboxing the Challenge Kit

rhavourd
rhavourd
30 Jun 2016

The day I had been waiting for is finally here! My challenge kit has arrived. I was feeling a bit nostalgic and thinking about all of those claymation TV shows of my youth, so I decided to make my own. Without further ado:


You don't have permission to edit metadata of this video.
Edit media
x
image
Upload Preview
image


Sidebar: The Time Lapse Video

I tried to produce the video using only the Raspberry Pi, but that turned out to be way too much effort (and distraction). In the end I decided to use the tools I had available or those that I was most familiar with. I shot a number of still images with my Canon G10. The images were humongous at 4416x3312 pixels for a whopping 5MB. I copied the images to a shared directory on my linux/Windows7 machine. Using imagemagick under linux I then resized them to a manageable 800x600 which resulted in an average filesize of 115KB. To stitch together a time lapse video, I used ffmpeg, again under linux.


sudo apt-get install imagemagick
cd ~/Unwrap
mkdir 800x600
ls -1 *.JPG | awk '{print "convert -resize 800x " $1 " 800x600/" $1}' | sh -v
cd 800x600
sudo apt-get install ffmpeg
ffmpeg -r 3 -i IMG_%*.JPG -c:v libx264 -vf "fps=25,format=yuv420p" out.mp4


Once I had the video with the time effect that I wanted, I switched over to my Windows7 machine. I used Applian Replay Music to record the audio track from YouTube. I then used Microsoft Movie Maker to add the title and credit frames and, ultimately, the soundtrack. I know that Movie Maker can also make a video from a bunch of stills, but I was having a tough time getting the timing even across all of the frames. Changes to the video proved problematic as well because it seemed as though frame timing would change or revert back to the default settings. Alas, I digress.


In the end, I am pleased with my cheesy little video and hope that you find some enjoyment from it as well. Don't worry I (probably) won't use this presentation format after this blog post!


The "Central" In Hangar Central

The Challengers Kit came with so many fun components that it is my goal to use all of them during the course of this project. The figurative central hub, Hangar Central, will be built using:

Used in ProjectUsed in This PostIncluded in the Challengers Kit

X


X


X

X

Raspberry Pi 3

Raspberry Pi B+

NEW! EnOcean Sensor Switch Design Kit

Pi Noir Camera 2

8 MP Camera

Raspberry Pi LCD 7" Touchscreen

Sense Hat

EnOcean Pi*

EnOcean Sensor Kit* ;

Pi Rack

PiFace Digital 2

WiFi Dongle

SD Card NOOBS

2.5 AMP International Raspberry Pi Power Supply


Setup Raspberry Pi 3 and LCD Touchscreen

And keeping with this weeks "claymation" theme...

You don't have permission to edit metadata of this video.
Edit media
x
image
Upload Preview
image


A couple of notes in regards to wiring up the units:

  • The power supply can apparently be hooked up to either the RPi or the display as the jumpers between 5V and GND provide a common path between the two.
  • Before connecting the ribbon cable, gently pull or slide out the white tab on the RPi. This is a tension release which makes inserting the cable a stress free affair. After the cable is in, gently press the cable frame back in and the cable will be held snuggly in place.


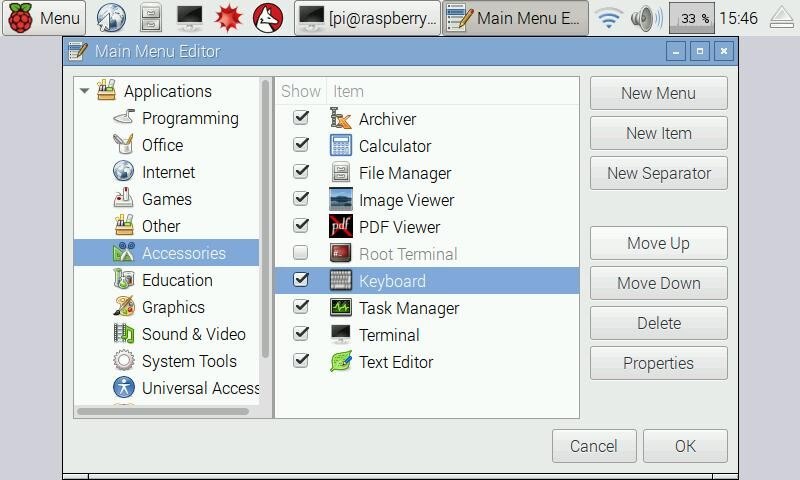
I was hoping to put together the central unit using only the components included in the kit. I might have been able to do it except for the fact that Raspian doesn't have an onscreen keyboard, so although I was able to get the machine up and running without any external parts, I still had to connect a keyboard to install the on screen matchbox-keyboard.


# Install the virtual keyboard
sudo apt-get install matchbox-keyboard

# After installing the keyboard, reboot. 
# It should appear on the desktop in Menu->Accessories->Keyboard


After installing matchbox-keyboard, I still did not have a menu option for it. If that is the case for you, simply go into Menu->Preferences->Main Menu Editor->Applications->Accessories. Enable the keyboard by clicking its' "Show" option.

image

Status Update

At this point I have the Raspberry Pi 3 running Raspian with a minimal display. The next step will be to get the central hub configured with a user interface that we can use for testing. Stay tuned...

  • Sign in to reply
  • mg.sergio
    mg.sergio over 9 years ago

    Great videos Rick!

    • Cancel
    • Vote Up 0 Vote Down
    • Sign in to reply
    • More
    • Cancel
  • rhavourd
    rhavourd over 9 years ago in reply to fvan

    Concise with pictures! Even better. Thanks.

    • Cancel
    • Vote Up 0 Vote Down
    • Sign in to reply
    • More
    • Cancel
  • fvan
    fvan over 9 years ago in reply to rhavourd

    Instructions can be found here: Raspberry Pi 7” Touchscreen Display


    The I2C lines are not needed. I'm using a 90° micro USB cable to power the Pi from the screen's control board, leaving the GPIO available for an add-on board.


    https://thepihut.com/products/short-microusb-power-cable-for-official-raspberry-pi-display?variant=10514273732

    • Cancel
    • Vote Up 0 Vote Down
    • Sign in to reply
    • More
    • Cancel
  • rhavourd
    rhavourd over 9 years ago in reply to gpolder

    I did not connect SCL and SDA by choice. As you may be aware, the LCD display does not come with installation instructions, so we are all left to become our own test pilots! When looking up how to connect the display, it seemed that everyone was using 4 jumpers (+5V, GND, SCL, SDA) plus the DSI cable. Not really thinking about it too much, I tested the setup without the SCL and SDA connected and it worked. For lack of any other reason, I left them off with the notion that should something not work later on then I would connect the missing links and see if that corrected it.


    Your query regarding SCL and SDA prompted me to do a bit of sleuthing. What I have found is that the original Raspberry Pi boards (models A & B) did not have the SDA and SCL lines in the DSI interface. Later models, A+ and B+, did have the lines in their DSI implementation.


    In short, well this last paragraph is the "short" part, late model RPi's (A+, B+, 2 and 3) do not need the SDA and SCL jumper wires for the LCD display to function properly.


    (There were many references, but the most concise was: https://www.raspberrypi.org/forums/viewtopic.php?f=29&t=120401 )

    • Cancel
    • Vote Up 0 Vote Down
    • Sign in to reply
    • More
    • Cancel
  • gpolder
    gpolder over 9 years ago

    Wow, what a nice video's. I just finished installing the Pi 3 and connecting it to the screen, so I'm at the same stage as you are, but without producing such a nice blogpost.


    I noticed that you didn't connect the SCL and SDA lines to the display, Is there a reason for that?

    I used the description at https://thepihut.com/blogs/raspberry-pi-tutorials/45295044-raspberry-pi-7-touch-screen-assembly-guide they also connect the I2C lines.


    thanks,

    Gerrit.

    • Cancel
    • Vote Up 0 Vote Down
    • Sign in to reply
    • More
    • Cancel
>
element14 Community

element14 is the first online community specifically for engineers. Connect with your peers and get expert answers to your questions.

  • Members
  • Learn
  • Technologies
  • Challenges & Projects
  • Products
  • Store
  • About Us
  • Feedback & Support
  • FAQs
  • Terms of Use
  • Privacy Policy
  • Legal and Copyright Notices
  • Sitemap
  • Cookies

An Avnet Company © 2025 Premier Farnell Limited. All Rights Reserved.

Premier Farnell Ltd, registered in England and Wales (no 00876412), registered office: Farnell House, Forge Lane, Leeds LS12 2NE.

ICP 备案号 10220084.

Follow element14

  • X
  • Facebook
  • linkedin
  • YouTube