


In this entry I discuss the implementation of MQTT (Message Queue Telemetry Transport) as the connectivity protocol. The Message Queue Telemetry Transport protocol was born as a machine to machine connection protocol for devices where a light implementation is needed. It consumes little bandwidth and its software stack implementation does not require much memory space (perfect for our IoT applications!).
MQTT deploys a publish/subscribe architecture, with a broker in the middle. To provide a multicast to multicast communication, information sources and destination are categorized as publisher and subscriber clients respectively. These clients connect to a central broker, which will manage the income information and distribute it accordingly.
The protocol behavior is orchestrated by the broker. Publishers will connect to the broker and send their data packages. Each of this packages will have a topic (the publisher sets this topic label to identify the type of information), used by the broker to organize them in queues. Subscriber clients can then subscribe to the topics of their interest. New packages arriving to the queue are received by the subscribed clients.
In order to work with MQTT, we will make use of two open source projects:
- Mosquitto – to implement the broker
- Paho – to implement the clients
Communication among broker and clients is achieved using the home WiFi network.
MQTT Elements
This MQTT architecture has three main elements. Their relationship is shown in the figure bellow:

Raspberry Pi 1 - Publisher
- Sensor Node
- Generates data (sensors reading)
- Sends data to broker
Raspberry Pi 3 - Broker
- Central node
- Receives messages publishers
- Organizes messages in topic queues
Samartphone - Subscriber
- User's devices
- Connected to broker
- Displays sensors reading
Figure 1. MQTT architecture
Next sections explain the choice of software and setup for broker and clients

1) Installation of Mosquitto Broker in the central node of our smart home (Raspberry Pi 3).
Initial setup: Raspberry Pi 3 – Raspbian 8.0 (jessie) / SSH connection enabled
A described in its project web “Eclipse Mosquitto is an open source (EPL/EDL licensed) message broker that implements the MQTT protocol versions 3.1 and 3.1.1. MQTT provides a lightweight method of carrying out messaging using a publish/subscribe model. This makes it suitable for "Internet of Things" messaging such as with low power sensors or mobile devices such as phones, embedded computers or microcontrollers like the Arduino.”
I will install the broker in a Raspberry Pi 3, which is already running Raspbian OS. Afterwards, I will configure this broker and test that it is actually running.
Install
<OPTIONAL> To do so, you may first need to include the corresponding Debian repository for Mosquitto files, with the following commands:
From Jessie's version on, this step is not needed anymore (as Mosquitto is officially part of the package){thanks rhe123 for the explanation in your comment}. So, if you have an older version of your a apt-get install does not work directly you may want add the repository. Otherwise, next command lines can be skipped
sudo wget http://repo.mosquitto.org/debian/mosquitto-repo.gpg.key
sudo apt-key add mosquitto-repo.gpg.key
cd /etc/apt/sources.list.d/
sudo wget http://repo.mosquitto.org/debian/mosquitto-jessie.list
sudo apt-get update
</OPTIONAL>
Then, I install Mosquitto broker. Additionally, we will also install the default mqtt clients included in the project:
sudo apt-get install mosquitto mosquitto-clients
Configure
Mosquitto allows for most of its parameters to be configured (such as the user name, maximum messages in queue, listener characteristics...). By default, however, Mosquitto is started without any configuration file (using its default values). I will have to create one mosquitto.conf to be used as a parameter when the broker is started. A mosquitto.conf can be created in the directory /etc/mosquitto/mosquitto.conf (*NOTE: the name of the file is irrelevant, as long as it is .conf type)
Broker can be started with the following command:
sudo /usr/sbin/mosquitto -c etc/mosquitto/mosquitto.conf
Mosquitto project has a very detailed explanations for this config file mosquitto-conf-5.html
I also attach a config file (can be found at /usr/share/doc/mosquitto/examples/mosquitto.conf.example). I found it very useful to start changing the parameters.
In this project, I modify the following parameters:
- MQTT general characteristics:
- user mosquitto
- persistence true (save messages information)
- Security:
- clientid_prefixes secure- (only clients of the type secure-clientname are allowed to connect... better to use something more original than secure- for the prefix). At this first trial, no prefix is included but we implement it later in the project.
- allow_anonymous false (clients connecting without user name are not allowed)
- Listener parameters --> it defines the broker's behavior when clients are trying to connect
- port 1883 (default)
- max_connections -1 (no limits for the # of connections)
- Certificate based SSL/TLS support --> include security with a Certificate Authority which generates a certificate for each client. Clients can be required to provide a valid certificate to connect with the broker. (I plan to have this feature enabled, but could not make it work in my first trials so.... no Certificate based SSL/TLS support as of now)
Test
Since mosquitto-clients wre also installed, I will use them to test our Mosquitto setup. I open three different terminals, to start the broker and create a subscriber client and a publisher client
1. Start the broker in terminal 1
2. Create an mqtt subscriber client. It will be listening for message with topic 'test/hello' in terminal 2
3. Create an mqtt publisher client. It will send a simple message "hello world!" (original, yeah!) with topic 'test/hello' in terminal 3
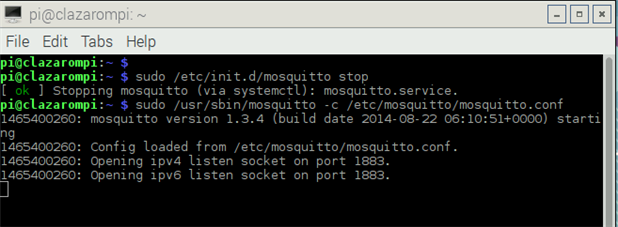
Figure 2. Start MQTT broker with our config file
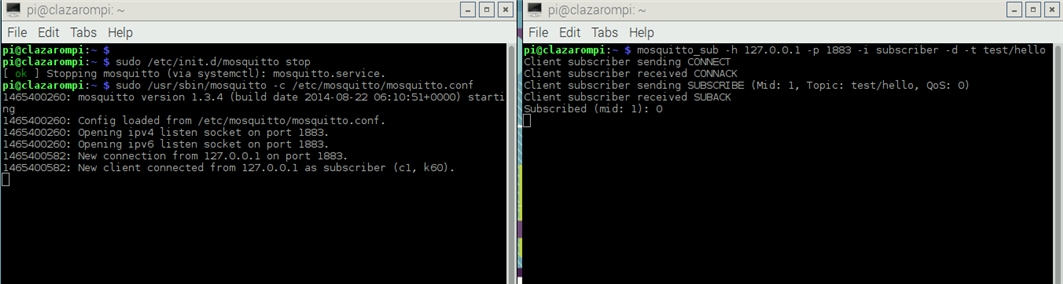
Figure 3. Create a subscribe client. It is subscribed to the topic test/hello

Figure 4. Create a publisher client. Send the message "Hello world!"
(*) Mosquitto broker is automatically started. We stop it first, to then start a broker with the desired configuration
We got the message in our subscriber, hurray!!
Useful Mosquitto commands
STOP BROKER
sudo /etc/init.d/mosquitto stop
START BROKER
sudo /usr/sbin/mosquitto -c /etc/mosquitto/mosquitto.conf
SUBSCRIBER CLIENT
mosquitto_sub -h <host> -p <port> -i <user> -d -t what/topic
PUBLISHER CLIENT
mosquitto_pub -h <host> -p <port> -i <user> -d -t what/topic -m "new message!"
MQTT broker (Mosquitto) successfully installed in Raspberry Pi 3
MQTT broker tested with local MQTT clients
2) Paho Clients (Raspberry Pi 1 / Smart phone & Raspberry Pi 3) 

Initial setup: Raspberry Pi 1 - Raspbian / Smartphone - Android 4.2.2/ Raspberry Pi 3 - Raspbian 8.0
Our clients, both Publisher and Subscriber, are created using Paho project. Paho provides client implementations of MQTT, in various programming languages. Main advantages we obtained from Paho are compatibility (available for different platforms and programming languages, such as Python and Java) and community support.
We are using Paho to implement three clients: one publisher (in our sensor node) and two subscribers (one in the broker and the other in the smartphone for the user).
MQTT Connectivity setup
We now have a running broker installed in the Raspberry Pi 3. We write down the values any MQTT client will need to connect to it:
- Host: local IP address of Raspberry Pi 3
- Port: 1883
- Client prefixes (if configured): secure-
We can develop publisher and subscriber clients, connected to our WLAN/LAN.
Top Comments