element14 Community
element14 Community
    Register Log In
  • Site
  • Search
  • Log In Register
  • Community Hub
    Community Hub
    • What's New on element14
    • Feedback and Support
    • Benefits of Membership
    • Personal Blogs
    • Members Area
    • Achievement Levels
  • Learn
    Learn
    • Ask an Expert
    • eBooks
    • element14 presents
    • Learning Center
    • Tech Spotlight
    • STEM Academy
    • Webinars, Training and Events
    • Learning Groups
  • Technologies
    Technologies
    • 3D Printing
    • FPGA
    • Industrial Automation
    • Internet of Things
    • Power & Energy
    • Sensors
    • Technology Groups
  • Challenges & Projects
    Challenges & Projects
    • Design Challenges
    • element14 presents Projects
    • Project14
    • Arduino Projects
    • Raspberry Pi Projects
    • Project Groups
  • Products
    Products
    • Arduino
    • Avnet & Tria Boards Community
    • Dev Tools
    • Manufacturers
    • Multicomp Pro
    • Product Groups
    • Raspberry Pi
    • RoadTests & Reviews
  • About Us
  • Store
    Store
    • Visit Your Store
    • Choose another store...
      • Europe
      •  Austria (German)
      •  Belgium (Dutch, French)
      •  Bulgaria (Bulgarian)
      •  Czech Republic (Czech)
      •  Denmark (Danish)
      •  Estonia (Estonian)
      •  Finland (Finnish)
      •  France (French)
      •  Germany (German)
      •  Hungary (Hungarian)
      •  Ireland
      •  Israel
      •  Italy (Italian)
      •  Latvia (Latvian)
      •  
      •  Lithuania (Lithuanian)
      •  Netherlands (Dutch)
      •  Norway (Norwegian)
      •  Poland (Polish)
      •  Portugal (Portuguese)
      •  Romania (Romanian)
      •  Russia (Russian)
      •  Slovakia (Slovak)
      •  Slovenia (Slovenian)
      •  Spain (Spanish)
      •  Sweden (Swedish)
      •  Switzerland(German, French)
      •  Turkey (Turkish)
      •  United Kingdom
      • Asia Pacific
      •  Australia
      •  China
      •  Hong Kong
      •  India
      •  Korea (Korean)
      •  Malaysia
      •  New Zealand
      •  Philippines
      •  Singapore
      •  Taiwan
      •  Thailand (Thai)
      • Americas
      •  Brazil (Portuguese)
      •  Canada
      •  Mexico (Spanish)
      •  United States
      Can't find the country/region you're looking for? Visit our export site or find a local distributor.
  • Translate
  • Profile
  • Settings
PiCasso Design Challenge
  • Challenges & Projects
  • Design Challenges
  • PiCasso Design Challenge
  • More
  • Cancel
PiCasso Design Challenge
Blog Installing  and Testing PiFace 2 Digital
  • Blog
  • Forum
  • Documents
  • Polls
  • Files
  • Events
  • Mentions
  • Sub-Groups
  • Tags
  • More
  • Cancel
  • New
  • Share
  • More
  • Cancel
Group Actions
  • Group RSS
  • More
  • Cancel
Engagement
  • Author Author: armour999
  • Date Created: 5 Apr 2019 2:10 PM Date Created
  • Views 1146 views
  • Likes 8 likes
  • Comments 2 comments
Related
Recommended

Installing  and Testing PiFace 2 Digital

armour999
armour999
5 Apr 2019

Installing:


I did a variation on the instructions to get the board working. I had to write a older version of the Operating system from 2016 to a SD card.  Using the current image , I could not find the PIFace  software to install from the current repository, You can download older versions from this link.


1. Enable SPI with the configuration tool.


2. Install PiFace Digital Software


sudo apt-get install python3-pifacedigital-emulator

sudo reboot


3. Make sure the power is off before connecting the board to the Raspberry Pi.


Testing:


1. Blinky Test


python3 /usr/share/doc/python3-pifacedigitalio/examples/blink.py


image

Use Ctrl + C  to stop it
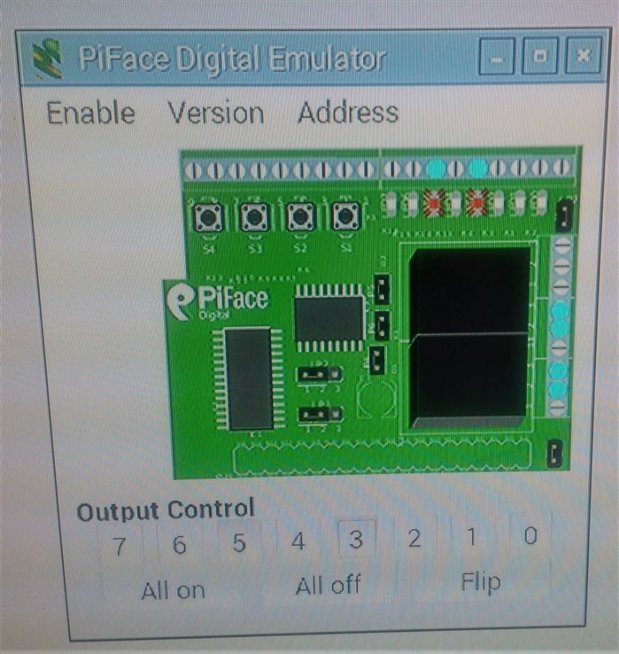
 

2. Emulator Test


Type in the terminal: pifacedigital-emulator or click on the desktop icon. The emulator should open and allows manual control of Outputs and Inputs. Select by clicking on Enable option.

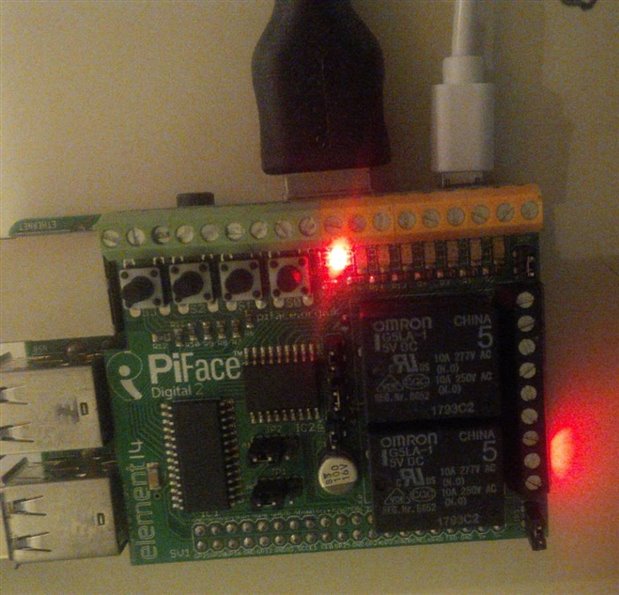
In this example I have selected 3 and 5. The LED lights have turned on in the Emulator and the PiFace


image


The PiFace example directory can be found at:


cd /usr/share/doc/python3-pifacedigitalio/examples


Flashing a LED example

from time import sleep
import pifacedigitalio as p
pinit()
while(True):
      p.digital_write(0,1) #turn on      sleep(1)
      p.digital_write(0,0) #turn off
      sleep(1)


Pushing a button example


To read the state of an input use the p.digital_read(pin) function as shown below. If a button is pressed the function returns a 1, otherwise it returns a 0.


import pifacedigitalio as p
p.init()
p.digital_read(1)


Python prints 0.

Now hold down switch number 1 (marked S1) and type p.digital_read(1) again.

Python prints 1.

  • Sign in to reply

Top Comments

  • DAB
    DAB over 6 years ago +1
    Nice update. DAB
  • e14phil
    e14phil over 6 years ago +1
    That is a great Step by Step guide
  • e14phil
    e14phil over 6 years ago

    That is a great Step by Step guide

    • Cancel
    • Vote Up +1 Vote Down
    • Sign in to reply
    • More
    • Cancel
  • DAB
    DAB over 6 years ago

    Nice update.


    DAB

    • Cancel
    • Vote Up +1 Vote Down
    • Sign in to reply
    • More
    • Cancel
element14 Community

element14 is the first online community specifically for engineers. Connect with your peers and get expert answers to your questions.

  • Members
  • Learn
  • Technologies
  • Challenges & Projects
  • Products
  • Store
  • About Us
  • Feedback & Support
  • FAQs
  • Terms of Use
  • Privacy Policy
  • Legal and Copyright Notices
  • Sitemap
  • Cookies

An Avnet Company © 2025 Premier Farnell Limited. All Rights Reserved.

Premier Farnell Ltd, registered in England and Wales (no 00876412), registered office: Farnell House, Forge Lane, Leeds LS12 2NE.

ICP 备案号 10220084.

Follow element14

  • X
  • Facebook
  • linkedin
  • YouTube