element14 Community
element14 Community
    Register Log In
  • Site
  • Search
  • Log In Register
  • Community Hub
    Community Hub
    • What's New on element14
    • Feedback and Support
    • Benefits of Membership
    • Personal Blogs
    • Members Area
    • Achievement Levels
  • Learn
    Learn
    • Ask an Expert
    • eBooks
    • element14 presents
    • Learning Center
    • Tech Spotlight
    • STEM Academy
    • Webinars, Training and Events
    • Learning Groups
  • Technologies
    Technologies
    • 3D Printing
    • FPGA
    • Industrial Automation
    • Internet of Things
    • Power & Energy
    • Sensors
    • Technology Groups
  • Challenges & Projects
    Challenges & Projects
    • Design Challenges
    • element14 presents Projects
    • Project14
    • Arduino Projects
    • Raspberry Pi Projects
    • Project Groups
  • Products
    Products
    • Arduino
    • Avnet & Tria Boards Community
    • Dev Tools
    • Manufacturers
    • Multicomp Pro
    • Product Groups
    • Raspberry Pi
    • RoadTests & Reviews
  • About Us
    About the element14 Community
  • Store
    Store
    • Visit Your Store
    • Choose another store...
      • Europe
      •  Austria (German)
      •  Belgium (Dutch, French)
      •  Bulgaria (Bulgarian)
      •  Czech Republic (Czech)
      •  Denmark (Danish)
      •  Estonia (Estonian)
      •  Finland (Finnish)
      •  France (French)
      •  Germany (German)
      •  Hungary (Hungarian)
      •  Ireland
      •  Israel
      •  Italy (Italian)
      •  Latvia (Latvian)
      •  
      •  Lithuania (Lithuanian)
      •  Netherlands (Dutch)
      •  Norway (Norwegian)
      •  Poland (Polish)
      •  Portugal (Portuguese)
      •  Romania (Romanian)
      •  Russia (Russian)
      •  Slovakia (Slovak)
      •  Slovenia (Slovenian)
      •  Spain (Spanish)
      •  Sweden (Swedish)
      •  Switzerland(German, French)
      •  Turkey (Turkish)
      •  United Kingdom
      • Asia Pacific
      •  Australia
      •  China
      •  Hong Kong
      •  India
      •  Japan
      •  Korea (Korean)
      •  Malaysia
      •  New Zealand
      •  Philippines
      •  Singapore
      •  Taiwan
      •  Thailand (Thai)
      •  Vietnam
      • Americas
      •  Brazil (Portuguese)
      •  Canada
      •  Mexico (Spanish)
      •  United States
      Can't find the country/region you're looking for? Visit our export site or find a local distributor.
  • Translate
  • Profile
  • Settings
Rocking Raspberry Pi
  • Challenges & Projects
  • Design Challenges
  • Rocking Raspberry Pi
  • More
  • Cancel
Rocking Raspberry Pi
Blog Raspberry Pi and Karaoke Machine (Setting Up Wi-Pi and Pi-Face CAD(only LCD))
  • Blog
  • Forum
  • Documents
  • Files
  • Mentions
  • Sub-Groups
  • Tags
  • More
  • Cancel
  • New
  • Share
  • More
  • Cancel
Group Actions
  • Group RSS
  • More
  • Cancel
Engagement
  • Author Author: babusingh9211
  • Date Created: 1 Mar 2014 6:40 AM Date Created
  • Views 1541 views
  • Likes 2 likes
  • Comments 6 comments
  • raspi
  • rockingraspberrypi
  • raspberry-pi
  • raspberrypi
  • rocking_pi
Related
Recommended

Raspberry Pi and Karaoke Machine (Setting Up Wi-Pi and Pi-Face CAD(only LCD))

babusingh9211
babusingh9211
1 Mar 2014

Hello everyone,


Before you proceed to this step, you need to follow the Raspbian Installation.


Setting Up Wi-Pi

There are 2 ways to setup Wi-Pi.

  1. Graphical Interface
  2. Using SSH


Using graphical interface

     1. Boot up your Raspberry Pi with Raspbian.

     2. You will find Wi-Fi Config shortcut on the desktop. Open it.
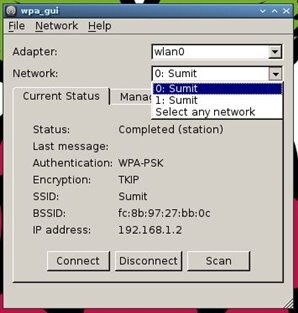
     3. Click on Scan.

     4. Select your network SSID.

     5. Select authentication method and enter password.

     6. Click on Add .

     7. Close the network scan.

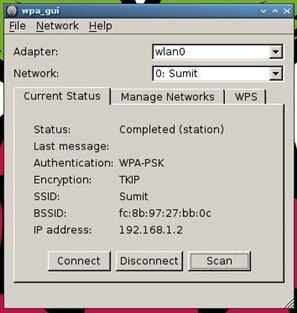
     8. Select your SSID from network and click on connect.

     9. Now you are connected to the network and it’s all done.

Fullscreen contentimage_30064.html Download
<html><head><title>Jive SBS</title></head>
<body><font face="arial,helvetica,sans-serif">
<b>Error</b><br><font size="-1">
An general error occurred while processing your request.
</font></font></body></html>

Fullscreen contentimage_30065.html Download
<html><head><title>Jive SBS</title></head>
<body><font face="arial,helvetica,sans-serif">
<b>Error</b><br><font size="-1">
An general error occurred while processing your request.
</font></font></body></html>

image

image


Using SSH

For this step you have to connect you Raspberry Pi with the LAN. And you know your Local IP.

     1.  SSH Raspbian with your user and password.

     2.  sudo nano /etc/network/interfaces

     3.  Make Changes in the file to

          auto lo


          iface lo inet loopback

          iface eth0 inet dhcp


          allow-hotplug wlan0

          iface wlan0 inet manual

          wpa-roam /etc/wpa_supplicant/wpa_supplicant.conf

          iface default inet dhcp

     4.  Save the Changes by pressing CTRL+O and exit by pressing CTRL+X .

     5.  sudo nano /etc/wpa_supplicant/wpa_supplicant.conf

     6.  Make changes in the file to

      ctrl_interface=DIR=/var/run/wpa_supplicant GROUP=netdev

      update_config=1


      network={

      ssid="Sumit"

      psk="your_auth_key"

      proto=WPA

      key_mgmt=WPA-PSK

      pairwise=TKIP

      group=TKIP WEP104 WEP40

      auth_alg=OPEN

     }


     7.  Save the Changes by pressing CTRL+O and exit by pressing CTRL+X .

     8. Don’t forget to change the “your_auth_key” to your network password.

     9. My network is WPA-PSK and encryption is TKIP. You can change it according to your’' network type.

     10.  Reboot the Raspberry Pi.

Fullscreen contentimage_30068.html Download
<html><head><title>Jive SBS</title></head>
<body><font face="arial,helvetica,sans-serif">
<b>Error</b><br><font size="-1">
An general error occurred while processing your request.
</font></font></body></html>
Fullscreen contentimage_30069.html Download
<html><head><title>Jive SBS</title></head>
<body><font face="arial,helvetica,sans-serif">
<b>Error</b><br><font size="-1">
An general error occurred while processing your request.
</font></font></body></html>

Fullscreen contentimage_30070.html Download
<html><head><title>Jive SBS</title></head>
<body><font face="arial,helvetica,sans-serif">
<b>Error</b><br><font size="-1">
An general error occurred while processing your request.
</font></font></body></html>
Fullscreen contentimage_30071.html Download
<html><head><title>Jive SBS</title></head>
<body><font face="arial,helvetica,sans-serif">
<b>Error</b><br><font size="-1">
An general error occurred while processing your request.
</font></font></body></html>

image


Setting Up LCD in Pi-Face CAD


          Interfacing LCD Display using Pi-Face control and display is too much easy even in hardware and for programming point of view. The Pi-face CAD provide you plug and play feature. Just a few command is needed.


           But before setting up LCD of Pi-Face we have to enable the SPI communication. It can be enable by entering the following command in terminal


                sudo raspi-config


         And in advanced setting you will find SPI option enable SPI and save the changes. Reboot the Raspberry Pi.


     Installing the latest Pi-face control and display

     Install the latest software by entering the following commands in terminal.


      sudo apt-get install python3-pifacecad


     To test that everything is setup fine. Enter the following command.


         python3 /usr/share/doc/python3-pifacecad/examples/sysinfo.py


     Assuming you already installed python3 in your Pi.


     Executing the file while booting


     Paste the code in /etc/init.d/lcd


### BEGIN INIT INFO

# Provides: LCD – IP address

# Required-Start: $remote_fs $syslog

# Required-Stop: $remote_fs $syslog

# Default-Start: 2 3 4 5

# Default-Stop: 0 1 6

# Short-Description: Liquid Crystal Display

# Description: IP address

### END INIT INFO

#! /bin/sh

# /etc/init.d/lcd


export HOME

case "$1" in

    start)

        echo "Starting LCD"

        python3 /usr/share/doc/python3-pifacecad/examples/sysinfo.py  2>&1 &

    ;;

    stop)

        echo "Stopping LCD"

       LCD_PID=`ps auxwww | grep sysinfo.py | head -1 | awk '{print $2}'`

       kill -9 $LCD_PID

    ;;

    *)

        echo "Usage: /etc/init.d/lcd {start|stop}"

        exit 1

    ;;

Esac

exit 0


     Make the script executable by entering the command


sudo chmod +x /etc/init.d/lcd


     After this execute the file by entering.         


          /etc/init.d/lcd start


     Make the LCD init script known to the system by using the update-rc.d command.


            sudo update-rc.d lcd defaults


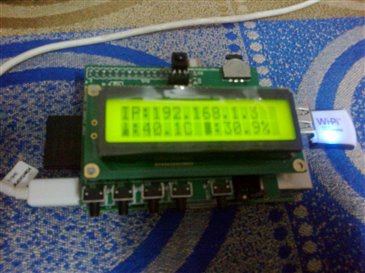
     This is how I setup my Raspberry Pi to display IP address on LCD so that I easily connect with it through SSH.

You can edit sysinfo.py file update time interval to update the IP on the LCD accordingly your choice.


This one is mine raspberry pi output.

image


This is how I setup my Wi-Pi and LCD. If you have any problem and query regarding this don’t hesitate to ask. If you have any suggestion’ please comment below.


Regards,

Sumit Rai


  • Sign in to reply

Top Comments

  • Former Member
    Former Member over 12 years ago +1
    Nice one...got to know about initialising the script and executing script at startup..
  • Former Member
    Former Member over 12 years ago +1
    nice post.
  • babusingh9211
    babusingh9211 over 12 years ago

    Hello Rohit Rangwani,
    I go through your problem and found that it is because of the PiFace CAD is not attached or properly plugged to the GPIO pins.
    If you have also done this properly then the problem is in Pi-Face CAD.

    • Cancel
    • Vote Up 0 Vote Down
    • Sign in to reply
    • More
    • Cancel
  • babusingh9211
    babusingh9211 over 12 years ago

    what steps you followed?
    where you are getting the error?
    Have you updated and upgraded your raspbian?

    If possible provide screenshot of error.

    • Cancel
    • Vote Up 0 Vote Down
    • Sign in to reply
    • More
    • Cancel
  • babusingh9211
    babusingh9211 over 12 years ago in reply to Former Member

    Thanks!! Rohit image
    hope you will find something more useful in my future post.

    • Cancel
    • Vote Up 0 Vote Down
    • Sign in to reply
    • More
    • Cancel
  • babusingh9211
    babusingh9211 over 12 years ago in reply to Former Member

    Thanks!!! Bhavna image

    • Cancel
    • Vote Up 0 Vote Down
    • Sign in to reply
    • More
    • Cancel
  • Former Member
    Former Member over 12 years ago

    nice post.

    • Cancel
    • Vote Up +1 Vote Down
    • Sign in to reply
    • More
    • Cancel
>
element14 Community

element14 is the first online community specifically for engineers. Connect with your peers and get expert answers to your questions.

  • Members
  • Learn
  • Technologies
  • Challenges & Projects
  • Products
  • Store
  • About Us
  • Feedback & Support
  • FAQs
  • Terms of Use
  • Privacy Policy
  • Legal and Copyright Notices
  • Sitemap
  • Cookies

An Avnet Company © 2026 Premier Farnell Limited. All Rights Reserved.

Premier Farnell Ltd, registered in England and Wales (no 00876412), registered office: Farnell House, Forge Lane, Leeds LS12 2NE.

ICP 备案号 10220084.

Follow element14

  • X
  • Facebook
  • linkedin
  • YouTube