element14 Community
element14 Community
    Register Log In
  • Site
  • Search
  • Log In Register
  • Community Hub
    Community Hub
    • What's New on element14
    • Feedback and Support
    • Benefits of Membership
    • Personal Blogs
    • Members Area
    • Achievement Levels
  • Learn
    Learn
    • Ask an Expert
    • eBooks
    • element14 presents
    • Learning Center
    • Tech Spotlight
    • STEM Academy
    • Webinars, Training and Events
    • Learning Groups
  • Technologies
    Technologies
    • 3D Printing
    • FPGA
    • Industrial Automation
    • Internet of Things
    • Power & Energy
    • Sensors
    • Technology Groups
  • Challenges & Projects
    Challenges & Projects
    • Design Challenges
    • element14 presents Projects
    • Project14
    • Arduino Projects
    • Raspberry Pi Projects
    • Project Groups
  • Products
    Products
    • Arduino
    • Avnet & Tria Boards Community
    • Dev Tools
    • Manufacturers
    • Multicomp Pro
    • Product Groups
    • Raspberry Pi
    • RoadTests & Reviews
  • About Us
  • Store
    Store
    • Visit Your Store
    • Choose another store...
      • Europe
      •  Austria (German)
      •  Belgium (Dutch, French)
      •  Bulgaria (Bulgarian)
      •  Czech Republic (Czech)
      •  Denmark (Danish)
      •  Estonia (Estonian)
      •  Finland (Finnish)
      •  France (French)
      •  Germany (German)
      •  Hungary (Hungarian)
      •  Ireland
      •  Israel
      •  Italy (Italian)
      •  Latvia (Latvian)
      •  
      •  Lithuania (Lithuanian)
      •  Netherlands (Dutch)
      •  Norway (Norwegian)
      •  Poland (Polish)
      •  Portugal (Portuguese)
      •  Romania (Romanian)
      •  Russia (Russian)
      •  Slovakia (Slovak)
      •  Slovenia (Slovenian)
      •  Spain (Spanish)
      •  Sweden (Swedish)
      •  Switzerland(German, French)
      •  Turkey (Turkish)
      •  United Kingdom
      • Asia Pacific
      •  Australia
      •  China
      •  Hong Kong
      •  India
      • Japan
      •  Korea (Korean)
      •  Malaysia
      •  New Zealand
      •  Philippines
      •  Singapore
      •  Taiwan
      •  Thailand (Thai)
      • Vietnam
      • Americas
      •  Brazil (Portuguese)
      •  Canada
      •  Mexico (Spanish)
      •  United States
      Can't find the country/region you're looking for? Visit our export site or find a local distributor.
  • Translate
  • Profile
  • Settings
Rocking Raspberry Pi
  • Challenges & Projects
  • Design Challenges
  • Rocking Raspberry Pi
  • More
  • Cancel
Rocking Raspberry Pi
Blog Raspberry Pi Karaoke machine - Headless Pi
  • Blog
  • Forum
  • Documents
  • Files
  • Mentions
  • Sub-Groups
  • Tags
  • More
  • Cancel
  • New
  • Share
  • More
  • Cancel
Group Actions
  • Group RSS
  • More
  • Cancel
Engagement
  • Author Author: rohitrangwani
  • Date Created: 28 Feb 2014 1:50 PM Date Created
  • Views 2230 views
  • Likes 0 likes
  • Comments 2 comments
  • wi-pi
  • rocking-the-rocking-raspberrypi-challenge
  • rockingraspberrypi
  • raspberry-pi
  • rocking_pi
Related
Recommended

Raspberry Pi Karaoke machine - Headless Pi

rohitrangwani
rohitrangwani
28 Feb 2014

Hi guys,

Don't  have any display unit ?

Stuck finding it and other accessories?

Headless mode of Pi is all you need to work on!


The steps below are not valid for 'noobs' installed sd card,if you need this to work out with noobs installed sd card you need a monitor  and a hdmi cable atleast once to install Raspbian os and then follow the same steps.


What you have:

  1. Raspberry Pi running the latest Raspbian Wheezy
  2. PC/Laptop with WiFi Internet connection and a Ethernet Jack (LAN Connector / RJ45)
  3. A working SSH connection with Raspberry Pi (direct access, explained here)

What you don’t have:

  1. Display Device for the Raspberry Pi (HDMI enabled display unit / Old TV)
  2. Direct Internet connection for the Raspberry Pi (LAN or WiFi)

Extra Stuff you need:

  1. Standard Network Cable (Cat 5, Standard or Crossover)
  2. PutTTY Software (will be used to SSH into the Pi)
  3. SD Card Writer

Please follow the below steps to have a working SSH connection:

  1. Install and burn the latest Raspbian Wheezy OS onto the SD card for the Raspberry Pi
  2. While the Raspberry Pi is switched off, connect one side of the Ethernet cable to Raspberry Pi and other side to the RJ45 jack of the PC/Laptop
  3. Open LAN properties and make sure that IPV4 properties are set to Obtain IP address automatically.
  4. We now need to determine the IP of our PC/Laptop when it’s connected to the Raspberry Pi
  5. Now power on the Raspberry Pi while making sure that the network cable is connected on both ends
  6. Wait for a min or two. You’ll notice that the PC/Laptop will scan and then show a small warning indicating the presence of an unidentified network.
  7. Now, open command prompt and type ipconfig. Note the IP of the Ethernet Adapter Local Area Connection as shown below:

Image


8. Now, power off the Raspberry Pi and take out the SD Card. Plug in the SD card into a card reader and open it. You should see a couple of files


Image


9. Open the cmdline.txt file and append this to the end of it:


Image


ip=169.254.39.71


Please change the IP accordingly and assign a unique value (while making sure you don’t go beyond the subnet mask). Preferably, change only the last parameterFor example, if your LAN’s ip is 169.254.0.1, we recommend using 169.254.0.3 as the IP for Raspberry Pi in cmdline.txt


  1. Save the cmdline.txt file without making any other changes
  2. Plug this back into the Raspberry Pi and with the Ethernet cables connected, power on the Raspberry Pi
  3. Wait a couple of minutes while the Raspberry Pi tries to establish a local network connection with our PC/Laptop
  4. Once you see the network warning message as shown above, ping the Raspberry Pi to see if it’s live on the network as follows
    1. Open CMD prompt
    2. Type ping ipaddress_of_raspberry-pi

Ex: ping 169.254.39.71

If all went good, you should see the Pi responding back to the ping requests.

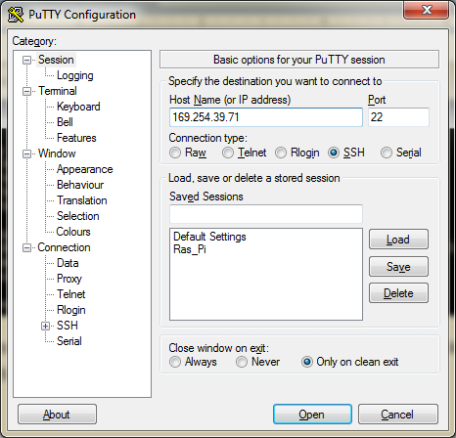
  1. Now its time to SSH into the R Pi. Open PuTTY client and type in the IP address of the Raspberry Pi (169.254.39.71) and hit OpenImage

You should get a certificate trust warning message (if SSHing for the first time) which you should accept. Once done, you’ll see the login terminal:

Image

Enter pi

The password should be raspberry.

Now, moving on to access the Raspberry Pi’s desktop, we first need to install Xming X Server for windows from this link:

http://sourceforge.net/project/downloading.php?group_id=156984&filename=Xming-6-9-0-31-setup.exe

Make sure you install the SSH components also when prompted to do so.

Once that gets successfully installed, simply click the Xming icon and make sure it’s running in the background.

Now, open PuTTY terminal and first enable X11 forwarding as shown below:

Image

Now, direct SSH into the Raspberry Pi as explained previously

Image

Hit in lxsession or startlxde and that should pop up the desktop of the Raspberry Pi.

Image

Have fun :)

Few pics of Pi in action.....

image

image

imageimage I loved this as I was able easily move in between my laptop os and simultaneously  remote access the Raspberry pi.

If you have any queries comment below.

Next post on Enabling Wipi and using it to connect to Internet.I already worked it out waiting for freetime to post it.

Stay tuned.image

--R.R.

Reference :

1. Direct Access Raspberry Pi Shell and Desktop on Laptop/PC without installing anything on the Raspberry Pi OS or connecti…

  • Sign in to reply

Top Comments

  • shabaz
    shabaz over 11 years ago in reply to rohitrangwani +1
    Good that you're pointing out that seeking a monitor and k/b can be unnecessary after the initial configuration! If you like, you can simplify the procedure a bit. As I understand, your scenario connects…
  • shabaz
    shabaz over 11 years ago in reply to rohitrangwani

    Good that you're pointing out that seeking a monitor and k/b can be unnecessary after the initial configuration!

    If you like, you can simplify the procedure a bit. As I understand, your scenario connects your laptop directly to the RPI.


    In this case, you can open up your Windows network connections dialog, and inside the 'local area connection properties' -> 'Internet Protocol Version 4' you can give yourself any IP - e.g. 192.168.1.4 .

    Then, you can set your RPI (I've not done this) to another value such as 192.168.1.5 . (no need for IP address scanning).


    Alternatively, if your laptop is already connected to a router, then your PC is likely set to 'Obtain an IP address automatically'. In that case, you can plug your RPI directly into the router too [technically it is going into a switch port

    on the same box] (no need to change a setting on the RPI, by default the image is set to obtain an IP address automatically from the router too. You've got a few ways to find out the IP address of the RPI - you could guess based on your IP address, or log into the router, or use the scanning tool you've mentioned. Other ways are possible too.


    Just a minor point, to be clear, 'headless mode' is not a real term. Looks like according to Wikipedia, a 'headless computer' entry was first created in 2009, from someone's webpage which no longer exists.

    This way of connecting not really a mode, it is just using network access to connect to a computer.

    I know you're not the only one to use the term, but it's good to make it clear that it isn't a real term as far as I can tell. Prior to SSH, according to Wikipedia, people were using Telnet for 40 years prior to that headless slang : )

    • Cancel
    • Vote Up +1 Vote Down
    • Sign in to reply
    • More
    • Cancel
  • rohitrangwani
    rohitrangwani over 11 years ago

    The other advantages of headless mode are :

    1. No need for Powered usb hubs as only one usb port is occupied (Wipi) that too can be released by using only Ethernet for internet as well as SSHing.
    2. No mouse and keyboard required.
    3. No display unit required.
    4. No Hdmi or VGA cable (offcourse).
    5. Only Wipi can be used to remote access (not worked out that until now).


    Only thing you require is another computer ,I am sure everybody has one

    • Cancel
    • Vote Up 0 Vote Down
    • Sign in to reply
    • More
    • Cancel
element14 Community

element14 is the first online community specifically for engineers. Connect with your peers and get expert answers to your questions.

  • Members
  • Learn
  • Technologies
  • Challenges & Projects
  • Products
  • Store
  • About Us
  • Feedback & Support
  • FAQs
  • Terms of Use
  • Privacy Policy
  • Legal and Copyright Notices
  • Sitemap
  • Cookies

An Avnet Company © 2025 Premier Farnell Limited. All Rights Reserved.

Premier Farnell Ltd, registered in England and Wales (no 00876412), registered office: Farnell House, Forge Lane, Leeds LS12 2NE.

ICP 备案号 10220084.

Follow element14

  • X
  • Facebook
  • linkedin
  • YouTube