element14 Community
element14 Community
    Register Log In
  • Site
  • Search
  • Log In Register
  • Community Hub
    Community Hub
    • What's New on element14
    • Feedback and Support
    • Benefits of Membership
    • Personal Blogs
    • Members Area
    • Achievement Levels
  • Learn
    Learn
    • Ask an Expert
    • eBooks
    • element14 presents
    • Learning Center
    • Tech Spotlight
    • STEM Academy
    • Webinars, Training and Events
    • Learning Groups
  • Technologies
    Technologies
    • 3D Printing
    • FPGA
    • Industrial Automation
    • Internet of Things
    • Power & Energy
    • Sensors
    • Technology Groups
  • Challenges & Projects
    Challenges & Projects
    • Design Challenges
    • element14 presents Projects
    • Project14
    • Arduino Projects
    • Raspberry Pi Projects
    • Project Groups
  • Products
    Products
    • Arduino
    • Avnet & Tria Boards Community
    • Dev Tools
    • Manufacturers
    • Multicomp Pro
    • Product Groups
    • Raspberry Pi
    • RoadTests & Reviews
  • About Us
  • Store
    Store
    • Visit Your Store
    • Choose another store...
      • Europe
      •  Austria (German)
      •  Belgium (Dutch, French)
      •  Bulgaria (Bulgarian)
      •  Czech Republic (Czech)
      •  Denmark (Danish)
      •  Estonia (Estonian)
      •  Finland (Finnish)
      •  France (French)
      •  Germany (German)
      •  Hungary (Hungarian)
      •  Ireland
      •  Israel
      •  Italy (Italian)
      •  Latvia (Latvian)
      •  
      •  Lithuania (Lithuanian)
      •  Netherlands (Dutch)
      •  Norway (Norwegian)
      •  Poland (Polish)
      •  Portugal (Portuguese)
      •  Romania (Romanian)
      •  Russia (Russian)
      •  Slovakia (Slovak)
      •  Slovenia (Slovenian)
      •  Spain (Spanish)
      •  Sweden (Swedish)
      •  Switzerland(German, French)
      •  Turkey (Turkish)
      •  United Kingdom
      • Asia Pacific
      •  Australia
      •  China
      •  Hong Kong
      •  India
      •  Korea (Korean)
      •  Malaysia
      •  New Zealand
      •  Philippines
      •  Singapore
      •  Taiwan
      •  Thailand (Thai)
      • Americas
      •  Brazil (Portuguese)
      •  Canada
      •  Mexico (Spanish)
      •  United States
      Can't find the country/region you're looking for? Visit our export site or find a local distributor.
  • Translate
  • Profile
  • Settings
Rocking Raspberry Pi
  • Challenges & Projects
  • Design Challenges
  • Rocking Raspberry Pi
  • More
  • Cancel
Rocking Raspberry Pi
Blog Raspberry Pi Rocking India Challenge: Karaoke Machine project overview
  • Blog
  • Forum
  • Documents
  • Files
  • Mentions
  • Sub-Groups
  • Tags
  • More
  • Cancel
  • New
  • Share
  • More
  • Cancel
Group Actions
  • Group RSS
  • More
  • Cancel
Engagement
  • Author Author: Former Member
  • Date Created: 10 Mar 2014 9:41 AM Date Created
  • Views 534 views
  • Likes 0 likes
  • Comments 0 comments
  • raspberry
  • rockingraspberrypi
  • raspberry-pi
  • ajinabraham
  • rocking_pi
Related
Recommended

Raspberry Pi Rocking India Challenge: Karaoke Machine project overview

Former Member
Former Member
10 Mar 2014

I got the package from element14 delivered to me today, unpacked the box and found the following things.


Raspberry Pi Model B

Pi-Face Control and Display

Wi-Pi USB Dongle


So a little bit about the components.


Raspberry Pi

“The Raspberry Pi is a credit-card-sized single-board computer developed in the UK by the Raspberry Pi Foundation”- wikipedia


Pi-Face Control and Display

Pi-Face allows you to display status information, messages and menus, and also control the Pi with an IR remote control or onboard buttons.

Wi-Pi USB

“Wi-Pi is a high performance, cost effective WLAN USB module which connects the Raspberry Pi low cost computer, to a Wi-Fi local area network.” – element14

Now let’s move on to the project.

NAME OF PROJECT: A KAROKE MACHINE WITH RASPBERRY PI


PROPOSED FEATURES

  1. Design a module for Karaoke
  2. Design a Web App that can interact with it, which will be higher abstraction that can be the user interface.
  3. Pi-Face can be used for manual interaction with the device.
  4. Software level changes for sound enrichment and control.
  5. Efficient sound output with minimum energy usage.
  6. Additional enhancements like LED, status display and visualization on Video Devices


First thing first.

Preparing SD Card with Raspberry.


* Formatted the SD Card.
* Downloaded the latest release of Rasbpian : http://downloads.raspberrypi.org/raspbian_latest
* Download the Win32DiskImager:
http://sourceforge.net/projects/win32diskimager/
* Burn the ISO to SD Card with Win32DiskImager.

Configure the eth0 and wlan0 interface and connect to Pi.


* Opened the SD Card in Ubuntu
* Replaced the contents of the file interfaces located at  “/etc/network/interfaces” with the following lines so that I can set an IP for the eth0 interface and configure wlan0.

auto lo


iface lo inet loopback


iface eth0 inet static

address 192.168.137.137

netmask 255.255.255.0

network 192.168.137.0

broadcast 192.168.137.255

gateway 192.168.137.1


allow-hotplug wlan0

iface wlan0 inet manual

wpa-roam /etc/wpa_supplicant/wpa_supplicant.conf

iface default inet dhcp


* Save it and put the card back to Pi and boot it. 

* Now configure an IP address in the range 192.168.137.XXX to your Host OS.
* Download and Run Putty.

* Take the sessions tab and give PI’s IP, ie 192.168.137.137

image

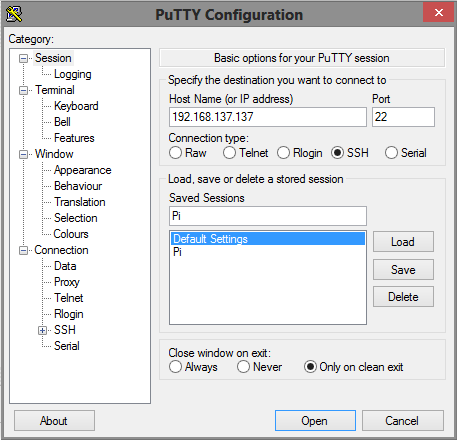
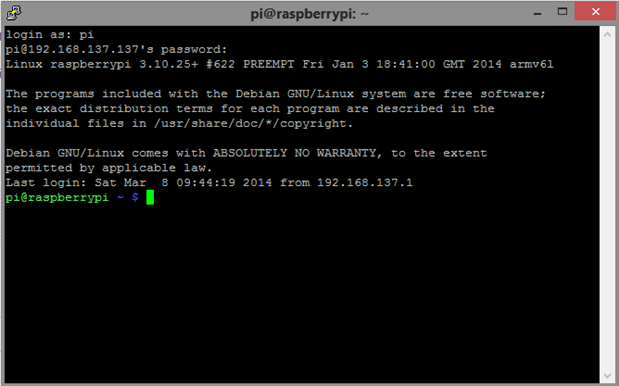
* Press open, provide the credentials as
   username: pi
   password: raspberry

* Now you are connected to the device via ssh.

image


Connecting to GUI of Raspbian

* For Later use if we want the GUI, then we can install xrdp. For that issue the command

sudo apt-get install -y xrdp


*
xrdp will allows you to connect to Remote Desktop. And will be auto started at every boot up.
* You can use any Remote Desktop utility to connect to the GUI of Raspbian.
* Connect to the GUI of Raspbian by providing the IP Address and Credentials.

Fullscreen contentimage_30453.html Download
<html><head><title>Jive SBS</title></head>
<body><font face="arial,helvetica,sans-serif">
<b>Error</b><br><font size="-1">
An general error occurred while processing your request.
</font></font></body></html>

Configure Pi-Face Control and Display

* Connect to Pi, and issue the following commands

   sudo apt-get update
   sudo apt-get upgrade


This will update and upgrade your Raspbian OS.
* To Enable the SPI Port, issue the command.

sudo nano /etc/modprobe.d/raspi-blacklist.conf

* And comment out the line by adding a slash before the line
   “blacklist spi-bcm2708”.
* Now the SPI Port is enabled so that Pi-Face Control and Display can communicate with your Pi.

* To install Pi-Face Control and Display Software issue the command

sudo apt-get install python-pifacecad


* To start the Pi-Face display, issue the command

python /usr/share/doc/python-pifacecad/examples/sysinfo.py

* To Enable Pi-Face Display on every boot up, add the following entry to your rc.local file.

sudo nano /etc/rc.local

   Add an entry.

python /usr/share/doc/python-pifacecad/examples/sysinfo.py &


piface.jpg
That's all for now.

Thank You

  • Sign in to reply
element14 Community

element14 is the first online community specifically for engineers. Connect with your peers and get expert answers to your questions.

  • Members
  • Learn
  • Technologies
  • Challenges & Projects
  • Products
  • Store
  • About Us
  • Feedback & Support
  • FAQs
  • Terms of Use
  • Privacy Policy
  • Legal and Copyright Notices
  • Sitemap
  • Cookies

An Avnet Company © 2025 Premier Farnell Limited. All Rights Reserved.

Premier Farnell Ltd, registered in England and Wales (no 00876412), registered office: Farnell House, Forge Lane, Leeds LS12 2NE.

ICP 备案号 10220084.

Follow element14

  • X
  • Facebook
  • linkedin
  • YouTube