element14 Community
element14 Community
    Register Log In
  • Site
  • Search
  • Log In Register
  • Community Hub
    Community Hub
    • What's New on element14
    • Feedback and Support
    • Benefits of Membership
    • Personal Blogs
    • Members Area
    • Achievement Levels
  • Learn
    Learn
    • Ask an Expert
    • eBooks
    • element14 presents
    • Learning Center
    • Tech Spotlight
    • STEM Academy
    • Webinars, Training and Events
    • Learning Groups
  • Technologies
    Technologies
    • 3D Printing
    • FPGA
    • Industrial Automation
    • Internet of Things
    • Power & Energy
    • Sensors
    • Technology Groups
  • Challenges & Projects
    Challenges & Projects
    • Design Challenges
    • element14 presents Projects
    • Project14
    • Arduino Projects
    • Raspberry Pi Projects
    • Project Groups
  • Products
    Products
    • Arduino
    • Avnet & Tria Boards Community
    • Dev Tools
    • Manufacturers
    • Multicomp Pro
    • Product Groups
    • Raspberry Pi
    • RoadTests & Reviews
  • About Us
    About the element14 Community
  • Store
    Store
    • Visit Your Store
    • Choose another store...
      • Europe
      •  Austria (German)
      •  Belgium (Dutch, French)
      •  Bulgaria (Bulgarian)
      •  Czech Republic (Czech)
      •  Denmark (Danish)
      •  Estonia (Estonian)
      •  Finland (Finnish)
      •  France (French)
      •  Germany (German)
      •  Hungary (Hungarian)
      •  Ireland
      •  Israel
      •  Italy (Italian)
      •  Latvia (Latvian)
      •  
      •  Lithuania (Lithuanian)
      •  Netherlands (Dutch)
      •  Norway (Norwegian)
      •  Poland (Polish)
      •  Portugal (Portuguese)
      •  Romania (Romanian)
      •  Russia (Russian)
      •  Slovakia (Slovak)
      •  Slovenia (Slovenian)
      •  Spain (Spanish)
      •  Sweden (Swedish)
      •  Switzerland(German, French)
      •  Turkey (Turkish)
      •  United Kingdom
      • Asia Pacific
      •  Australia
      •  China
      •  Hong Kong
      •  India
      •  Japan
      •  Korea (Korean)
      •  Malaysia
      •  New Zealand
      •  Philippines
      •  Singapore
      •  Taiwan
      •  Thailand (Thai)
      •  Vietnam
      • Americas
      •  Brazil (Portuguese)
      •  Canada
      •  Mexico (Spanish)
      •  United States
      Can't find the country/region you're looking for? Visit our export site or find a local distributor.
  • Translate
  • Profile
  • Settings
Rocking Raspberry Pi
  • Challenges & Projects
  • Design Challenges
  • Rocking Raspberry Pi
  • More
  • Cancel
Rocking Raspberry Pi
Blog Rocking The Rocking Raspberry Pi Challenge.. Part 5 - SSH The Right Way...
  • Blog
  • Forum
  • Documents
  • Files
  • Mentions
  • Sub-Groups
  • Tags
  • More
  • Cancel
  • New
  • Share
  • More
  • Cancel
Group Actions
  • Group RSS
  • More
  • Cancel
Engagement
  • Author Author: saurocksall
  • Date Created: 28 Feb 2014 9:24 PM Date Created
  • Views 1523 views
  • Likes 0 likes
  • Comments 9 comments
  • rpibeginner
  • raspberrypi-ssh
  • rocking-the-rocking-raspberrypi-challenge
  • ssh
  • rockingraspberrypi
  • raspberry-pi
  • raspberrypi
  • raspberry-pi-ssh
  • rocking_pi
Related
Recommended

Rocking The Rocking Raspberry Pi Challenge.. Part 5 - SSH The Right Way...

saurocksall
saurocksall
28 Feb 2014

Hi to everyone, In this post I will be talking about SSH, and how to do it The Right Way...


Some other contestants also wrote about the same but I found some problems in all of them, so I am going to tell you my secret  way of doing it...


You might ask whats special in your way...


1 ). You don't need to set RPi's IP address.

2 ). You don't even need to Know the IP address !!

3 ). This method even works on the Raspbian installed via NOOBS and Stand alone Raspbian also.

4 ). It works Through WiFi and also Ethernet.

5 ). You can still use Internet on your RPi.

6 ). RPi  can be in another room.


OK Lets start...


You need to get these 2 software on you PC...


1 ). PuTTY ( PuTTY is an SSH and telnet client, for the Windows platform. ) You can download it from HERE.


2 ). Xming ( Xming is an implementation of the X Window System for Microsoft Windows operating systems. )It will enable us to use the GUI

or Graphical User Interface of Raspbian.. You can download it from HERE.


Or you can do a Google search for both of them..


There are some more settings in Raspbian that we need to change...


1 ). Make sure that your OS is up to date, if not first update the OS..


2 ). Open LXTerminal, and type " sudo raspi-config " and press enter to run command..


3 ). This will open Raspberry pi software configuration tool..


image

4 ). Expand File system, In NOOBS you don't need to do this its done as default..


5 ). Now go in "Advance Options", and Enable SSH..

imageimage


6 ). Now Reboot. You can do this by typing " sudo reboot " in LXTerminal, and running the command..


7 ). After System reboots, Type " sudo apt-get install avahi-daemon " in LXTerminal, and run the command.. This will install a plugin that will allow you to connect to a Raspberry Pi in your Local Network without the need of knowing its IP address...


8 ). After installing it will ask you " Do You Want To Continue [Y/N]  " press " Y " and then run the command...


9 ). Now Reboot again..


OK we have done all the settings that we need to do at the Raspberry Pi, Now it can Run only with Power and WiFi dongle / Ethernet cable, however you can still other things to it for example, monitor, keyboard etc. Its is optional..


Now we just need to access it with our PC, Here is what to do...


1 ). Open / Start Xming. ( NOTE: you won't see any window opening, as we have not started ssh yet, Xming will only so up in your notifications area, in the bottom right hand corner. )


2 ). Open / Start PuTTY, Window will appear..

image

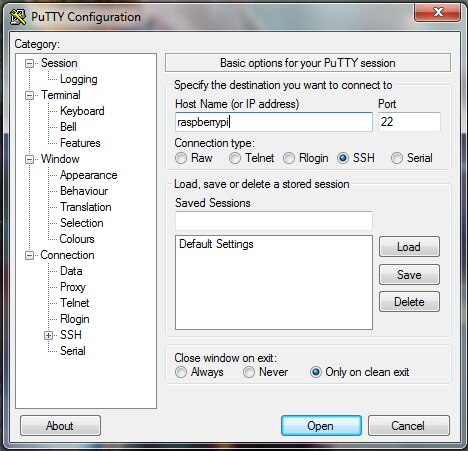
3 ). Type " raspberrypi " in Host Name (or IP address)..


4 ). Go to " X11 " option and Enable X11 forwarding, this will enable Xming to display RPi desktop, and Let us use GUI...

image

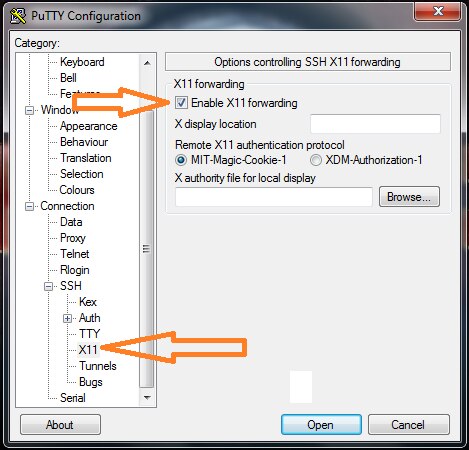
5 ). Then Go Back To " Sessions " And click " Open "...

image

6 ). If are doing SSH for the first time, You should get a certificate trust warning message which you should " accept " it.


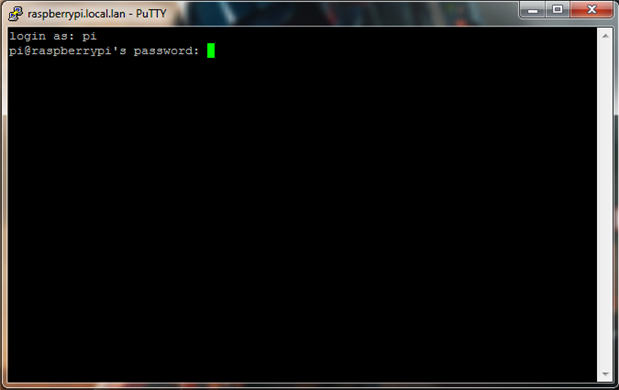
7 ). Now you are connected to your Raspberry Pi through SSH, a window will open named " raspberrypi.local.lan - PuTTY ", it will ask for Login type " pi " then it will ask your password, enter whatever your password is, after that Press Enter..

image

8 ). Once you see "pi@raspberrypi ~ $" type " startlxde " and press enter to run the command..


image

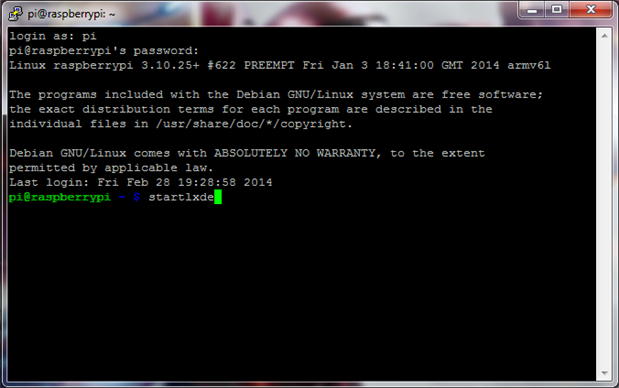
9 ). after about 5-6 seconds you will see your Raspberry Pi's Desktop, you can end the session by going to the PuTTY window " raspberrypi.local.lan - PuTTY " and pressing " Ctrl+c ", and you can start it again by typing " startlxde " and running the command...

image


10 ). You can also close the session by exiting PuTTY..


So Here it is I told you every thing, now do whatever you want to do via SSH... Rest is up to you now...

If you have any questions please ask in the comments below and I will make sure to answer them....

  • Sign in to reply

Top Comments

  • Former Member
    Former Member over 12 years ago +1
    This is the best method for ssh so for, i have worked on raspberry pi for a year but still i was unaware of this method.
  • Former Member
    Former Member over 12 years ago +1
    Best method i found till now, thanks for sharing. best of luck
  • rohitrangwani
    rohitrangwani over 12 years ago +1
    I dont think there is any need to install avahi-daemon. It worked out fine for me without it on raspbian. So guys you can skip sudo apt-get install avahi-daemon step .
  • rohitrangwani
    rohitrangwani over 12 years ago in reply to saurocksall

    Good question

    Yep  you got it right no need to enable ssh for my method as we assign the static ip to raspberry pi by appending cmdline file,which allows us to do so.

    This way we can ssh without even enabling ssh from rpi-config.(Some sort hacking).

    • Cancel
    • Vote Up +1 Vote Down
    • Sign in to reply
    • More
    • Cancel
  • saurocksall
    saurocksall over 12 years ago in reply to rohitrangwani

    If the method doesn't require a monitor from the beginning till the end it is a good one then...

    though I have a question, It is required to Enable SSH from the configurations menu after RPi boots up, and it requires a monitor for that because you can't perform SSH without enabling it from the configurations ??? How did you do that without a Monitor ???

    • Cancel
    • Vote Up 0 Vote Down
    • Sign in to reply
    • More
    • Cancel
  • rohitrangwani
    rohitrangwani over 12 years ago in reply to saurocksall

    Well its not how things are sorted out in end but all that matters for noobs like us is what we learn in the process.

    I shared my method because it seemed to work for me as I had no access to any display unit and noobs needs atleast once monitor for initial setting up and os installation.The process I shared was best as at that time I was not able to use my network for update and installation of other plugins and the reason was Proxy settings of my lan network.

    There are many methods for doing a thing but the best method is what suits your conditions,

    And the intent of my previous comment was that I think only enabling SSH will allow you to connect no need to install plugin too,Still one more step reduced!


    And no need to clear things out, Feedback is always a necessity, I personally encourage good quality discussion.

    • Cancel
    • Vote Up +1 Vote Down
    • Sign in to reply
    • More
    • Cancel
  • saurocksall
    saurocksall over 12 years ago in reply to Former Member

    Thanks Rohit,

    I am happy that you find my post useful..

    Keep following...

    • Cancel
    • Vote Up 0 Vote Down
    • Sign in to reply
    • More
    • Cancel
  • saurocksall
    saurocksall over 12 years ago

    Hi Rohit,


    I have read your method for SSH and its allot more complicated than mine, I don't mean that it does not works, I just want to say that it requires to do many things, like Finding the IP address (which is not that difficult), flashing the memory card with Raspbian (Because your method does not work with raspbian installed with NOOBS), Editing cmdline.txt file, and you said that it does not works with WiFi.... I found all this too much work for performing a simple thing and its complicated for beginners like me...


    My method works with NOOBS which is the latest and recommended software for RPi and it just requires to install a simple plugin which does every thing for me, making my life easy as Pi image...


    Hope you don't feel bad, i just wanted to clear things out ...

    Best of luck... 

    • Cancel
    • Vote Up 0 Vote Down
    • Sign in to reply
    • More
    • Cancel
>
element14 Community

element14 is the first online community specifically for engineers. Connect with your peers and get expert answers to your questions.

  • Members
  • Learn
  • Technologies
  • Challenges & Projects
  • Products
  • Store
  • About Us
  • Feedback & Support
  • FAQs
  • Terms of Use
  • Privacy Policy
  • Legal and Copyright Notices
  • Sitemap
  • Cookies

An Avnet Company © 2026 Premier Farnell Limited. All Rights Reserved.

Premier Farnell Ltd, registered in England and Wales (no 00876412), registered office: Farnell House, Forge Lane, Leeds LS12 2NE.

ICP 备案号 10220084.

Follow element14

  • X
  • Facebook
  • linkedin
  • YouTube