element14 Community
element14 Community
    Register Log In
  • Site
  • Search
  • Log In Register
  • About Us
  • Community Hub
    Community Hub
    • What's New on element14
    • Feedback and Support
    • Benefits of Membership
    • Personal Blogs
    • Members Area
    • Achievement Levels
  • Learn
    Learn
    • Ask an Expert
    • eBooks
    • element14 presents
    • Learning Center
    • Tech Spotlight
    • STEM Academy
    • Webinars, Training and Events
    • Learning Groups
  • Technologies
    Technologies
    • 3D Printing
    • FPGA
    • Industrial Automation
    • Internet of Things
    • Power & Energy
    • Sensors
    • Technology Groups
  • Challenges & Projects
    Challenges & Projects
    • Design Challenges
    • element14 presents Projects
    • Project14
    • Arduino Projects
    • Raspberry Pi Projects
    • Project Groups
  • Products
    Products
    • Arduino
    • Avnet Boards Community
    • Dev Tools
    • Manufacturers
    • Multicomp Pro
    • Product Groups
    • Raspberry Pi
    • RoadTests & Reviews
  • Store
    Store
    • Visit Your Store
    • Choose another store...
      • Europe
      •  Austria (German)
      •  Belgium (Dutch, French)
      •  Bulgaria (Bulgarian)
      •  Czech Republic (Czech)
      •  Denmark (Danish)
      •  Estonia (Estonian)
      •  Finland (Finnish)
      •  France (French)
      •  Germany (German)
      •  Hungary (Hungarian)
      •  Ireland
      •  Israel
      •  Italy (Italian)
      •  Latvia (Latvian)
      •  
      •  Lithuania (Lithuanian)
      •  Netherlands (Dutch)
      •  Norway (Norwegian)
      •  Poland (Polish)
      •  Portugal (Portuguese)
      •  Romania (Romanian)
      •  Russia (Russian)
      •  Slovakia (Slovak)
      •  Slovenia (Slovenian)
      •  Spain (Spanish)
      •  Sweden (Swedish)
      •  Switzerland(German, French)
      •  Turkey (Turkish)
      •  United Kingdom
      • Asia Pacific
      •  Australia
      •  China
      •  Hong Kong
      •  India
      •  Korea (Korean)
      •  Malaysia
      •  New Zealand
      •  Philippines
      •  Singapore
      •  Taiwan
      •  Thailand (Thai)
      • Americas
      •  Brazil (Portuguese)
      •  Canada
      •  Mexico (Spanish)
      •  United States
      Can't find the country/region you're looking for? Visit our export site or find a local distributor.
  • Translate
  • Profile
  • Settings
Rocking Raspberry Pi
  • Challenges & Projects
  • Design Challenges
  • Rocking Raspberry Pi
  • More
  • Cancel
Rocking Raspberry Pi
Blog Tips Before connecting Wolfson audio card with Raspberry pi
  • Blog
  • Forum
  • Documents
  • Files
  • Mentions
  • Sub-Groups
  • Tags
  • More
  • Cancel
  • New
  • Share
  • More
  • Cancel
Group Actions
  • Group RSS
  • More
  • Cancel
Engagement
  • Author Author: indiant3chi3
  • Date Created: 31 Mar 2014 8:27 PM Date Created
  • Views 667 views
  • Likes 0 likes
  • Comments 0 comments
  • wolfson
  • rockingraspberrypi
  • audiocard
  • rocking_pi
Related
Recommended

Tips Before connecting Wolfson audio card with Raspberry pi

indiant3chi3
indiant3chi3
31 Mar 2014

Hello World ..!!

     Here are some tips before connecting wolfson pi audio card with raspberry pi.

How  to  connect  the Wolfson  Audio  Card to  Raspberry  Pi

This  Wolfson  soundcard  has  been  designed  to  plug  in  to  Raspberry  Pi  simply  and  easily.  It  is  compatible  with  Raspberry  Pi  Models  A  and  B  Hardware  Revision  2.0  boards,  which  feature  the  8 pin  audio  GPIO  connector,  known  as  P5,  and  located  right  next  to  the  GPIO  header  as show  below.


image

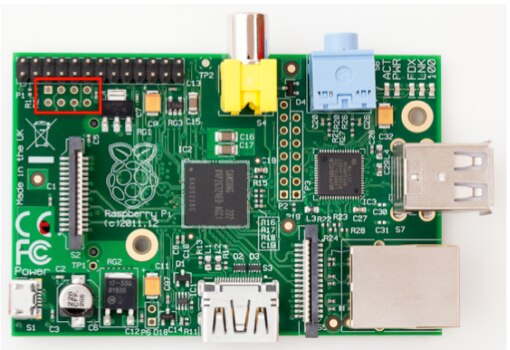
  Raspberry  Pi  with  P5  connector  outlined  in  red


It  uses  innovative  sprung  connectors  to  connect  with  Raspberry  Pi.  This  avoids  the  need  to solder  an  8 pin  header  to  your  Raspberry  Pi, thus making  installation  quick  and  easy.

a.     Ensure  the  eight  pads  on  connector  P5  on  Raspberry  Pi  are  free  of  dirt  and  grease.  If necessary,  use  a  little degreaser,  such  as  a  very  small  amount  of  detergent  on  a  lightly dampened  paper  towel,  and  wipe  the  eight  pads  clean.  Leave  them  to  dry  thoroughly.


b.     If  necessary,  repeat  the  process  with  the  sprung  connectors  on  the  soundcard.


c.     Locate  the  nylon  pillar  in  the  box  contents,  screw  it  into  the  mounting  hole  shown  in  the image  below,  and  tighten.  Don’t  over  tighten.


d.     Push  the  soundcard  onto  Raspberry  Pi,  making  sure  the  board  is  pressed  all  the  way,  and that  all  eight  pins  have  made  contact  with  Rasp pi .

  • Sign in to reply
element14 Community

element14 is the first online community specifically for engineers. Connect with your peers and get expert answers to your questions.

  • Members
  • Learn
  • Technologies
  • Challenges & Projects
  • Products
  • Store
  • About Us
  • Feedback & Support
  • FAQs
  • Terms of Use
  • Privacy Policy
  • Legal and Copyright Notices
  • Sitemap
  • Cookies

An Avnet Company © 2025 Premier Farnell Limited. All Rights Reserved.

Premier Farnell Ltd, registered in England and Wales (no 00876412), registered office: Farnell House, Forge Lane, Leeds LS12 2NE.

ICP 备案号 10220084.

Follow element14

  • X
  • Facebook
  • linkedin
  • YouTube