In my previous blog post, I was able to successfully detect ducks, as well as successfully not detecting ducks where there were none. I think I mentioned that I would need some artistic intervention to get some bees and hornets made up. My skillset doesn't allow for that level of awesome. However, given that the artist has been busy doing other important artist things that artists do, I have decided to move forward with some of the other technical things on the bee detection to-do list, while our ducks continue to be stunt-doubles for the time being. Oh but stay tuned - later in this blog post we will be introducing a new villain to really add to the excitement!
Reporting Results
A very important part of this project involves actually getting some useful information back from "the field". I mean, it's great and all that the Nicla Vision board can detect my rubber ducky stunt doubles, but if it were to just keep all this information to itself we'd just be staring at a little board while getting bored.
Given that I was unable to find a near enough LoraWan receiver, I decided to use the WiFi that is built into the Nicla Vision board. This simplifies the project in that we don't need the Arduino MKR WAN 1310 board
For other projects I already have a Raspberry Pi set up as a mini server, with Mosquitto and Node-Red installed. It also has an InfluxDB database, but I don't think we need that level of data retention for this project, as all we are really after is just a count of bees and hornets - mostly just to warn of the presence of hornets. Node-Red has variables we can use for to keep track of the numbers. The numbers will get reset if the server gets rebooted, but that rarely happens. If in the future we decide we want daily or monthly counts, we can expand the Node-Red flow at that point to save things to the database.
Node-Red for Logic and UI
Node-Red is super handy to have. I had avoided it in the past because it seems like a lot of "stuff" for a little computer, but the Raspberry Pi handles it like a champ. It handles several things really well, all of which saves a lot of effort and makes it quick and easy to create new software "flows" to handle a variety of different projects.
Here is the flow I built for this Honey Bee Safe project:
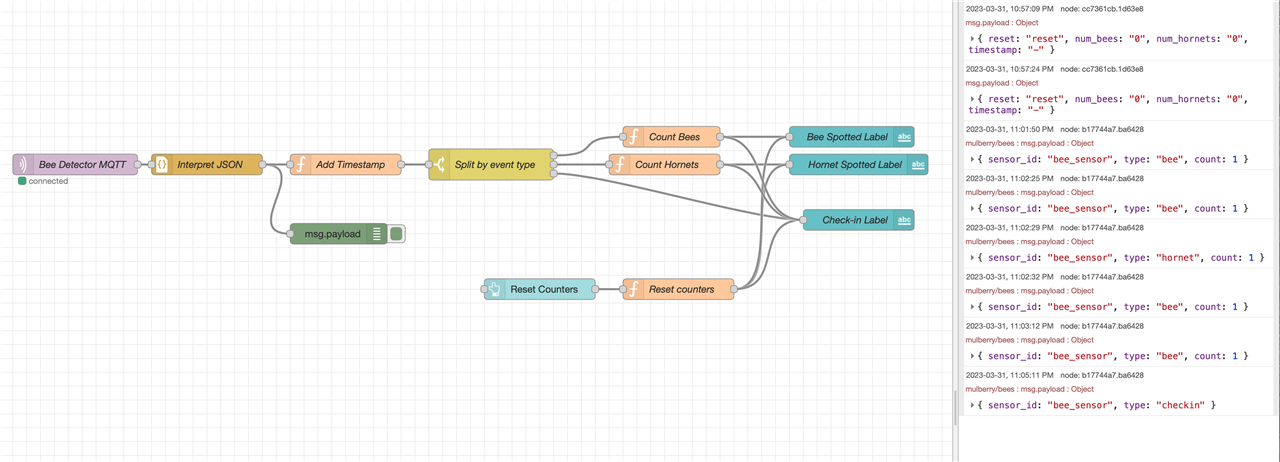
Starting with the first node, on the far left, it listens for MQTT messages from our Nicla Vision board. The node just needed me to point at our MQTT server, which is Mosquitto MQTT server on the same machine, and then tell it what topic to listent to. This is very handy, as it then ignores the other projects I have running on the same server simultaneously.
MQTT can send data in various formats, but by using JSON we can easily transfer information that's easy to interpret and expand on. So the second node takes the MQTT message and interprets the JSON into an object that Node-Red is more familiar with.
Next we have two branches: the top one is to add a timestamp, and we print out debug info with the bottom node, to see that the information we are receiving contains the information we are expecting. Debug nodes can easily be disabled and re-enabled as needed.
Then we check what event is being reported, and use it to count bees and hornets. I also added a check-in event that allows me to easily see if the Nicla Vision board is still running and reporting properly. This way even if no bees or hornets come by, we don't have to wonder if it might be a crash.
Within the count nodes we simply increment the counters as needed. The final label nodes are what shows the counts in the UI.
And I added a UI button to reset the counters - this was especially necessary during testing, but I can see it being useful in real life too - for example, to reset the numbers daily or weekly, or ad-hoc as we have time to check on the bees.
As you can see, Node-Red handles everything from getting the information from MQTT, handling the interpretation and logic, and then displaying the results on a web-based UI.
Node-Red added my new flow into the drop-down menu of my existing setup:
At this point I can use a browser on my phone to see the UI. However, all the counts are zero because the Nicla Vision board has not been updated to send anything yet.
To make testing of the Node-Red portion easier, I just used a terminal window to log into my Raspberry Pi server to manually send some MQTT test data:

You can see that the topic is mulberry/bees, and I opted to add a sensor_id in case we want to eventually have multiple bee detectors. The "type" is to let Node-Red know whether we saw a bee or a hornet, or if we're just checking in.
And now we see data coming in on the UI:
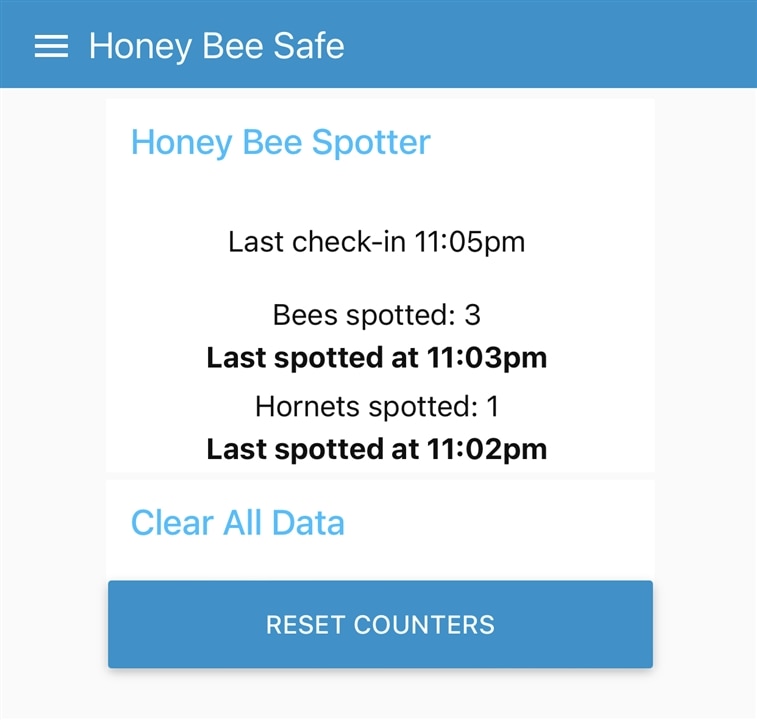
As with most projects, I started the UI and the MQTT messages with basic information, and then added and refined to it over several iterations until I got it to where it looks useable. The above MQTT testing, for example, does not yet include the number of bees or hornets that were spotted in the picture, where the final code for the Nicla Vision does send it now:
mosquitto_pub -t 'mulberry/bees' -m '{"sensor_id":"bee_sensor","type":"bee","count":1}'
It's probably not super important to have the count, as in real life I don't even know how to avoid double-counting the bees. I'm guessing bee experts have some clever ways of dealing with that - for this project we just check once every 10 seconds and hope for the best
Nicla Vision - Reporting Detections
Now that the Node-Red flow was complete, it was time to figure out how to get the Nicla Vision board to send MQTT messages whenever a detection event happens. Luckily, the examples that come with OpenMV include most of what we need to send MQTT messages. For this project we only care about sending messages, not receiving them, so I only needed the example that publishes a message. That turns out to be nearly trivial: just include the libraries and connect to your WiFi network and MQTT broker (Mosquitto on my Raspberry Pi). Other than using your own SSID and Key (WiFi password), it's a straight copy to connect to WiFi. Then, similarly, for the MQTT connection I just needed to change the server name. Thankfully, the OpenMV libraries recognize the .local extension, so it will always find my Raspberry Pi server by name, even if my WiFi network resets and changes the IP address.
Then whenever we wish to send a message, it's just one line, a little like this:
client.publish("mulberry/bees", "{\"sensor_id\":\"bee_sensor\",\"type\":\"checkin\"}")
After testing that out separately, I updated my duck detection python script to include the new networking code - it all plays nice together, so it was very easy to integrate.
I then updated the bit that detects the ducks to send a message to the server whenever a duck is found. I then extended it a little bit to also send the number of ducks found in the picture.
This all worked very nicely - a bit too fast at first, as pointing the camera at a duck quickly detected the duck something like 10 times per second (this is when I decided to add a reset button to the Node-Red flow!). So I adjusted the code to pause 10 seconds between detecting objects in the picture. I added some smarts so that the camera would keep taking pictures in the meantime, to make debugging easy - the OpenMV display would pause otherwise.
But, what about the hornets?
Good question! We need a stunt double for our villain, the murder hornet!
I happened to have a little garden gnome in my office (doesn't everyone?), which I decided would make a good stand-in. The features of the gnome should be different enough from the duckies to make detection and differentiation easy for our basic MV model, which has its limitations partly due to the fact that I only have a few pictures of ducks and gnomes.
Updating the Edge Impulse Model
For the last few models I took all the pictures with OpenMV and then exported it all over to Edge Impulse. However, I think that made a bit of a mess the last time I did that, duplicating images. And now I have all those little boxes drawn around ducks that I don't want to lose.
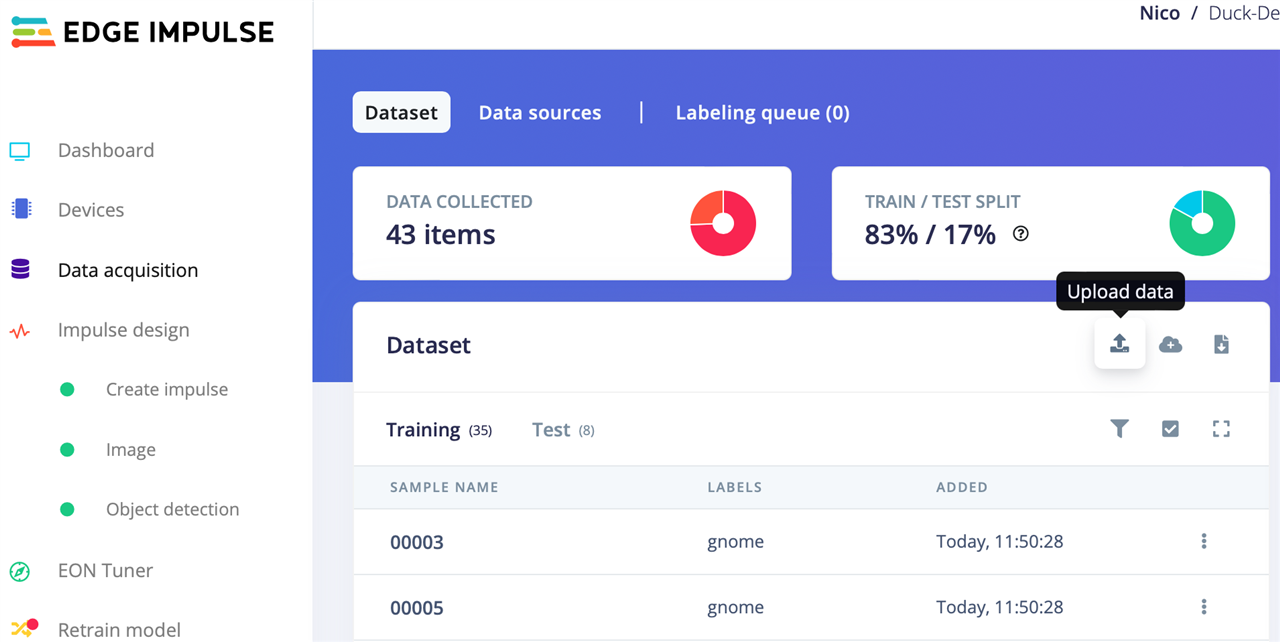
Thankfully there's a way around that. I did take the new pictures of the gnome with OpenMV as before, but didn't use OpenMV to move the images over to Edge Impulse.
To import the pictures, Edge Impulse has an "upload data" button that allows you to just select the list of new pictures and import them. It's under "Data acquisition", when looking at the Dataset. See picture:
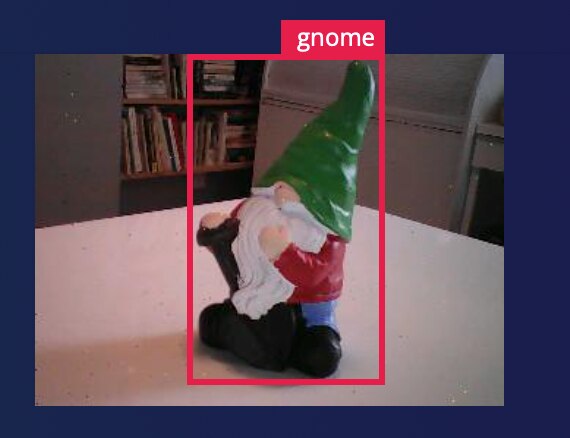
Then I had to draw boxes around the gnomes in the new pictures:
At this point I went to the object detection screen to start training the model with the new pictures, but for some reason the result didn't include any mention of gnomes! hmm.
Turns out I missed a step - under "Impulse Design", "Image", you have to "generate features" to get things set up again to include the new pictures.
Then back to "object detection" and the training results showed the existance of gnomes!
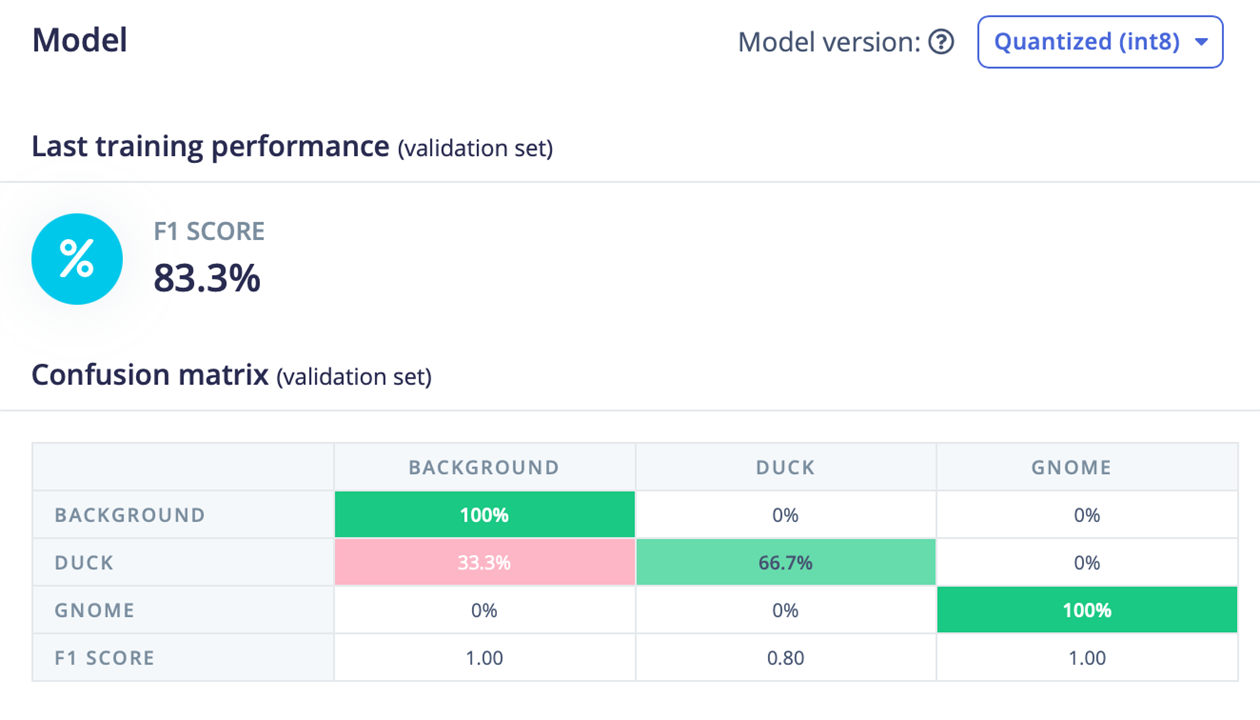
It looks like I lost some accuracy on the duck detection, but oh well. It's good enough to test the new setup from end-to-end now.
After installing the updated Firmware that Edge Impulse created, I did more testing, this time starring Mr. Gnome as "the bad guy".
And the results are coming in!
It doesn't look much different than before, just that the numbers are now coming in from the Nicla Vision board. Pretty cool!
I think we're almost ready for the finale!
Now we just need some artistic interpretations of bees and murder hornets, and then take a zillion pictures to rebuild a model for the final demo

