


Welcome to the #blog3 of IoT Bee Hive monitor. In the previous blog, we set up the Arduino Pro Nicla Vision and OpenMV IDE. We will be creating a Classification model to detect the presence of bees using the Arduino Pro Nicla Vision & edge impulse. The next step is creating the image dataset to build our machine vision(Object detection) model. We will be capturing the video frames from the camera stream and saving them into a dataset.
Creating a Data Set
Create a new dataset by using the menu command Tools > Dataset Editor > New Dataset and name it Dataset-Bee.
# Dataset Capture Script - By: Rahul - Sun Mar 26 2023

# Use this script to control how your OpenMV Cam captures images for your dataset.
# You should apply the same image pre-processing steps you expect to run on images
# that you will feed to your model during run-time.

import sensor, image, time

sensor.reset()
sensor.set_pixformat(sensor.RGB565) # Modify as you like.
sensor.set_framesize(sensor.QVGA) # Modify as you like.
sensor.skip_frames(time = 2000)
sensor.set_vflip(True) # Flips the image vertically
sensor.set_hmirror(True) # Mirrors the image horizontally
clock = time.clock()

while(True):
    clock.tick()
    img = sensor.snapshot()
    # Apply lens correction if you need it.
    # img.lens_corr()
    # Apply rotation correction if you need it.
    # img.rotation_corr()
    # Apply other filters...
    # E.g. mean/median/mode/midpoint/etc.
    print(clock.fps())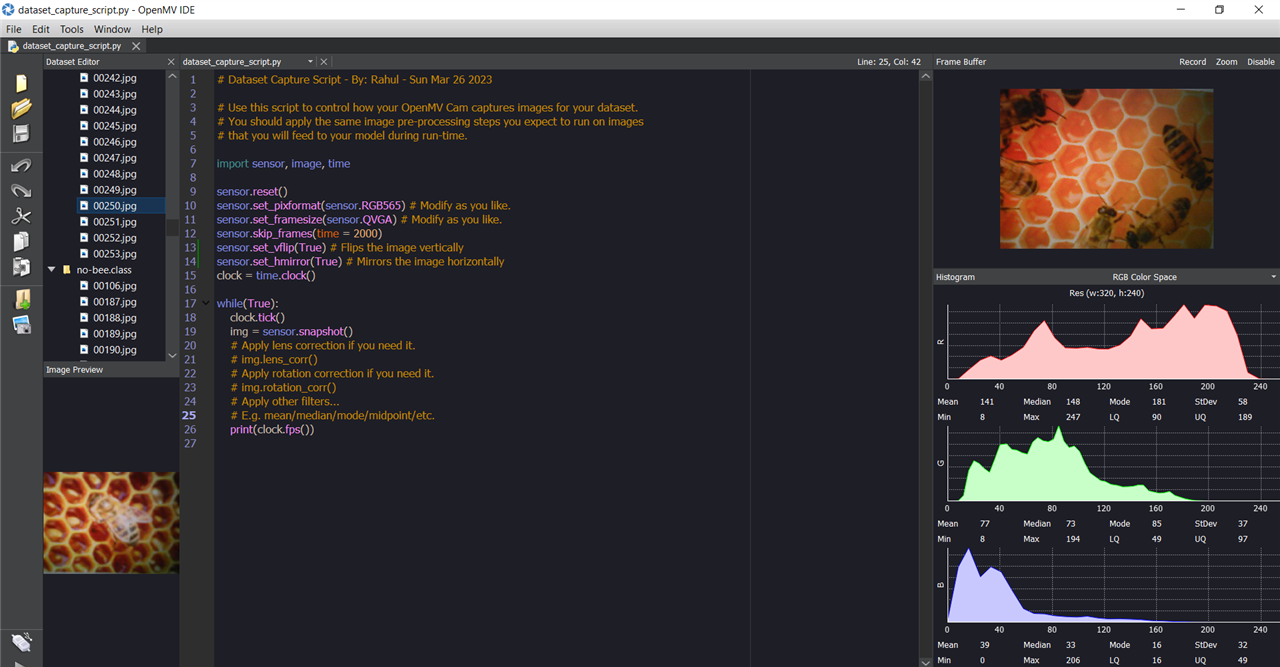
Upload the Image Dataset to Edge Impulse
Log in to the Edge Impulse® Studio and create a new project named BeeClassify. Select Tools > Dataset Editor > Export > Log in to Edge Impulse® Account and Upload to Project on the OpenMV IDE. I've created an Edge Impulse Projects "BeeClassify".

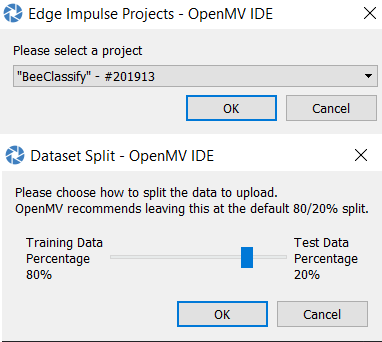
When using the OpenMV IDE with Edge Impulse, you'll be prompted to enter your Edge Impulse login details. Once you've done that, select the project you want to work on and click OK. The data set split setting will keep 20% of the images aside for testing the model after it's been trained.
Data Acquisition
To view the images that have been uploaded and labelled in your Edge Impulse project, go to "Data Acquisition" in the studio. Here, you'll see that the images have been sorted into the classes that we created ("bee" and "no-bee"). In this particular project, a total of 250 images were uploaded as a dataset.


Creating & Deploying the Edge Impulse Model
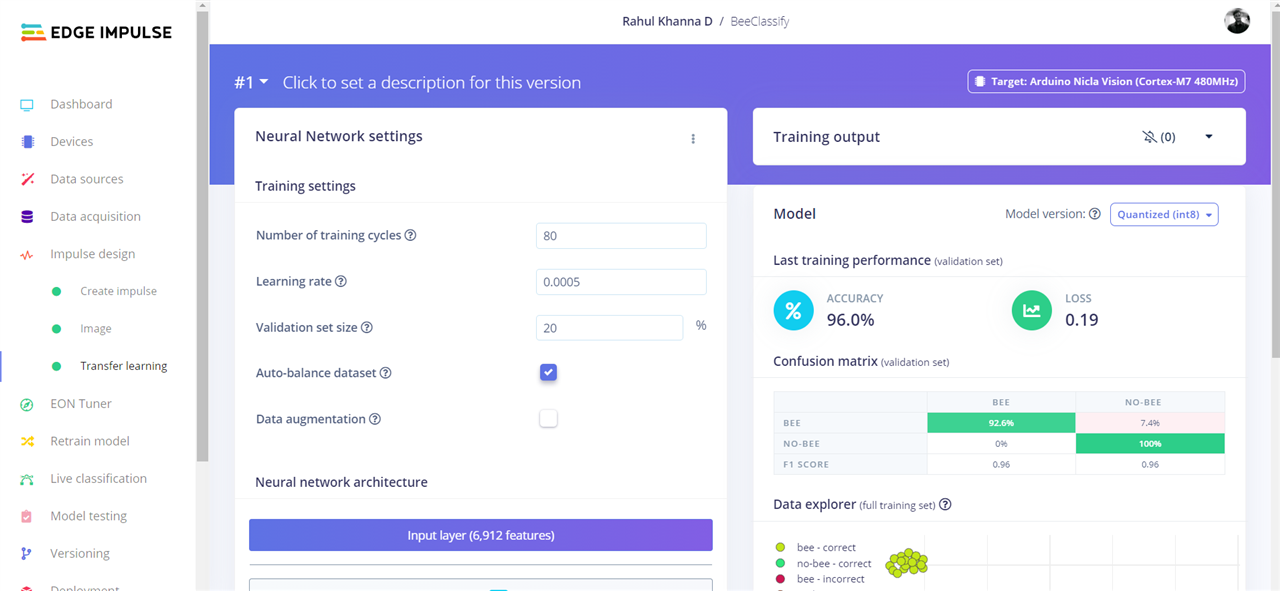
To create an impulse function, add an Image processing block with a 48x48 image size. Use transfer learning to fine-tune a pre-trained image classification model on your data and save the impulse. Set colour depth to RGB, and generate features to create feature maps. Set training cycles to 80 and use MobileNetV2 96x96 0.35 with 16 neurons as the NN model. Start training and wait a few minutes for the process to complete. After training, find the model's performance and confusion matrix. We achieved a 96% accuracy, with flash usage of 579.4K.
Build firmware from the deployment tab. Select firmware.bin from the folder and flash it to the board. Run the following python script to run the classification.
import sensor, image, time, os, tf, uos, gc

sensor.reset()                         # Reset and initialize the sensor.
sensor.set_pixformat(sensor.RGB565)    # Set pixel format to RGB565 (or GRAYSCALE)
sensor.set_framesize(sensor.QVGA)      # Set frame size to QVGA (320x240)
sensor.set_windowing((240, 240))       # Set 240x240 window.
sensor.skip_frames(time=2000)          # Let the camera adjust.
sensor.set_vflip(True) # Flips the image vertically
sensor.set_hmirror(True) # Mirrors the image horizontally

net = None
labels = None

try:
    # Load built in model
    labels, net = tf.load_builtin_model('trained')
except Exception as e:
    raise Exception(e)


clock = time.clock()
while(True):
    clock.tick()

    img = sensor.snapshot()

    # default settings just do one detection... change them to search the image...
    for obj in net.classify(img, min_scale=1.0, scale_mul=0.8, x_overlap=0.5, y_overlap=0.5):
        #print("**********\nPredictions at [x=%d,y=%d,w=%d,h=%d]" % obj.rect())
        img.draw_rectangle(obj.rect())
        # This combines the labels and confidence values into a list of tuples
        predictions_list = list(zip(labels, obj.output()))

        for i in range(len(predictions_list)):
           confidence = predictions_list[i][1]
           label = predictions_list[i][0]
           #print(label)
          # print("%s = %f" % (label[2:], confidence))

           if confidence > 0.9 and label != "unknown":
               print("It's a ", label, "!")
               #print('.')

    print(clock.fps(), "fps")
Classification Output

We've successfully created a classification model to identify bees in image frames. Moving forward, we'll be focusing on detecting individual bees within those frames in the next blog.
Thanks for reading!