


Introduction
Meditech will be used in many different environments and not always the visual information provided on the screen maybe useful. Receiving helpful audio hints and suggestions on-the-go is a good solution; when the user should activate a probe, start or stop the data acquisition nearby the patient it is very useful to control the entire system with a simple infrared controller but maybe not sufficient. This is the reason that to improve the system usability the TTS (Test-To-Speech) support has been added to enforce the user interaction and system feedback.
The introduction of this feature in the Meditech system has involved two devices: RPI master and RPI slave3 hosting the Cirrus Logic Audio Card.
One of the biggest issues is that as the audio card uses its own custom distribution of the raspian linux with a real-time kernel. Unfortunately it does not support the standard apt-get update and apt-get upgrade features: In few words, the raspian version of the RPI slave 3 should never be updated and there are very few packages that can be installed on this version. In fact the audio card performances are very good and are used for the microphonic stethoscope probe so it is not the worth to replace this hardware with a more flexible one penalising the quality.
Last but not least, the text strings are managed by the controller application installed on the RPI master device.
How it works
The scheme below shows the implementation architecture of the TTS feature in the Meditech device.
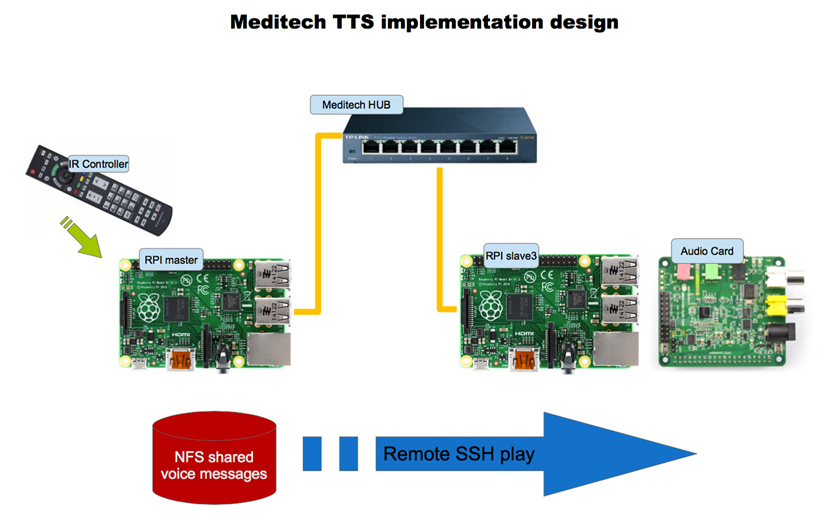
The synthesized strings can be disabled with the mute button on the controller. When the synthesis is active when the user press a command on the controller the Meditech speakers says a short contextual sentence. The video below shows the interaction effect.
TTS sentences generation
The voice synthesis does not need to be used at runtime. To be more clear, this must not used for at least two reasons: the voice synthesis is a resource consuming process and the sentences changes only when a new version of the applications is released. So what we really need is a TTS reliable system that should be run once and a good method to store audio text files on the RPI master device, where there is sufficient space as it has the 120 Gb SSD disk attached.
The synthesis tool
The TTS tool that has been adopted is festival that for many reasons if highly customizable, efficient yet reliable, runs on raspian linux and has a good environment for custom commands, voices definitions and more. The Festival Speech Synthesis System has been developed by the Centre for Speech Technology Research of the University of Edinburgh; it is a long-term project, started in 1984 that is already maintained with a wide community of users and developers sharing their knowledge. The actual version that can also be found in the raspian repository is the 2.4 of the end of 2014.
To install Festival in the Raspberry PI 2 (it works fine also in the B+ 512K) it is needed a simple operation:
sudo apt-get install festival
As the installation provided by the official raspian linux distribution, the best results can be obtained with a more in-depth analisys of the Festival features. To achieve good audible results and understanding a bit more the fascinating world of the Text-to-speech synthesys I strongly suggest to download the Festival package and compile it separately to have more voices, intonations and tools that can dramatically improve the features provided with the standard installation. Not required but it is a good advantage, an average knowledge on how the lisp language works. As a matter of fact Festival can run in command mode or process batch commands expressed with Scheme list sentences that is a variant of the official lisp language.
One of the features of Festival is the ability to execute the TTS generating wav files for further usage.
Speech synthesis batch command
What is needed to synth the text messages in audio format is a method that starting from a simple text string (e.g. "Hello World") a corresponding audio file is generated. The other important implication is that the audio file should follow a specific naming convention. The better way is that the generated file has the same name of the corresponding string ID in the controller program: this means that for the sentence whose ID is 10 the generated audio file should have the name 10.meditech where 'meditech' is the arbitrary file extension for the audio messages.
The resulting bash command create_ttsText.sh has the following format:
#!/bin/bash
# Create the text files to convert to TTS
echo "*** Creating TTS $2 ***"
echo $1 > ~/$3
text2wave -o $2 -F 48000 -otype snd ~/$3
rm ~/$3
echo "*** Completed ***"
Note that this command uses the text2wave festival scheme script that is part of the festival tts package
As far as the festival architecture it is not possible to pass to it a string but it is needed a text file. So the first action of the create_ttsText.sh script is just to convert the input string to a template text file that is deleted after the audio synthesis operation. With this bash command the synthesis parameters are preset to simplify as much as possible the process that will be automated. The text2wave festival script call fixes the output audio file to the snd type and the quality frequency to 48KHz; as a matter of fact these files will be played with a high quality sound card so it is the worth to keep the quality high (48KHz is the standard frequency for the DVD audio quality).
With this batch the number of parameters that should be passed for the synthesis is minimal. For example the generation of the audio file named output.meditech from the test string "hello, Element14 ! How is the weather today?" will be as shown below
./create_ttsText.sh "hello, Element14 ! How is the weather today?" output.meditech
Audio files creation
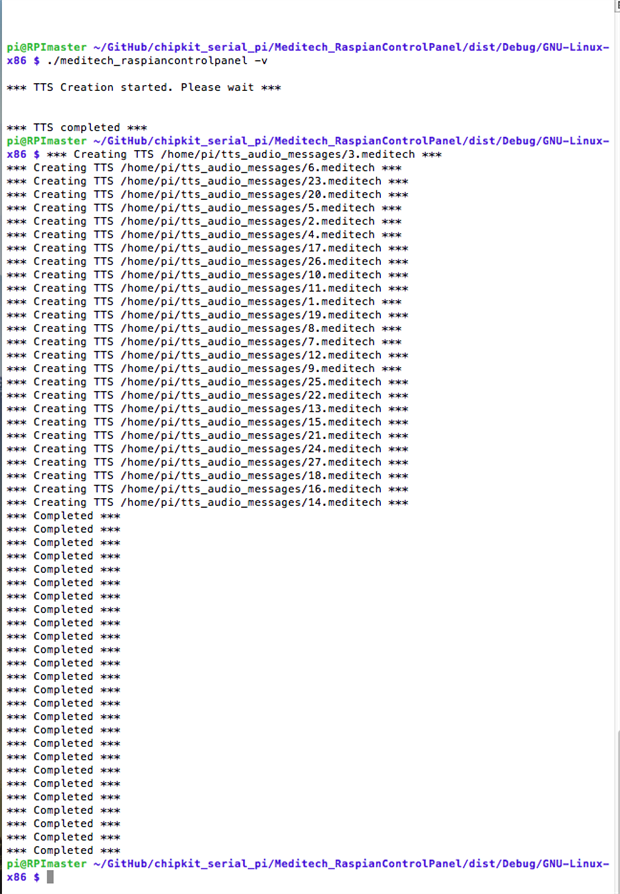
The audio files creation has been implemented as a special option in the controller application. This program will run indefinitely when the RPI master device starts (when the Meditech is powered-on) for the real-time process of the infrared controller buttons. When the program instead is launched with the -v (that is, "voice") parameter it executes the audio files creation. This option can be launched also when the program runs as a background process in standard mode so there are not special procedures to follow to generate the files when needed.
The audio files are stored in the ~/tts_audio_messages folder where the name of the file is the same of the message ID in the controller program.
pi@RPImaster ~ $ ls tts_audio_messages/
1.meditech   14.meditech  19.meditech  23.meditech  3.meditech  8.meditech
10.meditech  15.meditech  2.meditech   24.meditech  4.meditech  9.meditech
11.meditech  16.meditech  20.meditech  25.meditech  5.meditech
12.meditech  17.meditech  21.meditech  26.meditech  6.meditech
13.meditech  18.meditech  22.meditech  27.meditech  7.meditech
To add this feature a new version of the controller application has been created adding the file MessageStrings.h with the strings ID definition and some other useful constants.
// Strings array IDs
#define TTS_SYSTEM_RESTARTED 0
#define TTS_POWER_OFF 1
#define TTS_SHUTDOWN 2
#define TTS_VOICE_ACTIVE 3
#define TTS_MUTED 4
#define TTS_STETHOSCOPE_OFF 5
#define TTS_STETHOSCOPE_RUNNING 6
#define TTS_STETHOSCOPE_ON 7
#define TTS_BLOOD_PRESSURE_OFF 8
#define TTS_BLOOD_PRESSURE_RUNNING 9
#define TTS_BLOOD_PRESSURE_ON 10
#define TTS_HEARTBEAT_OFF 11
#define TTS_HEARTBEAT_RUNNING 12
#define TTS_HEATBEAT_ON 13
#define TTS_TEMPERATURE_OFF 14
#define TTS_TEMPERATURE_RUNNING 15
#define TTS_TEMPERATURE_ON 16
#define TTS_ECG_OFF 17
#define TTS_ECG_RUNNING 18
#define TTS_ECG_ON 19
#define TTS_INFORMATION 20
#define TTS_TESTING 21
#define TTS_TESTING_END 22
#define TTS_SYSTEM_READY 23
#define TTS_START_PROBE 24
#define TTS_PROBE_STOPPED 25
#define TTS_CONTINUOUS_ON 26
The strings themselves instead are loaded in an array in the program. In future versions, supporting the language localization a multi-language set of includes should be used to replace the hardcoded strings.
When the main() - i.e. the program itself - is launched it is checked if the -v parameter is passed, to start the generation function instead the normal process.
// Check for main parameters
    if(argc > 1) {
        // Check for valid arguments
        if(argc != 2) {
            printf(MAINEXIT_WRONGNUMPARAM);
            exit(EXIT_FAILURE); // Wrong number of arguments
        }
        // We expect and argument in the format '-x' where 'x' is
        // the option code
        if(strstr(argv[1], VOICE_STRINGS) ) {
            ttsStrings();
            printf(MAINEXIT_DONE);
            exit(0);    // ending
        } // Launch the TTS generation
        else {
            printf(MAINEXIT_WRONGPARAM);
            exit(EXIT_FAILURE); // Wrong argument
        }
    } //
With the -v parameter it is called the function ttsStrings() to execute recursively the bash script. As mentioned before, the strings are defined in an array, in the same order of the IDs in the MessageStrings.h header file.
/**
\brief Convert the program application strings to voice messages
*/
void ttsStrings(void) {

    //! The strings array with the messages
    const char * MESSAGES[TTS_MAX_MESSAGES] = {
        "System restarted to the power-on conditions. ",
        "Power-off: press the OK button for complete shutdown, any other button to ignore. ",
        "Power-off confirmed. Shutdown-sequence started. ",
        "Voice messages are now active. ",
        "Muted. ",
        "Microphonic Stethoscope is now disabled. ",
        "Microphonic Stethoscope is already active.",
        "Enabled Microphonic Stethoscope. ",
        "Blood Pressure measurement probe is now disabled. ",
        "Blood Pressure measurement probe is already active.",
        "Enabled Blood Pressure measurement probe. ",
        "Heart Beat measurement probe is now disabled. ",
        "Heart Beat measurement probe is already active.",
        "Enabled Heart Beat measurement probe. ",
        "Body Temperature measurement probe is now disabled. ",
        "Body Temperature measurement probe is already active.",
        "Enabled Body Temperature measurement probe. ",
        "E.C.G. probe is now disabled. ",
        "E.C.G. probe is already active.",
        "Enabled E.C.G. probe. ",
        "Look at the Control Panel display for system information. ",
        "Started a Control Panel test cycle. ",
        "Control Panel test cycle ended. ",
        "Startup completed. System ready. ",
        "Press OK button to start the probe collecting data. ",
        "Probe stopped.",
        "Continuous mode running. Press OK to stop collecting data."
    };

    printf(TTS_START_PROCESS);

    // Generate the TTS wav files
    for(int j = 0; j < TTS_MAX_MESSAGES; j++) {

        char fileName[64];
        char fileTemp[64];
        char programName[32];
        char programPath[64];
        char messageText[1024];

        sprintf(fileName, "%s%d.%s", TTS_FOLDER, j + 1, TTS_FORMAT);
        sprintf(fileTemp, "%d.tmp", j + 1);
        sprintf(programName, "%s", TTS_SHELL_COMMAND);
        sprintf(programPath, "%s", TTS_SHELL_PATH);
        sprintf(messageText, "%s", MESSAGES[j]);

        char* arg_list[] = {
            programName,     // argv[0], the name of the program.
            messageText,
            fileName,
            fileTemp,
            NULL
          };

        // Spawn a child process running the command.
        // Ignore the returned child process id.
        spawn (programPath, arg_list);
    }
}
There are different methods to execute a shell command from a C++ program using the exec command; the issue is that using a call to exec from the C++ program the second process (launched by exec) runs together with the calling process (our program) and - especially in case like this where there is a loop of many sequential calls - concurrency problems and arise. What we need is to be sure that when we launch the external program with exec our calling program wait until the child process has been completed. To do so, the parameters call is prepared as shown in the scriptlet above but the secondary process is launched spawning our primary process. So what happens is that the primary process launch the child processes in the correct way, then return back and proceed launching the next process and so on. As in this case we don't need to check a return value all the conversion processes can be executed in parallel. The following image explain what is shown on the terminal when the conversion process is started.
Playing audio files
In a similar way when the controller is not in mute mode, when a button is processes the corresponding audio file is played as shown in the example below from the function parseIR()
case CMD_RED:
            if(infraredID != controllerStatus.lastKey) {
                if(!controllerStatus.isMuted) {
                    playRemoteMessage(TTS_TESTING);
                }
                cmdString = cProc.buildCommandDisplayTemplate(TID_TEST);
                controllerStatus.serialState = SERIAL_READY_TO_SEND;
                setPowerOffStatus(POWEROFF_NONE);
                // Check the serial status
                manageSerial();
            }
            break;
Below there is the playRemoteMessage() function that uses the spawning method as well.
/**
\brief Play a voice message on the remote RPIslave3 with the
Cirrus Logic Audio Card.

\note To the Linux side the two computers should be set to share the
private / public ssh key to avoid passing user and password during the
ssh remote command launch

\param messageID The message ID to play remotely
*/
void playRemoteMessage(int messageID) {

        char sshCall[64];
        char sshServer[64];
        char programName[32];
        char programPath[64];

        sprintf(programName, "%s", SSH_COMMAND);
        sprintf(programPath, "%s", SSH_PATH);
        sprintf(sshCall, "%d", messageID + 1);

        char* arg_list[] = {
            programName,
            sshCall,
            NULL
          };

        // Spawn a child process running the command.
        // Ignore the returned child process id.
        spawn (programPath, arg_list);
}
Also in this case there is a call to the SSH_COMMAND that is a bash script as shown below.
#!/bin/bash
# Play a message remotely
ssh 192.168.5.4 "/home/pi/play_message.sh $1"
Here is the difference. In this case the audio - that is stored on the RPI master linux device, should be played on a different IP address, that is the RPI slave3 linux device hosting the Cirrus Logic Audio Card. To reach this behavior some linux actions were needed:
- The RPI master storage folder ~/tts_audio_messages has been exported, i.e. shared via linux NFS
- On the RPI slave3 the same empty folder has been created, then has been mounted remotely. The result is that in the mounted folder there are the same files for playing
- On the RPI slave3 the bash command play_message.sh has been created (see the description below)
When the spawned (child) process is launched by the controller program on the RPI master what really happens is that the bash script command play_message.sh is executed on the RPI slave3. The only parameter passed is - again  - the message ID. The remote bash command plays the audio file without consuming resources of the RPI master that gain immediately the control of the main program after launching the command.
pi@RPIslave3 ~ $ more play_message.sh
#!/bin/bash
# Play a Meditech controller audio message
AUDIODEV=hw:0 play --no-show-progress -V0 /home/pi/tts_audio_messages/$1.meditech reve
rb 30
The updated sources are available on the GitHub repository as usual.
Top Comments