


I am using the PiFace CAD to display the contents of a configuration file used for the Serial Master program so the user can see and change the parameters that are being used. A snippet of a config file is shown below:
[RS-232]
device = /dev/ttyUSB0
baudrate = 19200

[RS-422]
Device = /dev/ttyUSB1
Baudrate = 9600
I will use ConfigParser to read the configuration file.
I believe that a State Machine is the best way to handle the coding for the navigation and display of the different options.
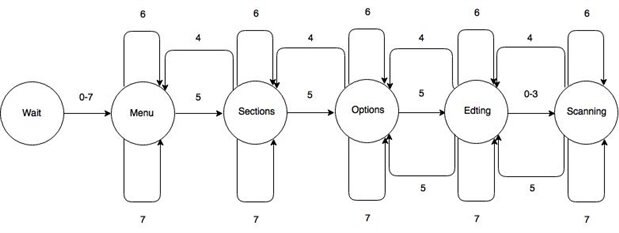
Wait – Initial State. LCD is turned off. Any button press from the CAD will move to the Menu state. Whenever there have been no button presses for 60 seconds, the state will revert back to this initial state.
Menu – The Menu State will allow the operator to scroll through the different ‘Sections’ of the configuration file. Sections are represented inside of ‘[‘ and ‘]’ in the configuration file. The rocker switch can be pushed left or right to scroll through the different section names. Depressing the rocker switch will move to the Sections State
Sections – The Sections State will show the different options available for the selected section. The
Rocker switch can be pushed left or right to scroll through the different options available in the given section. Pressing button 4 will take the operator back to the Sections State
Options – The Options State will allow the operator to scroll through the different sub-options available for the given option. The rocker switch can be pushed left or right to scroll through the different sub-options. Depressing the rocker switch will move the operator to the Editing State. Pressing Button 4 will move the operator back to the Sections State.
Editing – The Editing State will allow the operator to choose the character that they want to change or they can move to the space following the last character to append a character. The operator can use the rocker switch to move the cursor left or right to choose the desired character. Depressing the rocker commit the change and move the user back to the Options State. Button 4 will return the user to the Options State without committing the change. Pressing Button 0 will allow the operator to cycle through capital letters. Button 1 will allow cycling through lower case letters. Button 2 will allow cycling through numbers. Button 3 will allow cycling through punctuation.
Scanning – The Scanning State allows the operator to cycle through the characters selected by the previous button press. The rocker switch can be moved left or right to cycle through the selections. Depressing the rocker switch will take the operator back to the Editing State with the change ready to be committed. Pressing Button 4 will take the operator back to the Editing State without showing the change.
Code for this part of the project can be found at:
https://github.com/frellwan/SciFy-Pi.git in the PiFace directory
The PiFace Control and Display connects to the Raspberry Pi using the expansion connector (GPIO). Follow the below steps to connect the PiFace CAD:
- First disconnect power from the RaspberryPi.
- Take special care to make sure all the RaspberryPi expansion pins are lined up with the holes on the PiFace Control and Display socket. For the Pi2 there are more header pins than there are holes in the PiFace CAD socket. Align the holes with the pins closest to the board edge.
- Make sure that both lines of pins line up with both lines of holes and never force the boards together if they don’t slide smoothly.
Install the latest PiFace python software by typing the following command in a Terminal:
sudo apt-get install python{,3}-pifacecad
The PiFace CAD uses the SPI communication port of the Pi. The Raspian kernel comes with the SPI disabled by default. To enable the SPI port type the following command in a Terminal:
sudo raspi-config
This will bring up the configuration screen:
Select option 8 - Advanced Options" to view the list of advanced configuration options.
Choose the A5 SPI option,
set this to <Yes>
then select <OK>
then <Finish>
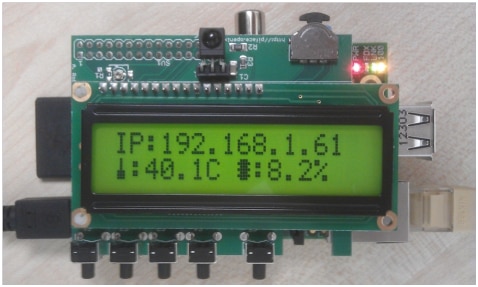
To test that everything is working, connect power to the Pi and log in. In a Terminal type:
python3 /usr/share/doc/python3-pifacecad/examples/sysinfo.py
Details about the Raspberry Pi’s temperature, memory and I.P. address will appear on the LCD screen.
The documentation for the PiFace CAD can be found at:
https://media.readthedocs.org/pdf/pifacecad/latest/pifacecad.pdf
The documentation gives enough information to get started, but it lacks a lot of the underlying information about the LCD.
Initially I tried to use the Scanf tool to allow editing of the configFile. I had instantiated a SwitchEventListener object in my code to navigate through the .ini file. When I wanted to edit the text, I called PiFaceCad.Tools.Scanf to allow the editing. Some very quirky things began to happen. Very few of the button press events were being captured from the edit and when the edit was finished the excess button presses were executed in my original code.
Digging into the source code of the PiFace, I found that the Scanf function was instantiating another SwitchEventListener object. The SwitchEventListener object subclasses PortEventListener which starts a thread to read the PiFace switches and instantiates a queue for the events. So with 2 SwitchEventListener objects alive at the same time, there were 2 processes fighting for the same resource.
I tried to solve this 2 different ways. The first was to rewrite the PiFace code to only instantiate a single Queue for events – basically a global queue. The PortEventListener would then use a threading.Lock() to determine who had access to the data. This worked fine, but I did not like the arrow that the ScanF function . The second option I tried was to write my own Scanf code. I ended up using my SwitchEventListener to use most of the code in the Scanf module, just bypassing the Scanf function.
The other issue that I had was that the debounce on the switches was allowing false events to be passed. Again digging through the code, I was able to find that one of the parameters to the register function was a ‘settling time’. I set this to 200ms and the issues all but disappeared.
Top Comments
-

balearicdynamics
-
Cancel
-
Vote Up
0
Vote Down
-
-
Sign in to reply
-
More
-
Cancel
Comment-

balearicdynamics
-
Cancel
-
Vote Up
0
Vote Down
-
-
Sign in to reply
-
More
-
Cancel
Children