element14 Community
element14 Community
    Register Log In
  • Site
  • Search
  • Log In Register
  • Community Hub
    Community Hub
    • What's New on element14
    • Feedback and Support
    • Benefits of Membership
    • Personal Blogs
    • Members Area
    • Achievement Levels
  • Learn
    Learn
    • Ask an Expert
    • eBooks
    • element14 presents
    • Learning Center
    • Tech Spotlight
    • STEM Academy
    • Webinars, Training and Events
    • Learning Groups
  • Technologies
    Technologies
    • 3D Printing
    • FPGA
    • Industrial Automation
    • Internet of Things
    • Power & Energy
    • Sensors
    • Technology Groups
  • Challenges & Projects
    Challenges & Projects
    • Design Challenges
    • element14 presents Projects
    • Project14
    • Arduino Projects
    • Raspberry Pi Projects
    • Project Groups
  • Products
    Products
    • Arduino
    • Avnet & Tria Boards Community
    • Dev Tools
    • Manufacturers
    • Multicomp Pro
    • Product Groups
    • Raspberry Pi
    • RoadTests & Reviews
  • About Us
  • Store
    Store
    • Visit Your Store
    • Choose another store...
      • Europe
      •  Austria (German)
      •  Belgium (Dutch, French)
      •  Bulgaria (Bulgarian)
      •  Czech Republic (Czech)
      •  Denmark (Danish)
      •  Estonia (Estonian)
      •  Finland (Finnish)
      •  France (French)
      •  Germany (German)
      •  Hungary (Hungarian)
      •  Ireland
      •  Israel
      •  Italy (Italian)
      •  Latvia (Latvian)
      •  
      •  Lithuania (Lithuanian)
      •  Netherlands (Dutch)
      •  Norway (Norwegian)
      •  Poland (Polish)
      •  Portugal (Portuguese)
      •  Romania (Romanian)
      •  Russia (Russian)
      •  Slovakia (Slovak)
      •  Slovenia (Slovenian)
      •  Spain (Spanish)
      •  Sweden (Swedish)
      •  Switzerland(German, French)
      •  Turkey (Turkish)
      •  United Kingdom
      • Asia Pacific
      •  Australia
      •  China
      •  Hong Kong
      •  India
      • Japan
      •  Korea (Korean)
      •  Malaysia
      •  New Zealand
      •  Philippines
      •  Singapore
      •  Taiwan
      •  Thailand (Thai)
      • Vietnam
      • Americas
      •  Brazil (Portuguese)
      •  Canada
      •  Mexico (Spanish)
      •  United States
      Can't find the country/region you're looking for? Visit our export site or find a local distributor.
  • Translate
  • Profile
  • Settings
Sci Fi Your Pi
  • Challenges & Projects
  • Design Challenges
  • Sci Fi Your Pi
  • More
  • Cancel
Sci Fi Your Pi
Blog PizzaPi: Xtrinsic MEMs Board Meets RPi B+
  • Blog
  • Forum
  • Documents
  • Files
  • Mentions
  • Sub-Groups
  • Tags
  • More
  • Cancel
  • New
  • Share
  • More
  • Cancel
Group Actions
  • Group RSS
  • More
  • Cancel
Engagement
  • Author Author: dmrobotix
  • Date Created: 25 Apr 2015 3:33 AM Date Created
  • Views 463 views
  • Likes 3 likes
  • Comments 0 comments
  • design_challenge
  • pizza_pi
  • sci_fi_your_pi
Related
Recommended

PizzaPi: Xtrinsic MEMs Board Meets RPi B+

dmrobotix
dmrobotix
25 Apr 2015

image

Today I managed to get the Raspberry Pi B+ up and running. I had some initial trouble with the SD card I was using, the adapter was buggy but luckily I had a spare. I don't know if anyone else has run into this problem, but when I ran the latest version of NOOBS on the B+, I got a warning saying that Raspbian was not compatible with it. The installation was flawless otherwise and I have not had any issues since.


image

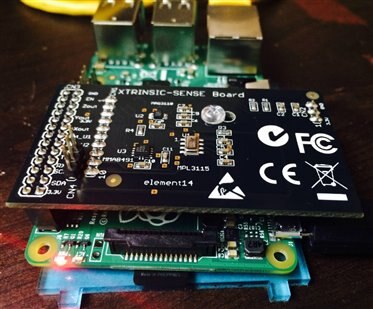
I decided to start with the Xtrinsic MEMS board. It was a little difficult to get it to fit onto the GPIO pins as I was afraid of breaking it. Not only that, the little pins that stick out on top hurt! After some effort, it locked in securely. It hangs over the HDMI port so I had to run it through SSH (my preferred method).


The setup was super easy. I didn't follow the directions on the pamphlet that comes in the box because I don't think it's really the best way to do things. They want you to download a special install image onto your SD card that includes the modifications that will run the board, but the steps to do it manually are incredibly easy. Plus, I had already spent a few hours trying to get NOOBS on my SD card (erasing a card is slow business, try doing it twice). The directions I followed can be found at Raspberry Pi Spy.


There are several example scripts that demonstrate the capabilities of each of the sensors on the board. All of the scripts worked perfectly right out of the box. I scanned the code for the accelerometer and it looks really easy to understand and work with. Modifying this should be a really straightforward (dare I say...enjoyable?) task. There is an option to send sensor readings to the browser, I have not set this up yet as I need to setup a web server first, but this ties in extremely well with my design idea.


So far, I am really impressed at how easy the board is to use right out of the box. I have a side quadcopter project and the sensor board I am using is not this "plug and play" friendly. You really have to get your hands dirty to get that going. I really like that kind of work, but for rapid prototyping, a board like this one definitely has its advantages. I'm guessing that the rest of the boards in the kit are going to be similar. I should say, I've never worked with development boards before on the Raspberry Pi, so this is a whole new world.

  • Sign in to reply
element14 Community

element14 is the first online community specifically for engineers. Connect with your peers and get expert answers to your questions.

  • Members
  • Learn
  • Technologies
  • Challenges & Projects
  • Products
  • Store
  • About Us
  • Feedback & Support
  • FAQs
  • Terms of Use
  • Privacy Policy
  • Legal and Copyright Notices
  • Sitemap
  • Cookies

An Avnet Company © 2025 Premier Farnell Limited. All Rights Reserved.

Premier Farnell Ltd, registered in England and Wales (no 00876412), registered office: Farnell House, Forge Lane, Leeds LS12 2NE.

ICP 备案号 10220084.

Follow element14

  • X
  • Facebook
  • linkedin
  • YouTube