element14 Community
element14 Community
    Register Log In
  • Site
  • Search
  • Log In Register
  • Community Hub
    Community Hub
    • What's New on element14
    • Feedback and Support
    • Benefits of Membership
    • Personal Blogs
    • Members Area
    • Achievement Levels
  • Learn
    Learn
    • Ask an Expert
    • eBooks
    • element14 presents
    • Learning Center
    • Tech Spotlight
    • STEM Academy
    • Webinars, Training and Events
    • Learning Groups
  • Technologies
    Technologies
    • 3D Printing
    • FPGA
    • Industrial Automation
    • Internet of Things
    • Power & Energy
    • Sensors
    • Technology Groups
  • Challenges & Projects
    Challenges & Projects
    • Design Challenges
    • element14 presents Projects
    • Project14
    • Arduino Projects
    • Raspberry Pi Projects
    • Project Groups
  • Products
    Products
    • Arduino
    • Avnet & Tria Boards Community
    • Dev Tools
    • Manufacturers
    • Multicomp Pro
    • Product Groups
    • Raspberry Pi
    • RoadTests & Reviews
  • About Us
  • Store
    Store
    • Visit Your Store
    • Choose another store...
      • Europe
      •  Austria (German)
      •  Belgium (Dutch, French)
      •  Bulgaria (Bulgarian)
      •  Czech Republic (Czech)
      •  Denmark (Danish)
      •  Estonia (Estonian)
      •  Finland (Finnish)
      •  France (French)
      •  Germany (German)
      •  Hungary (Hungarian)
      •  Ireland
      •  Israel
      •  Italy (Italian)
      •  Latvia (Latvian)
      •  
      •  Lithuania (Lithuanian)
      •  Netherlands (Dutch)
      •  Norway (Norwegian)
      •  Poland (Polish)
      •  Portugal (Portuguese)
      •  Romania (Romanian)
      •  Russia (Russian)
      •  Slovakia (Slovak)
      •  Slovenia (Slovenian)
      •  Spain (Spanish)
      •  Sweden (Swedish)
      •  Switzerland(German, French)
      •  Turkey (Turkish)
      •  United Kingdom
      • Asia Pacific
      •  Australia
      •  China
      •  Hong Kong
      •  India
      •  Korea (Korean)
      •  Malaysia
      •  New Zealand
      •  Philippines
      •  Singapore
      •  Taiwan
      •  Thailand (Thai)
      • Americas
      •  Brazil (Portuguese)
      •  Canada
      •  Mexico (Spanish)
      •  United States
      Can't find the country/region you're looking for? Visit our export site or find a local distributor.
  • Translate
  • Profile
  • Settings
Sci Fi Your Pi
  • Challenges & Projects
  • Design Challenges
  • Sci Fi Your Pi
  • More
  • Cancel
Sci Fi Your Pi
Blog Sci Fi Your Pi: PiDesk - Guide: Setting Up the Raspberry Pi 2
  • Blog
  • Forum
  • Documents
  • Files
  • Mentions
  • Sub-Groups
  • Tags
  • More
  • Cancel
  • New
  • Share
  • More
  • Cancel
Group Actions
  • Group RSS
  • More
  • Cancel
Engagement
  • Author Author: fvan
  • Date Created: 29 Apr 2015 9:59 AM Date Created
  • Views 1211 views
  • Likes 2 likes
  • Comments 4 comments
  • design_challenge
  • touch_motion_controls
  • touch_motion_control
  • sci_fi_your_pi
Related
Recommended

Sci Fi Your Pi: PiDesk - Guide: Setting Up the Raspberry Pi 2

fvan
fvan
29 Apr 2015

  • Introduction
  • Video
  • Unboxing
  • First Boot
  • Wifi
  • Update
  • Camera
  • Conclusion


Introduction


The Raspberry Pi 2 Model B is the latest member to join the Raspberry Pi family. Even though it has the same form factor as the Raspberry Pi B+, the Raspberry Pi 2 has a quad core ARM v7 processor running at 900Mhz. The RAM has also received an upgrade and has been increased from 512MB to 1GB. Besides these changes, the Raspberry Pi 2 remains similar to the previous B+ model, with:

  • 40-pin GPIO header
  • 4 USB ports
  • 10/100 Ethernet port
  • HDMI port
  • microUSB input for power
  • CSI port for camera board
  • DSI port for display/touch screen
  • combined 4-pole stereo and composite video output


Video


I've made a video of the entire configuration process. If you prefer, you can follow the written instructions instead, starting below the video.


You don't have permission to edit metadata of this video.
Edit media
x
image
Upload Preview
image


Unboxing


The Raspberry Pi 2 Model B - NOOBS Edition from element14 comes with the following:

  • Raspberry Pi 2 Model B
  • preloaded 8GB microSD card with SD adapter
  • Raspberry Pi quick start guide (in 16 languages!)


The included microSD card is a 8GB SanDisk MicroSDHC Ultra Class 10.


First Boot


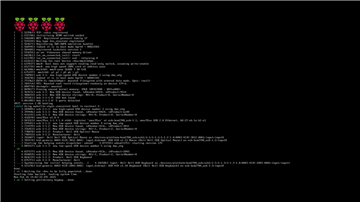
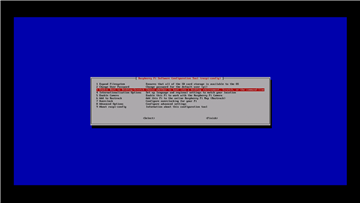
After having connected the necessary peripherals such as keyboard, mouse and monitor and having inserted the preloaded microSD card in the designated slot, the Pi is powered on using a 5V/2A microUSB power supply. It seems that no distribution installation selection menu is offered upon the first boot, instead, it appears like Raspbian is already installed. This is different from what I have experienced with a model B+ NOOBS Edition. During the boot process, four raspberries are displayed in the top left corner, indicating four CPU cores have been detected. Once the boot process completes, the Raspberry Pi configuration tool is automatically launched. The configuration tool can be used to configure basic things such as the hostname or wether to boot to the console or directly to the desktop, but also more advanced things such as I2C, SPI, camera support, etc...


imageimage


Wifi


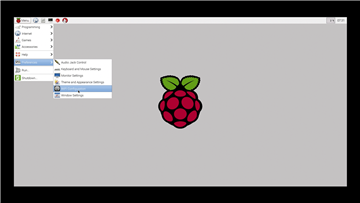
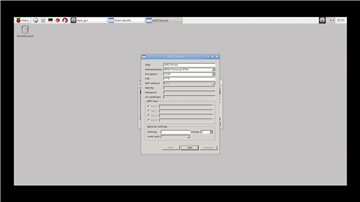
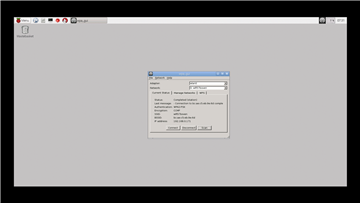
Instructions on how to configure Wifi from the graphical environment are provided with the element14 WiPi dongle, but work just as well for any other wifi dongle. First, connect the wifi dongle while the Pi is powered off, when done, power on the Pi. Using the menu in the top left corner, go to "Preferences" > "WiFi Configuration". Press the scan button at the bottom of the wpa_gui application and double-click the SSID of the wireless network you would like to connect to.


imageimage

Enter the password of the selected wireless network and click "Add". If all went well, the Pi should be connected to the wireless network and an IP address should be displayed.


imageimage


Update


With network connectivity taken care of, the next step was to update the software. In a terminal, use following commands:

  • sudo apt-get update
  • sudo apt-get upgrade


The process could take more time depending on how old the preloaded version is, and in my case, it took about 15 minutes in total to upgrade the software. Once the software is upgraded, a reboot is necessary to apply the changes:

  • sudo reboot


Camera


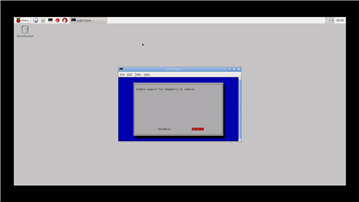
Connecting the camera module to the Raspberry Pi 2 is identical as with previous models. Ensure the camera's flex cable is inserted in the CSI port near the ethernet port, with the exposed contacts facing away from the ethernet port. Once connected, the Pi can be booted. Before the camera can be used, support for it needs to be enabled. This can be done by running following command in a terminal:

  • sudo raspi-config


This launches the Raspberry Pi configuration tool, which was also presented during the first boot. Menu option 5 allows to enable camera support, and requires a reboot to apply.


imageimage


After having enabled support and having rebooted the Pi, the camera can be used. In a terminal, use following command to make a picture:

  • sudo raspistill -o test.jpg


This will create a file called "test.jpg" after a five second preview on screen. In case the image's orientation is not correct, it can be changed by adding the horizontal and/or vertical flip options to the command:

  • sudo raspistill -o test.jpg --hflip --vflip


imageimage

Conclusion


The Pi is now set up and up-to-date, have fun!

  • Sign in to reply

Top Comments

  • dmrobotix
    dmrobotix over 10 years ago +1
    Interesting. Mine didn't come with a pre-loaded SD card. Must be differences between what is stocked in the US warehouse and in the EU warehouse. Happy RPi'ing.
  • DAB
    DAB over 10 years ago +1
    It looks strait forward, I need to get back to my new RPi 2 and add the wifi and camera to it. Thanks DAB
  • technicallyitworks
    technicallyitworks over 10 years ago +1
    Excellent post, very useful for beginners just opening their Raspberry Pi.
  • balearicdynamics
    balearicdynamics over 10 years ago

    Great post Frederick!

    Well Done. Enrico

    • Cancel
    • Vote Up +1 Vote Down
    • Sign in to reply
    • More
    • Cancel
  • technicallyitworks
    technicallyitworks over 10 years ago

    Excellent post, very useful for beginners just opening their Raspberry Pi.

    • Cancel
    • Vote Up +1 Vote Down
    • Sign in to reply
    • More
    • Cancel
  • DAB
    DAB over 10 years ago

    It looks strait forward, I need to get back to my new RPi 2 and add the wifi and camera to it.


    Thanks

    DAB

    • Cancel
    • Vote Up +1 Vote Down
    • Sign in to reply
    • More
    • Cancel
  • dmrobotix
    dmrobotix over 10 years ago

    Interesting. Mine didn't come with a pre-loaded SD card. Must be differences between what is stocked in the US warehouse and in the EU warehouse. Happy RPi'ing.

    • Cancel
    • Vote Up +1 Vote Down
    • Sign in to reply
    • More
    • Cancel
element14 Community

element14 is the first online community specifically for engineers. Connect with your peers and get expert answers to your questions.

  • Members
  • Learn
  • Technologies
  • Challenges & Projects
  • Products
  • Store
  • About Us
  • Feedback & Support
  • FAQs
  • Terms of Use
  • Privacy Policy
  • Legal and Copyright Notices
  • Sitemap
  • Cookies

An Avnet Company © 2025 Premier Farnell Limited. All Rights Reserved.

Premier Farnell Ltd, registered in England and Wales (no 00876412), registered office: Farnell House, Forge Lane, Leeds LS12 2NE.

ICP 备案号 10220084.

Follow element14

  • X
  • Facebook
  • linkedin
  • YouTube