element14 Community
element14 Community
    Register Log In
  • Site
  • Search
  • Log In Register
  • Community Hub
    Community Hub
    • What's New on element14
    • Feedback and Support
    • Benefits of Membership
    • Personal Blogs
    • Members Area
    • Achievement Levels
  • Learn
    Learn
    • Ask an Expert
    • eBooks
    • element14 presents
    • Learning Center
    • Tech Spotlight
    • STEM Academy
    • Webinars, Training and Events
    • Learning Groups
  • Technologies
    Technologies
    • 3D Printing
    • FPGA
    • Industrial Automation
    • Internet of Things
    • Power & Energy
    • Sensors
    • Technology Groups
  • Challenges & Projects
    Challenges & Projects
    • Design Challenges
    • element14 presents Projects
    • Project14
    • Arduino Projects
    • Raspberry Pi Projects
    • Project Groups
  • Products
    Products
    • Arduino
    • Avnet Boards Community
    • Dev Tools
    • Manufacturers
    • Multicomp Pro
    • Product Groups
    • Raspberry Pi
    • RoadTests & Reviews
  • About Us
  • Store
    Store
    • Visit Your Store
    • Choose another store...
      • Europe
      •  Austria (German)
      •  Belgium (Dutch, French)
      •  Bulgaria (Bulgarian)
      •  Czech Republic (Czech)
      •  Denmark (Danish)
      •  Estonia (Estonian)
      •  Finland (Finnish)
      •  France (French)
      •  Germany (German)
      •  Hungary (Hungarian)
      •  Ireland
      •  Israel
      •  Italy (Italian)
      •  Latvia (Latvian)
      •  
      •  Lithuania (Lithuanian)
      •  Netherlands (Dutch)
      •  Norway (Norwegian)
      •  Poland (Polish)
      •  Portugal (Portuguese)
      •  Romania (Romanian)
      •  Russia (Russian)
      •  Slovakia (Slovak)
      •  Slovenia (Slovenian)
      •  Spain (Spanish)
      •  Sweden (Swedish)
      •  Switzerland(German, French)
      •  Turkey (Turkish)
      •  United Kingdom
      • Asia Pacific
      •  Australia
      •  China
      •  Hong Kong
      •  India
      •  Korea (Korean)
      •  Malaysia
      •  New Zealand
      •  Philippines
      •  Singapore
      •  Taiwan
      •  Thailand (Thai)
      • Americas
      •  Brazil (Portuguese)
      •  Canada
      •  Mexico (Spanish)
      •  United States
      Can't find the country/region you're looking for? Visit our export site or find a local distributor.
  • Translate
  • Profile
  • Settings
Sci Fi Your Pi
  • Challenges & Projects
  • Design Challenges
  • Sci Fi Your Pi
  • More
  • Cancel
Sci Fi Your Pi
Blog Sci Fi Your Pi: PiDesk - Guide: Stepper Motors with Gertbot
  • Blog
  • Forum
  • Documents
  • Files
  • Mentions
  • Sub-Groups
  • Tags
  • More
  • Cancel
  • New
  • Share
  • More
  • Cancel
Group Actions
  • Group RSS
  • More
  • Cancel
Engagement
  • Author Author: fvan
  • Date Created: 6 May 2015 10:35 AM Date Created
  • Views 594 views
  • Likes 4 likes
  • Comments 0 comments
  • design_challenge
  • touch_motion_controls
  • touch_motion_control
  • sci_fi_your_pi
Related
Recommended

Sci Fi Your Pi: PiDesk - Guide: Stepper Motors with Gertbot

fvan
fvan
6 May 2015

  • Introduction
  • Setting up
  • Script
  • Demo


Introduction


The Gertbot is an add-on board for the Raspberry Pi, compatible with all existing models.


It brings power and motor control capabilities to the Raspberry Pi, but can also be used with other controllers supporting serial communication. Because the Gertbot has it's own CPU dedicated to the real time activities, the Raspberry Pi is only required to pass high level commands such as "DC motor 1, ON", "Stepper motor 2, 200 steps at 500Hz". The drivers come in two flavours: Python and C/C++. There is also an optional GUI, not requiring the use of code to use the Gertbot.


To know more about Gertbot, visit: http://www.gertbot.com


In this post, I'll be demonstrating how to control two stepper motors using the Gertbot Python drivers.

Setting up


Getting everything set up is really easy and can be done in a matter of minutes.


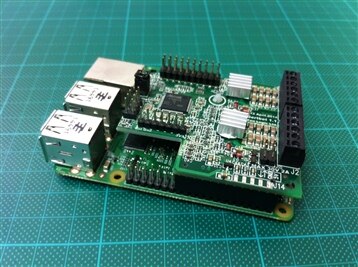
The first step is to connect the Gertbot to the Raspberry Pi, but before doing so, ensure the Pi is powered off. Take the Gertbot and connect the 26-pin header, starting from pins 0 and 1. The Gertbot should slide in nicely next to the ethernet port, without touching it.


The result should be as follows:

image


Next, the Gertbot Python drivers need to be installed on the Raspberry Pi. To do this, power on the Pi and using a terminal, browse to where you'd like to deploy the drivers.


The Gertbot Python drivers can be downloaded from the Gertbot website using following command:

  • wget http://www.gertbot.com/gbdownload/src/gertbot_py.tgz


The output of the command should be similar to this:


pi@PiDesk ~ $ wget http://www.gertbot.com/gbdownload/src/gertbot_py.tgz
--2015-05-04 19:28:43-- http://www.gertbot.com/gbdownload/src/gertbot_py.tgz
Resolving www.gertbot.com (www.gertbot.com)... 93.93.130.166
Connecting to www.gertbot.com (www.gertbot.com)|93.93.130.166|:80... connected.
HTTP request sent, awaiting response... 200 OK
Length: 8537 (8.3K) [application/x-gzip]
Saving to: `gertbot_py.tgz'

100%[================================================================================>] 8,537 --.-K/s in 0.01s

2015-05-04 19:28:43 (752 KB/s) - `gertbot_py.tgz' saved [8537/8537]


The downloaded drivers are compressed. In order to be able to use it, the file must be extracted:

  • tar -xvzf gertbot_py.tgz


pi@PiDesk ~ $ tar -xvzf gertbot_py.tgz
gertbot.py


There you have it, the "gertbot.py" file. By importing this file in other Python scripts, it is possible to call certain functions that will facilitate the control of the motors.

Script


At the bottom of the Gertbot's download page, some example scripts are provided. Starting off from the "Simple Rover" Python script and looking at the "Stepper Rover" C code, I came up with my own simple Python script to control two stepper motors. The script allows the control of two stepper motors to either go in one direction or the other. This is for example useful to control the Z-axis of a 3D printer. It's possible to define the number of steps and the frequency at which the steps are taken.


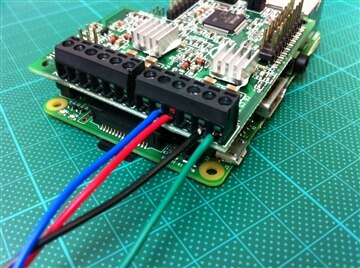
As for the hardware, I used two 200 steps, bipolar, 12V NEMA17 stepper motors and connected them to the Gertbot as per the documentation. The underside of the Gertbot also indicates how to connect the motors.


imageimageimage


Demo


As a demo application, I've built a prototype of a lift to slide a screen in and out of place. The lift is controlled using the Python script documented earlier.


You don't have permission to edit metadata of this video.
Edit media
x
image
Upload Preview
image

  • Sign in to reply
element14 Community

element14 is the first online community specifically for engineers. Connect with your peers and get expert answers to your questions.

  • Members
  • Learn
  • Technologies
  • Challenges & Projects
  • Products
  • Store
  • About Us
  • Feedback & Support
  • FAQs
  • Terms of Use
  • Privacy Policy
  • Legal and Copyright Notices
  • Sitemap
  • Cookies

An Avnet Company © 2025 Premier Farnell Limited. All Rights Reserved.

Premier Farnell Ltd, registered in England and Wales (no 00876412), registered office: Farnell House, Forge Lane, Leeds LS12 2NE.

ICP 备案号 10220084.

Follow element14

  • X
  • Facebook
  • linkedin
  • YouTube